• Email
    • Facebook
    • Instagram
    • Pinterest
    • Twitter

Girl and Her Kitchen

Plan. Make. Eat. Design. Craft. Create. Celebrate. Life.

  • Home
  • About the Girl
  • Recipe Index
  • We LOVE
  • Weekly Menu

Christmas Cookies & Bars Desserts

Homemade Tagalong Bars

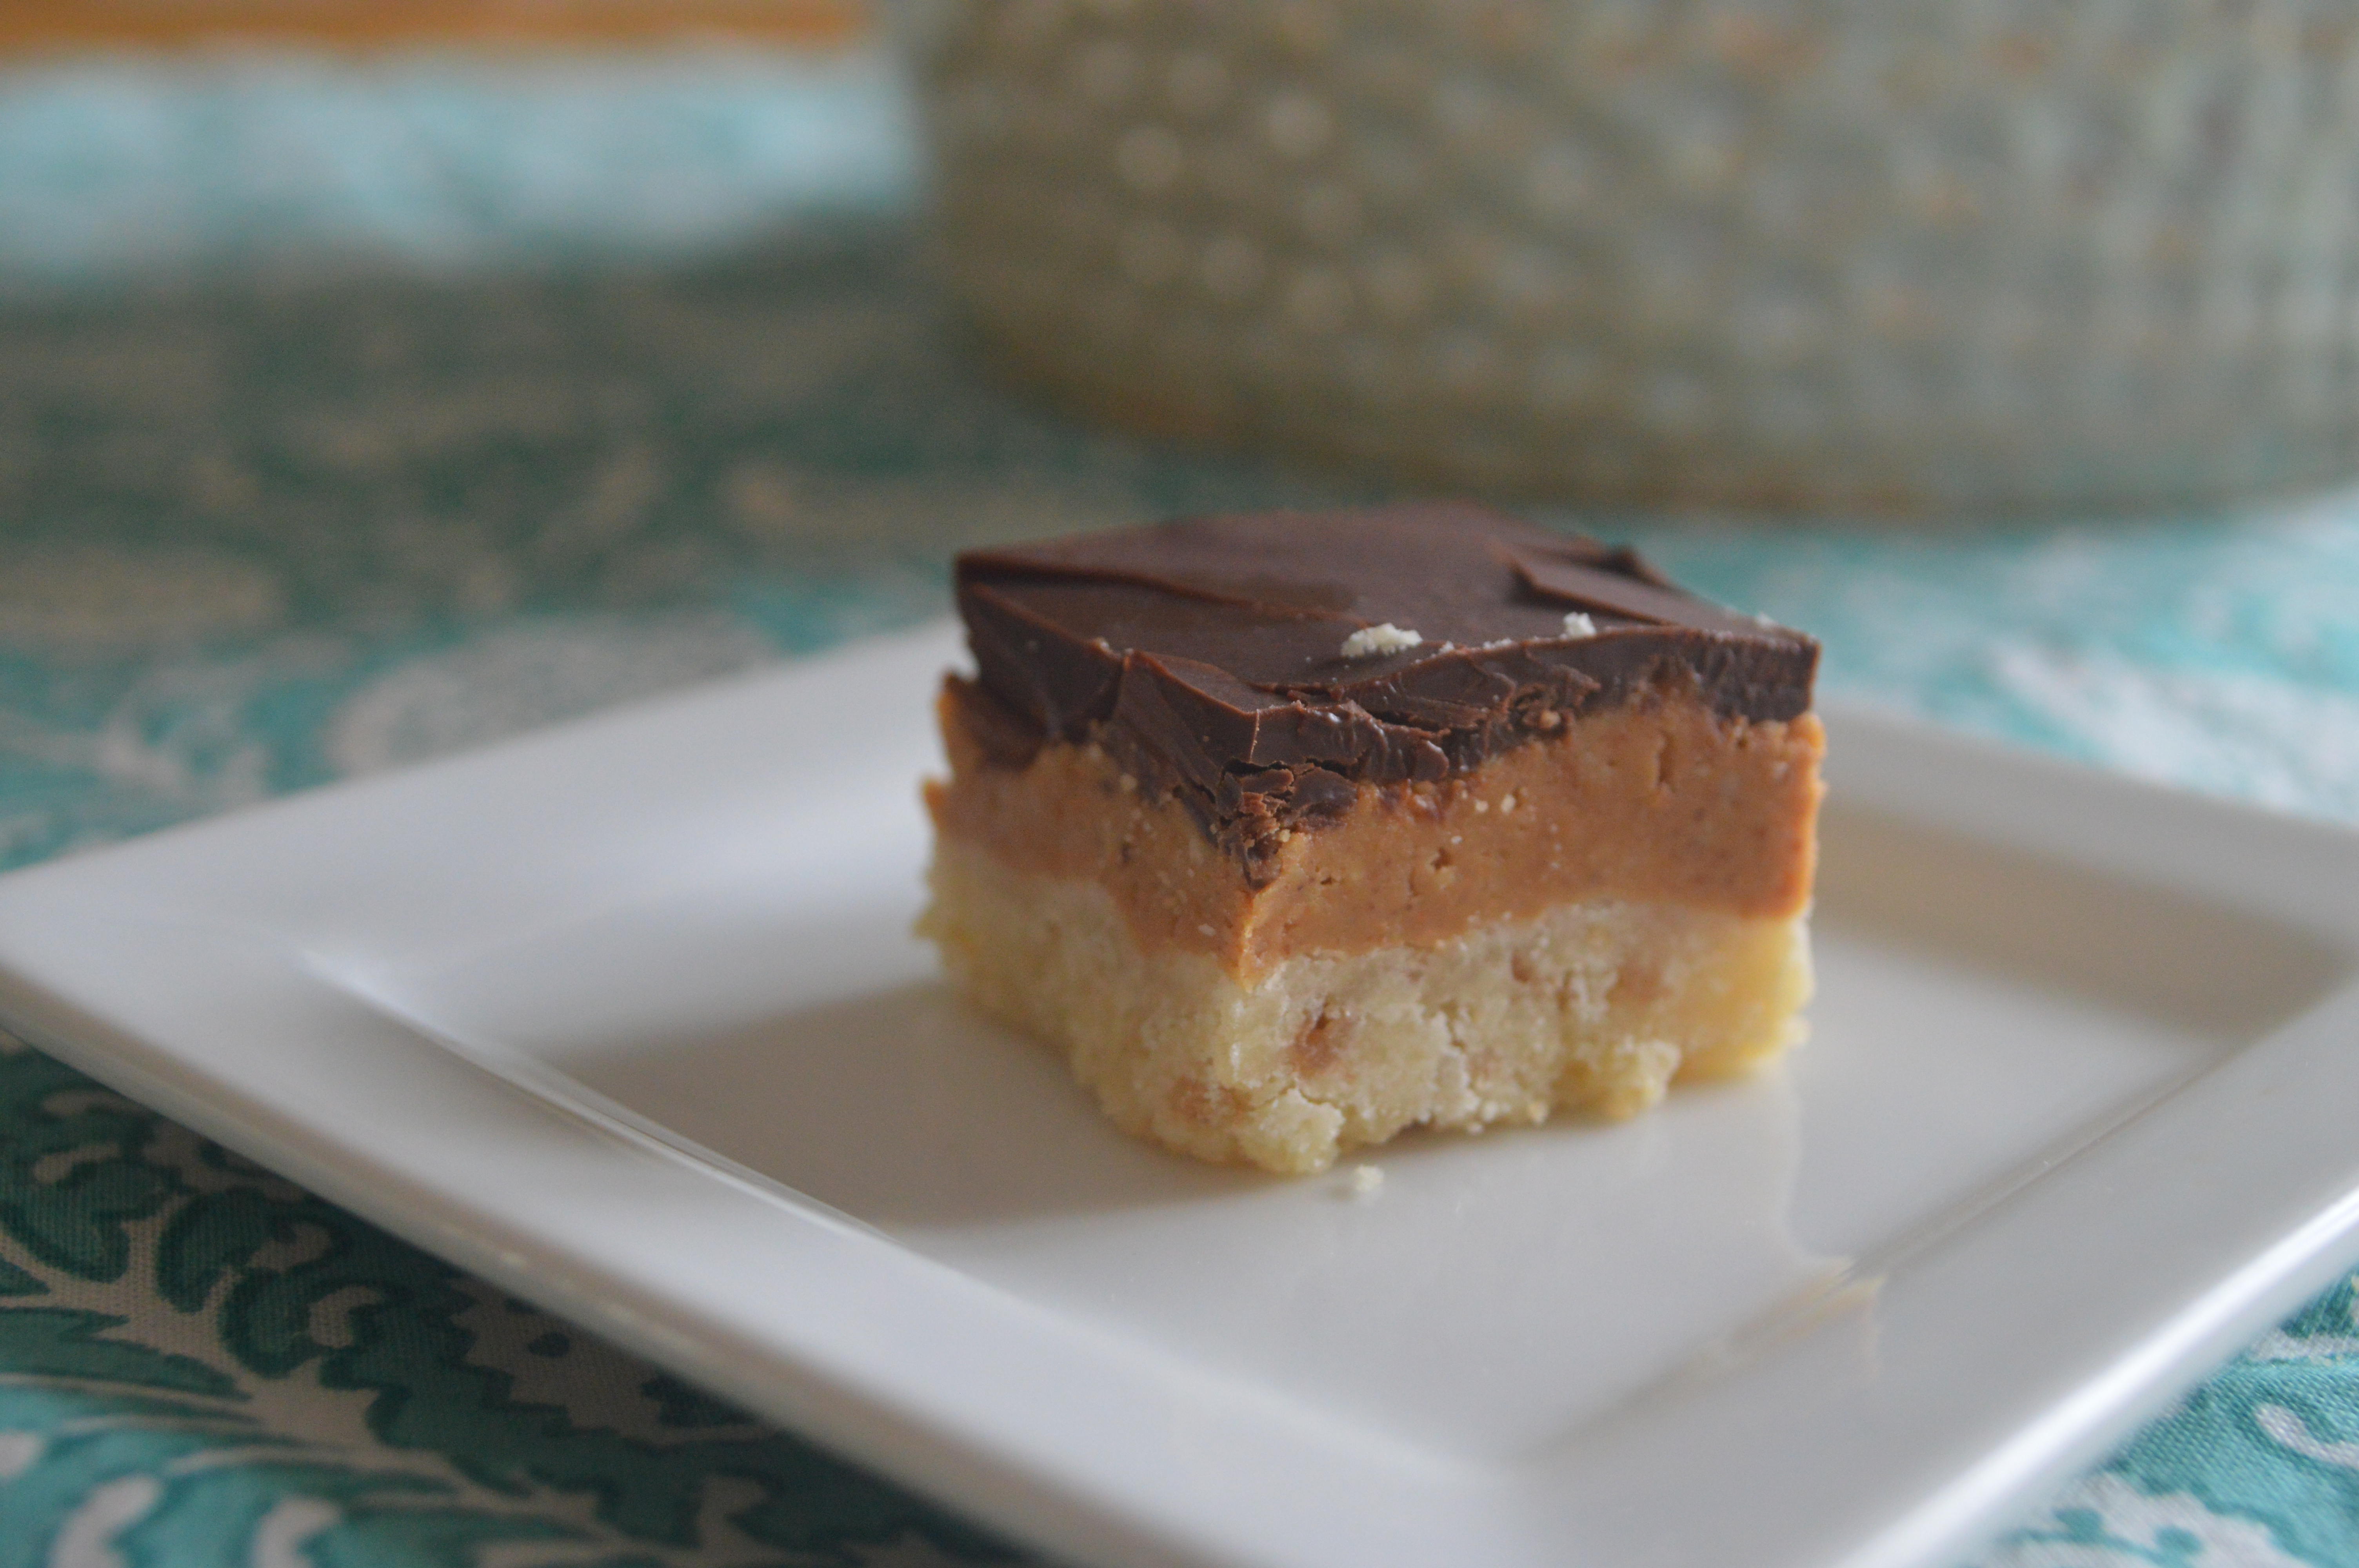
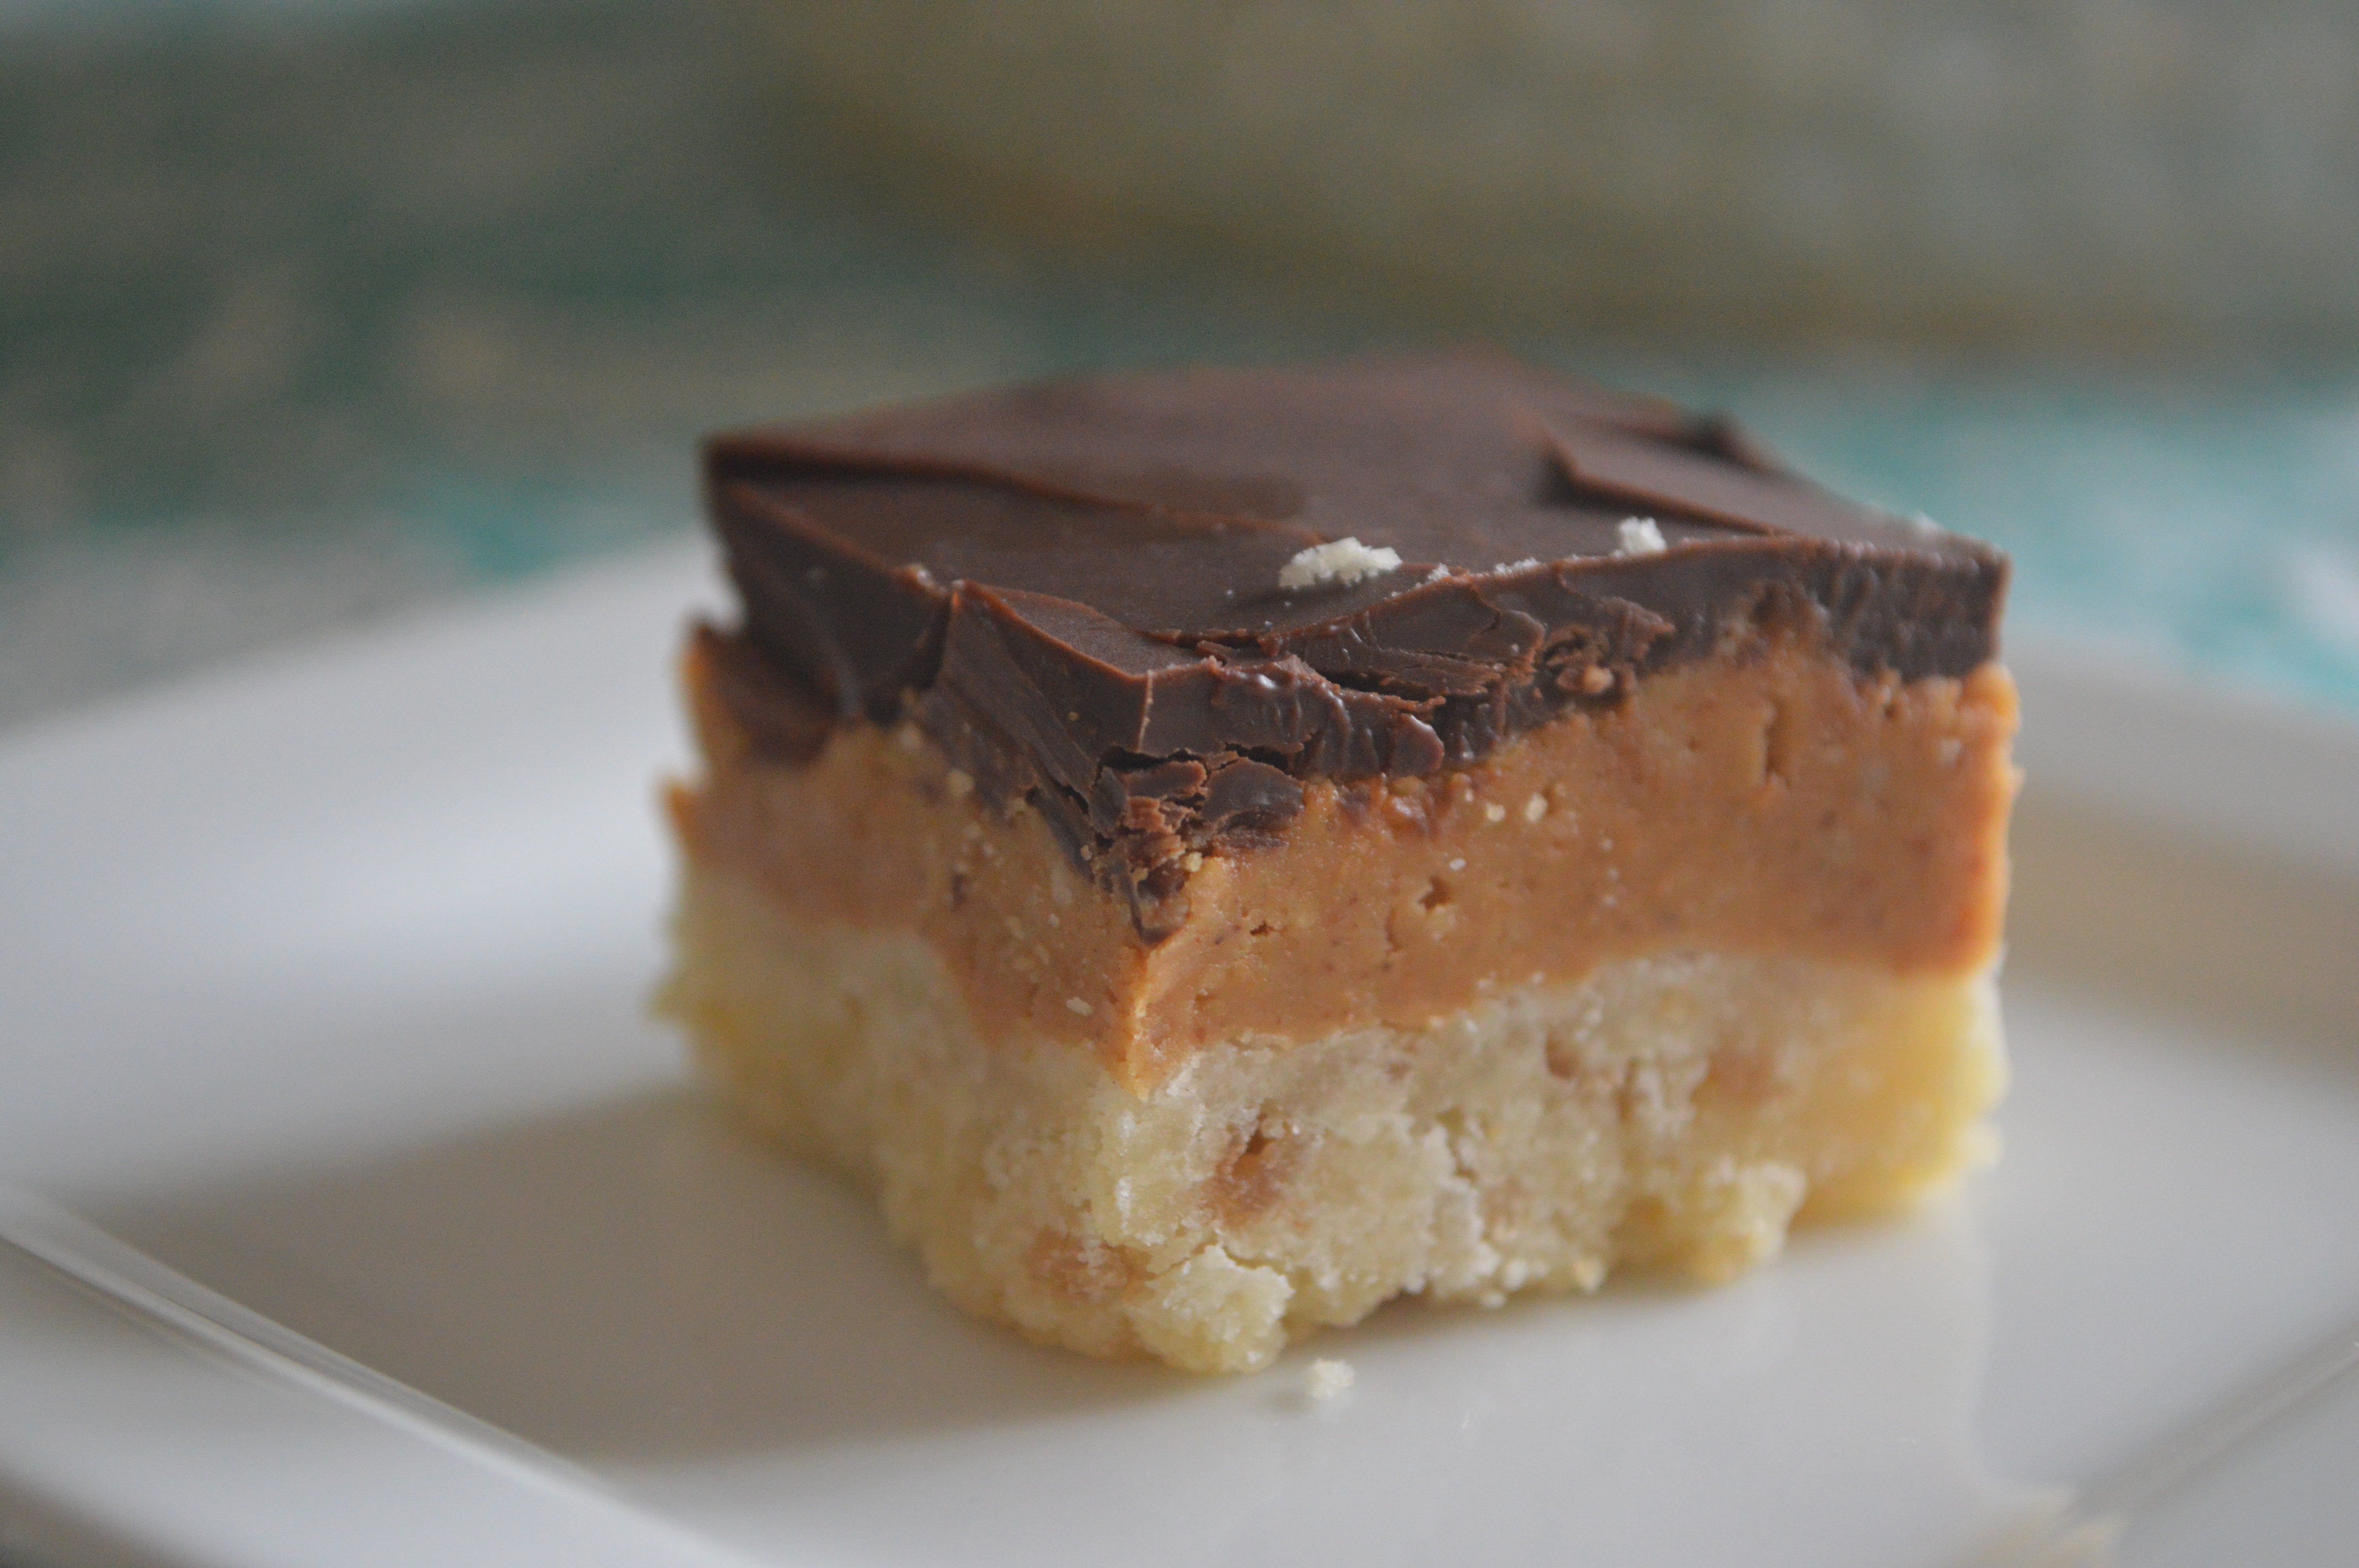
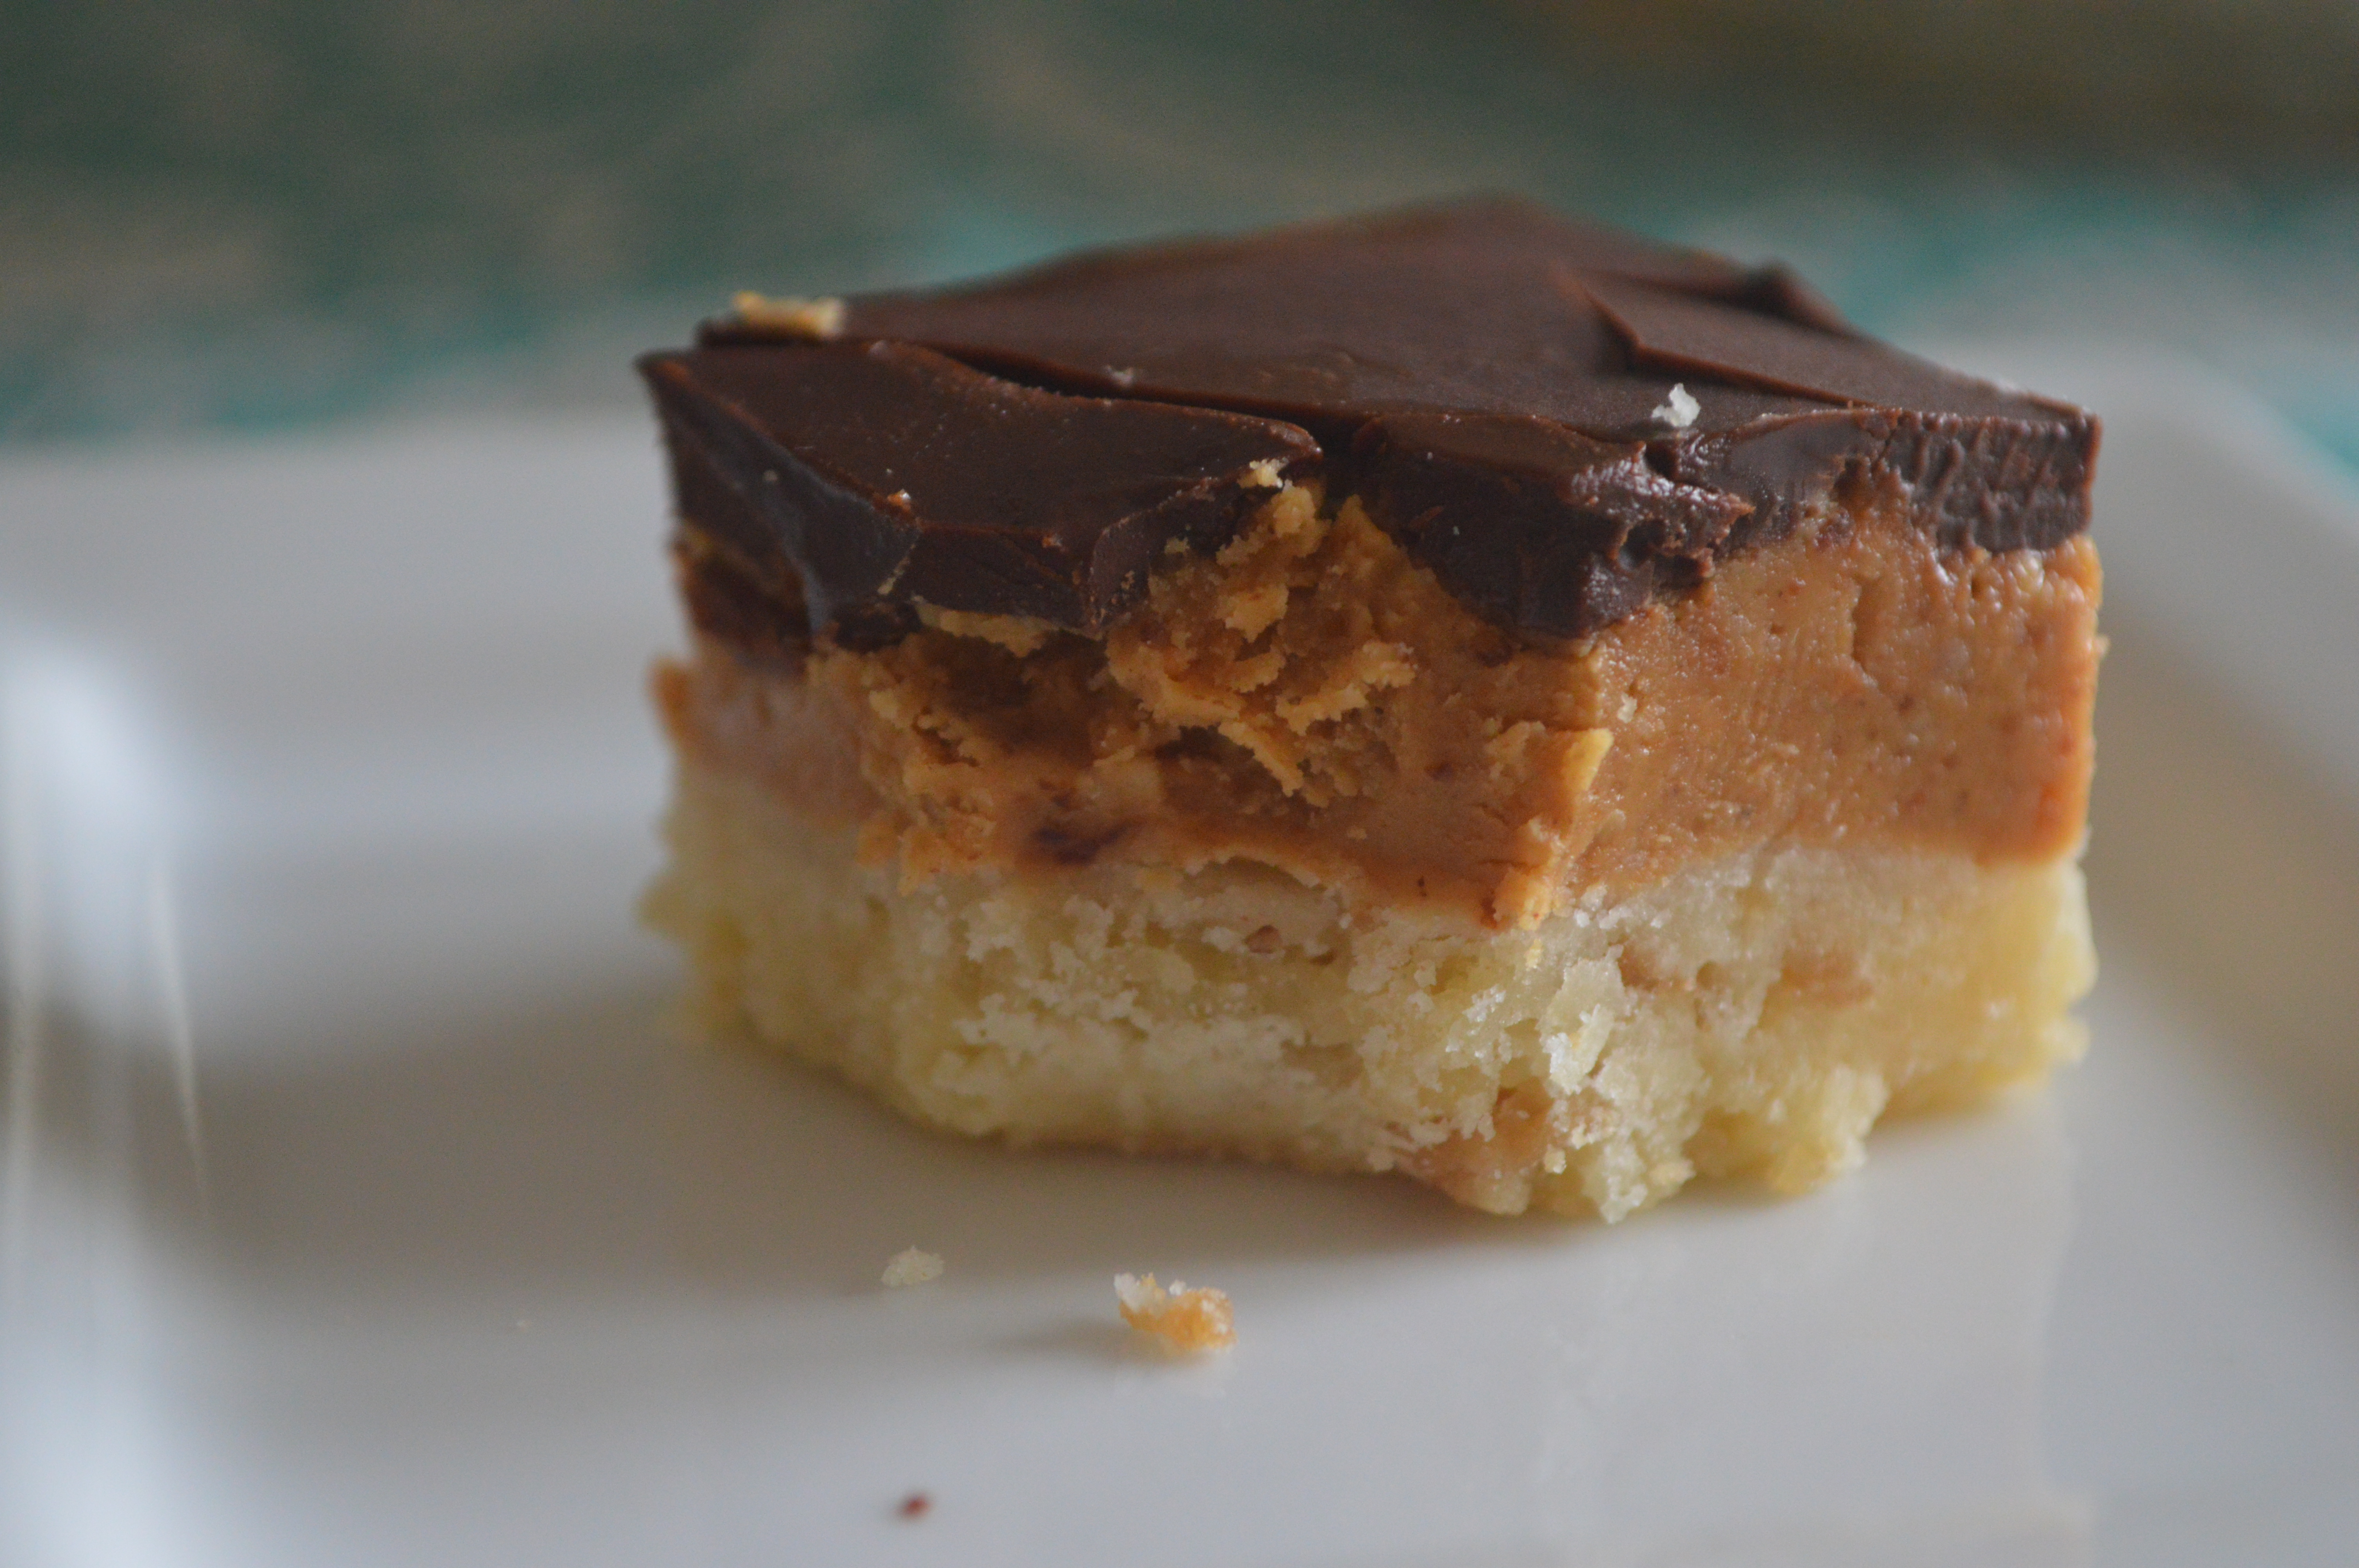
Girl scout cookies won’t be here for awhile, and sometimes, a girl just can’t wait. These cookies taste just like a tagalong, but in a bar form, so in my opinion, even better. The chocolate and peanut butter on top of a buttery shortbread crust is just irresistible, and these are pretty easy to pull together. For every day entertaining, or for a showstopper on your holiday cookie plate, these are sure to win everyone over.

Sprinkle a little salt on top to bring it really over the edge, and try to grab one before everyone else gobbles them up!

Save Print
Homemade Tagalong Bars
Author: Heather
Recipe type: Cookie Bar
Cuisine: Dessert
 
These knock off Tagalong bars will help curb your girl scout cookie craving until they are available!
Ingredients
  • Shortbread Crust
  • ½ cup butter, very soft
  • 1 cup flour
  • ⅓ cup powdered sugar
  • 1 tablespoon cornstarch
  • 1 teaspoon vanilla extract
  • Peanut Butter Filling
  • 2 tablespoons butter, melted
  • 1 heaping cup creamy peanut butter (I used Skippy creamy natural and it worked fine)
  • ½ cup powdered sugar
  • ½ teaspoon vanilla extract
  • ¼ teaspoon salt
  • Chocolate Layer
  • 1 heaping cup dark chocolate chips
  • 2 tbsp heavy cream
  • 1 tsp butter
  • Sea salt, if desired
Instructions
  1. Preheat oven to 350F.
  2. Line an 8-inch square baking pan with parchment paper
  3. Shortbread Crust:
  4. Combine all ingredients in a large bowl, until a crumbly mixture forms.
  5. Turn mixture out into pan and using your fingertips, pack the crumbs to form an even, smooth crust l Pierce crust with a fork in a dozen places so steam can escape while it bakes.
  6. Bake for 13 minutes, or until crust is set.
  7. While crust bakes, prepare the filling
  8. Peanut Butter Filling:
  9. Add the butter to a medium microwave-safe bowl and heat on high power to melt, about 1 minute. Add the remaining ingredients and stir until smooth.
  10. Spread filling over baked crust using a spatula,
  11. Crust does not have to be cool, it's heat will help with the spreading
  12. Chocolate Layer:
  13. Add the ingredients to a medium bowl and heat on high power to melt, about 1 minute.
  14. Stir until smooth and creamy
  15. Pour chocolate over pb layer and shake the pan to chocolate slide and cover peanut butter layer.
  16. Smooth it with a spatula if desired.
  17. Sprinkle with sea salt.
  18. Place pan in the refrigerator and chill for at least 3 hours.
  19. Slice and serve.
  20. Store leftovers in the refrigerator
3.5.3226


Heather

Leave a Comment

Christmas Cookies & Bars

Soft and Fluffy Snickerdoodle Cookies

These cookies.

These are the cookies you bring to a party when you are looking to really bring your A game. These light, fluffy, sweet and spicy cookies are just what every gathering needs. You don’t have a party to go to? Um…make these for yourself. Pour a tall glass of milk and enjoy a cookie, or two or three…

I can tell you, they are completely worth it! 

Save Print
Soft and Fluffy Snickerdoodle Cookies
 
Ingredients
  • Cookie Dough
  • 1 cup butter, softened
  • 1 cup granulated sugar
  • ⅔ cup light brown sugar, packed
  • 2 large eggs
  • 2 teaspoon vanilla extract
  • 3 cups all-purpose flour
  • 1 teaspoon baking soda
  • 1 teaspoon cream of tartar
  • ½ teaspoon salt, optional and to taste
  • Cinnamon Sugar for Rolling
  • ½ cup granulated sugar
  • 4 teaspoons cinnamon
Instructions
  1. Combine butter and sugars and beat on high until well mixed
  2. Add egg and vanilla and beat until light and fluffy
  3. Add flour, baking soda, cream of tartar and salt and continue beating until just mixed
  4. Roll into 1 inch balls, chill for 3 hours or overnight
  5. Preheat oven to 350 degrees
  6. Combine cinnamon and sugar for rolling
  7. Roll cookie dough balls in cinnamon sugar mixture
  8. Place on an ungreased cookie sheet or a cookie sheet covered with parchment about 2 inches apart
  9. Bake about 9 minutes-cookies may seem not done, but take them out anyways. Cookies will continue baking and will turn out perfectly.
  10. Cool for one minute on the cookie sheet, and then transfer to a wire rack for 10 more minutes of cooling.
  11. Store leftovers in a tightly covered container for one week.
3.5.3226

Heather

Leave a Comment

Chicken & Turkey Main Dishes

One Pan Chicken and Orzo

I absolutely love one pan meals. I hate doing dishes, so this might have a little something to do with this, but I also just love working with ONE pan on the stove and not juggling several things at the same time. It helps make dinnertime prep so much more calm.

This dish was not only pretty easy to pull together, it stuck with the one pan rule, even cooking the orzo! Not only that, but it was absolutely delicious. Of course my kids picked out the spinach, (to be expected) but everything else was gobbled down quickly, and that, my friends, equals dinnertime success.

Save Print
One Pan Chicken and Orzo
Serves: 4 servings
 
This one pan meal will help you get a tasty dinner on the table in no time flat, with little clean up!
Ingredients
  • 1 tbsp olive oil
  • 1 tbsp butter
  • 4- 4oz chicken breasts
  • 1 tsp smoked paprika
  • 1 tsp garlic powder
  • 1 tsp salt-divided
  • coarse black pepper
  • ½ cup red onion, diced
  • 2 garlic cloves, minced
  • 1 red pepper, sliced into strips
  • 1 cup fresh cherry tomatoes, sliced
  • 3 cups fresh spinach
  • 3 cups chicken broth
  • 1 tbsp butter
  • ½ cup fresh parmesan cheese
  • salt and pepper
Instructions
  1. Toss paprika, garlic powder, salt and pepper together.
  2. Using your hands, coat the chicken breasts with the spice mixture
  3. In a large saute pan, begin heating olive oil and butter
  4. Add chicken once pan is hot, searing on both sides until golden brown (about 2-3 minutes per side)
  5. Remove chicken and keep warm.
  6. Add an extra tsp or two of olive oil if pan seems to dry
  7. Add garlic and onion to hot pan
  8. Stir and cook until translucent
  9. Add red peppers and cherry tomatoes
  10. Cook until they begin to carmelize
  11. Add uncooked orzo to pan and cook for one minute
  12. Add chicken broth
  13. Put chicken back in pan and coat with vegetables and broth
  14. Cook for 6-7 minutes or until orzo is tender
  15. In the last minute of cooking, add fresh spinach, butter, and parmesan cheese
  16. Use salt and pepper to taste.
  17. Serve immediately with extra parmesan cheese.
3.5.3226


Heather

Leave a Comment

Cakes and Cupcakes Desserts Fall

Chocolate Pumpkin Cake

So…you hate pumpkin.

Well, I am here to help you out. I am a self professed pumpkin lover…well except for the classic pumpkin pie…don’t ask, but I never liked it. I love all the rest though…pumpkin bread, pumpkin cookies, pumpkin cake, you name it!

But, there are some of you, some of you that I just don’t understand…who actually do not like pumpkin. I can’t even begin to understand you, but I still love you. So, I present to you…Chocolate Pumpkin Cake–a delicious cake using pumpkin with actually NO pumpkin flavor! Just a simple, moist, deliciously chocolatey cake, that uses pumpkin only for its benefits. Yep. We are being users right now, but the best kind of users because this cake is delicious!

Pumpkin gives baked goods a wonderfully moist texture, but in this particular cake, you will not taste any pumpkin flavor. Now, you too, can buy those cans of pumpkin and bake a cake that YOU will eat! Believe me when I say, this cake is easy, delicious, and one of a kind!

Save Print
Chocolate Pumpkin Cake
Author: Heather
Recipe type: Cake
Cuisine: Dessert
Cook time:  35 mins
Total time:  35 mins
Serves: 1 13x9 cake
 
A deliciously chocolatey cake, using pumpkin, but with no pumpkin flavor!
Ingredients
  • 1 cup coconut oil, NOT melted
  • 1½ cups brown sugar
  • 4 eggs
  • 2 cups pumpkin puree
  • 2 cups whole wheat pastry flour
  • ½ cup cocoa powder
  • 2 tsp baking soda
  • 1 tsp baking powder
  • ½ tsp salt
  • 2 tbsp sour cream
  • 2 tsp vanilla extract
  • 1 cup dark chocolate chips
  • Whipped Cream, for serving
  • Toffee Bits or mini chocolate chips, for serving
Instructions
  1. Preheat oven to 350 degrees.
  2. In a large bowl, using a handheld mixer, beat together coconut oil, brown sugar, eggs and pumpkin puree.
  3. In a small, separate bowl, whisk together the flour, cocoa powder, baking soda, baking powder, and salt
  4. Add the dry mixture slowly to the wet, using the beaters on low. Do not over mix
  5. Add sour cream and vanilla extract, continue beating on low
  6. Stir in chocolate chips
  7. Spoon into greased and floured 13x9 pan.
  8. Bake 35 minutes or until toothpick comes out clean
  9. Top with whipped cream and toffee bits or chocolate chips , if desired
  10. Refrigerate any leftovers
3.5.3226


Heather

Leave a Comment

Easy and Quick Main Dishes Pasta Pork

Easy Sausage and Rigatoni

With busy commitments after school, my family seems like we are always on the go. It is not as easy as it was when they were little to sit down and have dinner together, although we always try! Even if we eat in shifts, have conversation when we can, we try to enjoy a hot, home cooked meal together. I have been trying to come up with easy crockpot, one pot, or oven meals that are simple, delicious and a perfect way to enjoy your family dinner, without slaving in the kitchen all evening.

This particular one was so easy. Basically using one pan, except the pot to cook your rigatoni in, and came together so fast! It was delicious and the kids absolutely loved it! It seemed like comfort food, but without the hours in the kitchen. this sauce can be made ahead too, then reheated and tossed with freshly cooked pasta!

I hope some of these easy meals help you out if you are running around with your family trying to squeeze dinner in, or even if you just want a quick meal to enjoy some down time!

Save Print
Easy Sausage and Rigatoni
 
Ingredients
  • 12 ounces Rigatoni pasta
  • 1 tablespoon olive oil
  • 1 medium onion, chopped
  • 1 pound Italian sausage Remove from casings if in casings, use either sweet or spicy
  • 3 cloves garlic, minced
  • 1 (14.5-ounce) can diced tomatoes, undrained
  • 1 (8-ounce) can tomato sauce
  • 1 tablespoon tomato paste
  • ½ teaspoon dried basil
  • ½ teaspoon salt
  • ½ teaspoon red pepper flakes
  • ¼ teaspoon black pepper
  • ½ cup heavy cream
  • ½ cup grated Parmesan cheese
  • Fresh Parsley and Freshly grated parmesan for sprinkling, if desired
Instructions
  1. Heat olive oil in a large pan and cook onion until it starts to soften. Add sausage, and break it into pieces with a wooden spoon as it cooks.
  2. When sausage is no longer pink, add garlic and cook for 1 minute. Drain off any excess fat.
  3. Add diced tomatoes, tomato sauce, tomato paste, basil, salt, red pepper flakes, and black pepper and simmer until thickened, about 15 minutes.
  4. Meanwhile, cook pasta according to package directions. Drain and place drained pasta in a large bowl.
  5. Add cream and simmer another 5 minutes, Turn heat to low and stir in Parmesan cheese.
  6. Pour sauce over pasta and toss to coat.
  7. Sprinkle with fresh parsley or parmesan cheese if desired
3.5.3226

Heather

Leave a Comment

Pasta Side Dishes

Easy Mac and Cheese

Mac and cheese is a staple in this house. We love it! Not the boxed version so much, although we definitely use that, but the homemade, creamy version that dreams are made of!

This version that I came up with on a night of busy commitments for the kids is an easy recipe, perfect for a quick, on the go meal, but still allowing for that decadent, comfort food taste. All in no time flat!

While this is easy and perfect for busy nights, you can also wow a crowd at a holiday or celebratory gathering as well. It is really THAT good!


Save Print
Easy, Creamy Mac and Cheese
Author: Heather
Recipe type: Macaroni and Cheese
Cuisine: Dinner
 
This version of Mac and Cheese is as easy as it gets, but still lets you feel like you are enjoying a bowl of slow comfort food.
Ingredients
  • 1 lb. pasta, cooked
  • 5 tbsp butter
  • ¼ cup flour
  • 2 cups milk
  • ½ cup half and half
  • 1 8 oz brick of cream cheese, cut into chunks
  • 2 cups white cheddar cheese, shredded
  • 1 tsp salt
  • salt and pepper to taste
Instructions
  1. In a large saucepan, heat butter on medium low heat
  2. Sprinkle in flour, and whisk for one minute
  3. Add in milk and half and half, whisking quickly to dissolve the flour
  4. Heat until slightly bubbling at the sides, but NOT boiling. Watch carefully
  5. Add in cream cheese and cheddar cheese and stir until melted
  6. Add in salt and pepper
  7. Add in cooked pasta and stir to coat
  8. Serve immediately
3.5.3226


Heather

Leave a Comment

Cakes and Cupcakes Desserts Fall Halloween Thanksgiving

Pumpkin Poke Cake

This cake is one that will pretty much be a keeper after the first time you make it. As I mentioned in another post, I know there are some people out there just passing this one by because they don’t care for pumpkin (I just don’t understand it, but it is okay, I accept you…), but if you like pumpkin, this is definitely one to try!

I pretty much overdose (in a good way) on all things pumpkin in the fall. This year I literally couldn’t wait for my first pumpkin dessert, and whipped out the ingredients for pumpkin bread before Labor Day weekend even came to a close. I seriously love pumpkin that much. It is problem, I get it.

This cake came to be when I was making a dessert for some company, wanted something pumpkin, but a little fancier that the usual pumpkin bread. It came together easily, and the flavor was out of this world! I loved how moist the cake was, and the whipped topping and heath crunch, just finished it off right.

This is not a usual recipe for me….I usually make everything from scratch! This is one of the very few times you will see me putting a boxed cake mix and a tub of cool whip in the ingredients, but even someone like me who loves to cook and bake needs to take some shortcuts sometimes. Enjoy the ease of this recipe, and the compliments when it is served.

Save Print
Pumpkin Poke Cake
Author: Heather
Recipe type: Cake
Cuisine: Dessert
 
This moist and delicious cake will become a family favorite! Some shortcuts make a decadent dessert, easy to put together!
Ingredients
  • 1 boxed spice cake mix
  • 1 15-ounce can pumpkin puree
  • 1 large egg
  • ⅓ cup canola oil
  • 1½ tsp cinnamon
  • ½ tsp nutmeg
  • ¼ tsp ground cloves
  • 1 12 oz can sweetened condensed milk
  • 1 container whipped topping, thawed
  • ½ cup salted caramel sauce, store bought or homemade + some to drizzle over the top if desired
  • ½ cup toffee bits
  • ½ cup mini dark chocolate chips
Instructions
  1. Preheat oven to 350F
  2. Coat a 9×13-inch pan with baking spray or line it with parchment paper, set aside.
  3. In a large bowl, add the cake mix, pumpkin puree, egg, oil, spices and beat until smooth and combined, about 2-3 minutes
  4. Bake for about 28 to 30 minutes (test with a toothpick to see if it comes out clean)
  5. While the cake is in the oven, combine the sweetened condensed milk, caramel sauce and whisk, set aside.
  6. Remove cake from the oven when it’s done and use the end of a wooden spoon to poke holes all over the cake. Make sure they are evenly spaced.
  7. Slowly pour the sweetened condensed milk and caramel mixture over the cake, making sure it is evenly distributed
  8. Place cake in the fridge for about 30 minutes to cool slightly before adding the whipped topping
  9. Remove cake from the fridge, evenly spread the whipped topping over the surface
  10. Sprinkle with toffee bits and chocolate chips. Drizzle with more caramel if desired
  11. Cover cake, and refrigerate for at least 2 hours, preferably overnight before slicing and serving. Cake will keep in the fridge for up to 5 days
3.5.3226

Heather

Leave a Comment

Fall Pies and Tarts Thanksgiving

The Perfect Apple Pie

I have been baking for long time. I love to bake, and I love to eat the baked goods…although I try to give as much away as possible! I have always loved pie, but that has always been one thing that I had never been good at! The pastry has just eluded me completely. I never could get it the perfect consistency and flavor, and I felt like my fruit was either undercooked and crunchy, or overcooked mush.

I haven’t given up trying. I have baked so many pies to practice, I could have fed a small village. My daughter began helping fine tune the recipe, and wouldn’t you know it, as soon as she helped, we nailed down what we call the perfect apple pie. Flaky, slightly sweet crust, crisp tart apples baked just right and the best tasting pie I have ever made!

Give this pie a try for your thanksgiving dessert. My daughter is making it for us, and I cannot wait!


Save Print
The Best Apple Pie
Recipe type: Pie
Cuisine: Dessert
 
This is the perfect apple pie. We have tested and retested crust recipes, filling recipes, baking times and so much more! We did all the work so you can enjoy the best slice of apple pie!
Ingredients
  • SOUR CREAM CRUST:
  • 3 cups all purpose flour
  • ½ tsp salt
  • 3 tbsp sugar
  • 2½ sticks of butter, (20 tbsp) frozen
  • 1 cup sour cream
  • APPLE FILLING:
  • 5 apples, peeled, cored, sliced into ¼ inch thick slices (A mix of sweet and tart, both firm apples)
  • 1 tbsp lemon juice
  • 5 tbsp sugar
  • 4 tbsp flour
  • 1 tsp cinnamon
  • ½ tsp nutmeg
  • ¼ tsp ground cloves
  • 2 tbsp butter, cubed
  • Finishing Touch:
  • 1 egg yolk
  • 2 tbsp heavy cream
  • Coarse sugar for sprinking
Instructions
  1. SOUR CREAM CRUST:
  2. Whisk flour, sugar and salt
  3. Using a box grater, grate the sticks of butter into the flour mixture
  4. Using your hands, lightly mix the flour and grated butter together
  5. Add in sour cream, and once again, using your hands or a fork, lightly press the mixture together
  6. If the mixture still seems too dry, add more sour cream
  7. Shape into two discs
  8. Flour a work surface
  9. Gently roll out the bottom crust and place into deep 9 inch pie dish
  10. Trim edges
  11. Place in fridge to chill for 30 minutes
  12. Wrap second disc in plastic wrap and place in the refrigerator
  13. APPLE FILLING:
  14. Toss apples, lemon juice, flour, sugar and spices together in a bowl.
  15. Add fruit into chilled pie crust. Dot with butter.
  16. ASSEMBLING AND BAKING THE PIE:
  17. Preheat oven to 425 degrees
  18. Roll out second crust on a floured surface into a 12 inch circle and place over fruit in the pie
  19. Pinch the edges together. Trim excess. Crimp edges.
  20. In a small bowl, beat one egg yolk and 2 tbsp heavy cream. Brush over top crust.
  21. Sprinkle a few pinches of coarse sugar over the top
  22. Poke a few decorative holes in the top to vent.
  23. Place pie dish on a baking sheet to avoid dripping in oven.
  24. Bake the pie at 425 degrees for 20 minutes until crust is golden
  25. Reduce oven temperature to 375 degrees
  26. Continue baking about 25 minutes or until crust is deep golden and juices are bubbling
  27. Let cool completely before slicing
  28. Serve with fresh whipped cream or vanilla bean ice cream.
3.5.3226

Heather

Leave a Comment

Appetizers

Dill Pickle Dip

We have been having an incredibly busy and amazingly fun summer so far! I feel like we barely ever have the chance to sit down we are doing so much, which is a good thing for someone like me who gets bored very easily! I love planning and organizing fun things to do with the kids and all of our friends and families. It is such a fun time to reconnect with old friends, and have fun new experiences that you just don’t have the time for during the school year.

With all of the fun, comes food…of course! Did you actually think that wouldn’t fit in there somewhere? I have been chopping, slicing, cooking and baking since school got out back in May. It is so fun for me, someone who loves to cook, but I am always searching for some new and exciting recipes. I love finding one, and then tweaking it here and there to become my own.

That’s exactly what happened when I was searching for a new and unique dip recipe. I found a recipe for Dill Pickle Dip…yep, that’s right, DILL PICKLES! I LOVE pickles! I don’t know what it is…their saltiness, the delicious flavor or what, but I just adore them. When I saw this recipe, it was like my appetizer and condiment worlds met and became very happy! I decided to try it out and I was glad I did. It was new, different, and delicious! I am sharing it now with you, because you deserve to have a recipe to bring to a party that is delicious and tasty and unlike anything you have tasted before! I served this with our favorite flat pretzels and rye crackers, but get creative with what you think would taste good!

Save Print
Dill Pickle Dip
Author: Heather
Recipe type: Dip
Cuisine: Appetizer
 
This is a delicious and unique dip to add to your appetizer recipe box!
Ingredients
  • 1 (8 oz) package cream cheese, softened
  • ¼ cup pickle juice
  • ¼ cup diced red onion
  • 1 tsp garlic powder
  • 2 tsp Old Bay seasoning or a mix of paprika, pepper, salt and celery seed
  • 1 teaspoon coarse ground pepper
  • 2 cups diced pickles
Instructions
  1. With a handheld mixer, beat the cream cheese until smooth.
  2. Add in pickle juice.
  3. Add red onion an spices and beat with mixer.
  4. With a spoon, stir in pickles.
  5. Chill for at least 1 hour before serving.
  6. Serve with pretzels, chips, crackers or veggies.
3.5.3226


Heather

Leave a Comment

Breakfast Muffins & Scones

Banana Chocolate Chip Muffins

bananachocolatechip


As you all know I am constantly searching for the perfect muffin. I am like a muffin addict. (I guess that wouldn’t be the worst addiction you could have…). This combination of banana and chocolate is sure to win you over. The whole wheat flour puts a healthy spin on this muffin and the chocolate chips make it seem like a treat. These are perfect for breakfast, lunch or an anytime snack. I would double the batch if I were you, you won’t regret it!


Save Print
Banana Chocolate Chip Muffins
Recipe type: Muffins
Cuisine: Breakfast
Cook time:  25 mins
Total time:  25 mins
Serves: 12
 
A delicious tender and sweet muffin, perfect for breakfast, or a snack!
Ingredients
  • 8 tbsp butter, melted and cooled
  • 2 eggs
  • ½ cup buttermilk
  • 2 large, over ripe bananas, mashed
  • 2 cups whole wheat pastry flour
  • ½ cup sugar
  • 2 tsp baking powder
  • 1 tsp salt
  • 1 cup bittersweet chocolate chips
Instructions
  1. Preheat oven to 350 degrees
  2. Line a 12 cup muffin tin with liners
  3. Mix butter, eggs and buttermilk in a large bowl.
  4. Add mashed banana and mix until smooth and creamy.
  5. In a small bowl, combine the flour, sugar, baking powder and salt.
  6. Whisk in dry ingredients slowly.
  7. Fold in chocolate chips.
  8. Fill each muffin tin ¾ full
  9. Bake for 20-25 minutes or until a toothpick comes out clean and the muffin tops are golden brown
3.5.3226


Heather

Leave a Comment

  • « Previous Page
  • 1
  • 2
  • 3
  • 4
  • 5
  • 6
  • …
  • 38
  • Next Page »

Heather

I am a midwestern girl who grew up in the big city, but now enjoys her days as a stay at home mom in the suburbs. Who says spending time in the kitchen has to be boring? I hope to inspire your family kitchen with some new ideas, fun recipes and great tips.

Stay Up to Date

Get all the latest tasty goodness straight to your inbox!

Girl and her Kitchen

Join us!

Hey! I am the GIRL in the kitchen and I am so glad you decided to visit. Love to cook and eat? You will find some great recipes on this site, whether you are looking to eat healthy, splurge on a dessert, make dinner or host a party-I have it all! Sometimes I’ll give you a story along with my recipe, other times, I want to take you straight to the food!  Whatever the reason that you decided to visit, I am so glad you joined me in the kitchen! Feel free to take a look around the site, and please…stay awhile!

Archives

Popular Categories

  • Appetizers
  • Breakfast
  • Crafts
  • Salads and Dressings
  • Side Dishes
  • Vegetables and Fruit

Most Popular Posts

Corner Bakery Cafe Giveaway!

Corner Bakery Cafe Giveaway!

Filed Under: Reviews

Bacon Cheddar Skillet Cornbread

Bacon Cheddar Skillet Cornbread

Filed Under: Breads, Quick Breads and Rolls, Side Dishes

Puffy Pancakes {Perfect for Valentine’s Day!}

Puffy Pancakes {Perfect for Valentine’s Day!}

Filed Under: Breakfast, Valentine's Day

100 Days of Real Food Cookbook Review {and Giveaway!}

100 Days of Real Food Cookbook Review {and Giveaway!}

Filed Under: Vegetarian

Copyright © 2026 · Divine theme by Restored 316