• Email
    • Facebook
    • Instagram
    • Pinterest
    • Twitter

Girl and Her Kitchen

Plan. Make. Eat. Design. Craft. Create. Celebrate. Life.

  • Home
  • About the Girl
  • Recipe Index
  • We LOVE
  • Weekly Menu

Chicken & Turkey Main Dishes Soups & Stews

Chicken Noodle Soup with Fresh Herbs

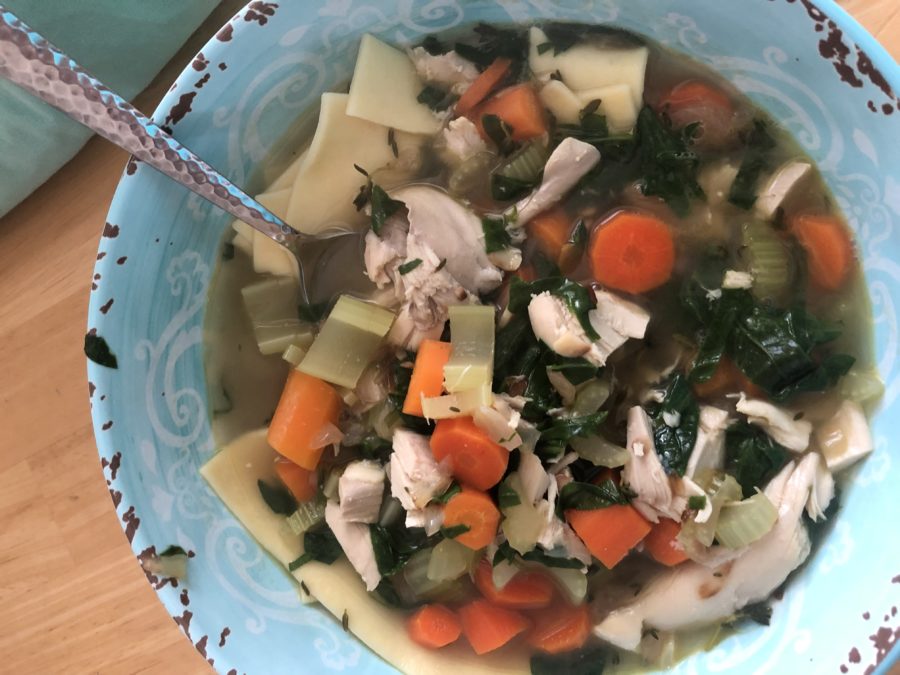
I keep waiting and waiting for warm weather, but it seems to be reluctant to arrive. I am hoping that it comes soon, but in the meantime, I will keep making comforting foods for dinner that warm me and my family up a bit. Soups are a big hit in my house, they are easy to make, mostly popular with the kids and an easy way to throw in a ton of vegetables, protein and carbs, and cook it all in one pot. I have a standard chicken noodle soup recipe, but this one is a bit different from my usual. The addition of some chopped spinach to pump up the veggie factor and a handful of some fresh, green herbs really bring this soup up a few notches. If you are looking for a quick and easy, comforting meal for your family, try this one night before it actually gets warm outside and the soup pot gets put away until the fall!


Save Print
Chicken Noodle Soup with Fresh Herbs
Author: Heather
Recipe type: Soup
Cuisine: DInner
 
This soup is freshened up by a handful of fresh herbs and some chopped spinach. Healthy, comforting and delicious, this soup does not disappoint!
Ingredients
  • 4 tbsp butter, divided
  • ¾ cup sweet onion, finely diced
  • 2 garlic cloves, minced
  • 2 tbsp fresh tarragon, chopped
  • 2 tbsp fresh thyme leaves, removed from stem
  • 2 tbsp fresh parsley, chopped finely
  • 2 tsp salt
  • 1 tsp fresh ground pepper
  • 6 carrots, peeled and sliced
  • 6 stalks of celery, sliced
  • 12 cups chicken stock
  • 3 cups cooked chicken, diced
  • 4 cups fresh spinach, chopped
  • 12 oz. cooked noodles of your choice-we used thick egg noodles, but any noodle type will work
Instructions
  1. In a large pot, melt 2 tbsp butter.
  2. Once butter is sizzling, add onions and garlic
  3. Stir until golden
  4. Add fresh herbs, salt and pepper and stir until combined
  5. Add 2 tbsp butter and stir
  6. Add carrots and celery and cook for 2-3 minutes until slightly softened
  7. Add broth and heat until simmering, about 15 minutes
  8. Add cooked chicken and fresh spinach, heat for 10 minutes
  9. While soup is simmering, cook noodles al dente
  10. Serve soup over noodles
  11. *Adding noodles to soup will cause the noodles to soak up all the broth. If soup will be completely consumed immediately, add noodles. If you are saving some soup, I would keep the noodles and soup separate.
3.5.3251


Heather

Leave a Comment

Christmas Desserts Fall Pies and Tarts Thanksgiving

Peanut Butter Chocolate Pie


This was the pie that surprised us all. We sort of made up the recipe based on a craving, and it was one of the best pies of Thanksgiving. We are making it again for Christmas Day, and let’s just say…our mouths are already watering.

Save Print
Peanut Butter Chocolate Pie
Author: Heather
Recipe type: Pie
Cuisine: Dessert
Serves: 1 pie
 
This pie was a surprise addition to our thanksgiving menu this year, and we are making it again for Christmas! It is delicious and the peanut butter and chocolate together are amazing!
Ingredients
  • 20 graham cracker sheets
  • ½ cup + 1 tbsp butter, melted
  • ½ cup heavy cream
  • ¾ cup dark chocolate chips (or enough until chocolate ganache isn't to thin, but pourable and creamy)
  • 1 4 oz block of cream cheese, softened
  • 1 cup peanut butter, creamy
  • ½ cup powdered sugar (add more to get desired sweetness)
  • 1 container whipped topping (I use Cool Whip)
  • Whipped cream, chocolate drizzle, chocolate shavings, salted peanuts for garnish, if desired
Instructions
  1. Pulse graham cracker sheets in food processor until finely ground
  2. Slowly, drizzle in butter
  3. Press into a 9 inch pie pan and bake at 350 degrees for 7 minutes
  4. Cool
  5. In a microwave safe bowl, heat heavy cream until hot about 45 seconds to one minute
  6. Stir in chocolate chips until mixture is smooth and creamy
  7. Pour into cooled pie crust.
  8. Place in refrigerator until chocolate sets
  9. In a medium bowl, beat cream cheese until light and fluffy.
  10. Add peanut butter and powdered sugar and beat until well combined
  11. Fold in whipped topping until creamy
  12. Fold into pie crust
  13. Chill for three hours
  14. Garnish with whipped cream, chocolate and peanuts as desired
  15. Store in refrigerator or freezer for a frozen delight!
3.5.3251

Heather

Leave a Comment

Christmas Cookies & Bars Desserts

Holiday Baking! Pistachio Cherry Slices {Slice and Bake Recipe!}

I just love the red and green color of these cookies! It is just so festive for a holiday cookie. The sweetness of the maraschino cherries with the salty crunch of the pistachio makes this cookie delicious even before it is rolled in coconut-which you can imagine-makes it even better!

The best thing about these cookies? They are seriously easy to make. The dough comes together super quick and once you get past that annoying “chill for three hours or overnight” part, you just slice them up and bake them. Easier than most recipes! Sometimes these are called Fruitcake cookies…but I shy away from that name because I’m not sure if anyone would want to try them then!

Enjoy these and add something a little creative to your holiday cookie plate!

Save Print
Holiday Baking! Pistachio Cherry Slices {Slice and Bake Recipe!}
Author: Heather
Recipe type: Cookie
Cuisine: Dessert
Cook time:  14 mins
Total time:  14 mins
Serves: 24
 
These red and green festive cookies will add a splash of color to your holiday cookie plate!
Ingredients
  • ¾ cup butter, room temperature
  • ⅔ cup sugar
  • 1 egg
  • 1½ tsp vanilla extract
  • ¾ tsp almond extract
  • 2 cups flour
  • ¾ cup finely chopped maraschino cherries
  • ¼ cup chopped roasted pistachios
  • 1 cup shredded sweetened coconut, for rolling
Instructions
  1. In a large bowl, beat butter and sugar with handheld mixer on medium until creamy
  2. Beat in the egg, vanilla and almond extract
  3. Scrape down sides and continue to mix until light and fluffy
  4. Turn the mixer to low, and beat in flour slowly.
  5. Turn off mixer and fold in cherries and pistachios.
  6. Stir just until combined, over stirring caused the dough to get really pink
  7. Turn the dough out onto a floured work area and divide in half
  8. Shape each into a roughly 8 inch log about 2-3 inches in diameter
  9. Roll in shredded coconut and wrap in plastic wrap
  10. Place in refrigerator and chill for three hours or overnight.
  11. Preheat oven to 350 degrees
  12. Line a baking sheet with parchment paper
  13. Slice each log into 12 equal in size cookies and place on baking sheet about 2 inches apart
  14. Bake the cookies for 12-14 minutes
  15. Leave on baking sheet for about three minutes and then place on cooling racks to cool completely
3.5.3251

Heather

Leave a Comment

Christmas Cookies & Bars

Holiday Baking! Chocolate Peppermint Cream Cookies

This cookie is so deliciously rich and dense, you will only need one to satisfy your cookie craving. Well, maybe.

I say maybe because they are so delicious, you may not be able to stop. They are pretty too! So festive for the holidays.

I love chocolate and mint together and these come together nicely to make a delicious holiday cookie. Sprinkle crushed candy canes on top, or leave the peppermint cream draped with chocolate ganache as your finisher. Either way, they are a must this holiday season.

Save Print
Holiday Baking! Chocolate Peppermint Cream Cookies
Author: Heather
Recipe type: Cookie
Cuisine: Dessert
Prep time:  30 mins
Cook time:  10 mins
Total time:  40 mins
Serves: 18-20
 
These minty delights will satisfy your cookie craving in no time!
Ingredients
  • COOKIE:
  • 1⅔ cup flour
  • ½ cup unsweetened cocoa powder
  • ½ tsp baking soda
  • ¼ tsp salt
  • ¾ cup butter, melted
  • 1 cup dark brown sugar
  • 1 egg + 1 egg yolk
  • 2 tsp vanilla extract
  • 1 cup bittersweet or dark chocolate chips
  • PEPPERMINT CREAM:
  • 2 cups powdered sugar
  • 1½ tbsp butter, softened
  • 3 tbsp evaporated milk
  • ¼ tsp coconut oil, melted (canola or light olive oil will do if you don't have coconut on hand)
  • ½ tsp vanilla extract
  • ⅓ tsp peppermint extract
  • GANACHE:
  • 6 oz dark chocolate, chopped
  • 1 tbsp heavy cream
Instructions
  1. Preheat oven to 350 degrees.
  2. Whisk together the flour, cocoa, salt and baking soda in a bowl.
  3. Set aside
  4. In another bowl, beat together the butter and sugars for the cookie base.
  5. Add egg, yolk and vanilla and continue to beat.
  6. Slowly add in dry ingredients and mix until a soft dough forms.
  7. Gently fold in the chocolate chips
  8. Roll dough into 1½ to 2 inch balls and place on a baking sheet prepared with parchment paper
  9. Make sure cookies are spaced at least two inches apart
  10. Bake for 8-10 minutes, let cool on cookie sheet
  11. While cookies are cooling, add powdered sugar, butter, milk, oil and extracts to a bowl
  12. Beat until smooth and creamy
  13. Use a spatula to spread the peppermint cream on top of the cooled cookie
  14. If using ganache, Melt chocolate and cream together in the microwave in 30 second intervals
  15. Drizzle with chocolate ganache and crushed peppermint, if desired
3.5.3251

Heather

Leave a Comment

Christmas Cookies & Bars

Holiday Baking! Pistachio Cookies Dipped in Dark Chocolate

These cookies are a gem from my mother that everyone needs in their Christmas Cookie rotation. These delicate, nutty cookies are packed with flavor, and then dipped into rich dark chocolate to finish them off. They are small and look beautiful with their light green hue from the pistachios and the dark contrast with the chocolate. They are pretty easy, and the dough does not need to chill which is the most annoying part of mass cookie baking in my opinion. These are fancy, but without the fancy instructions or ingredients.


Save Print
Pistachio Cookies Dipped in Dark Chocolate
Author: Heather
Recipe type: Cookies
Cuisine: Dessert
Prep time:  30 mins
Cook time:  30 mins
Total time:  1 hour
Serves: 24
 
These delicate nutty cookies are a perfect addition to your seasonal favorites.
Ingredients
  • 2 cups shelled, roasted pistachios, about 12 oz.
  • 1 cup of butter, softened (2 sticks)
  • ⅓ cup powdered sugar
  • ½ tsp salt
  • 2 cups sifted flour
  • 1 tsp vanilla extract
  • ½ tsp almond extract
  • 1 tsp water
  • Sugar for rolling
  • 4 oz dark chocolate
  • 1 tsp vegetable or coconut oil
Instructions
  1. Heat oven to 300 degrees.
  2. (If nuts are not roasted, toast on a cookie sheet for 6-7 minutes.
  3. If they are roasted, no need to do this step).
  4. Grind nuts in food processor until finely ground but NOT a paste. Be careful!
  5. In a large bowl, beat butter, powdered sugar and salt with a hand mixer on medium until light & fluffy
  6. Lower speed, gradually add flour until just blended.
  7. Add vanilla, almond extract and water
  8. Gently mix in pistachios
  9. Roll tablespoons of dough into balls.
  10. Once all dough is rolled into balls, roll them all in sugar
  11. Place 2 inches apart on parchment lined cookie sheets
  12. Press down lightly to flatten
  13. Bake on top and middle racks for 15 minutes
  14. Switch sheets around on baking racks and bake for another 15 minutes.
  15. Let cool on cookie sheet for 10 minutes.
  16. Melt chocolate and oil in microwave
  17. Dip half of cooled cookie in chocolate and let rest on wire rack with parchment paper underneath (to catch the dripping chocolate!) for 20 minutes
  18. Refrigerate to cool completely
  19. Keep in a tightly lidded container for up to one week
3.5.3251

Heather

Leave a Comment

Travel

Mother Daughter Trip to NYC! Trip Details + The Stuff You Can’t Miss! {Part Three}

Waking up on the third day of our New York Mother Daughter getaway was bittersweet. We had an amazing day ahead of us, but we were leaving later that night to head home. We couldn’t wait to see our families, but we were having the time of our lives! We got up really early that morning to shower and get ready to see the rest of New York! We checked our luggage at the hotel since check out was at noon and we wouldn’t be coming back to the hotel until after dinner. The hotel was so nice and understanding about everything. We had such a pleasant experience at the Hampton Inn Times Square.

We were heading to Central Park and the Upper East side on our third day, and we talked to the concierge again about using the subway. She told us we could walk up there, but we were worried about how much walking we would be doing and we didn’t want to tire ourselves out right away. We took the subway, but as we got off as quick as we got in, we realized we really could have easily done the walk!

We started out exploring the Plaza Hotel. I mean, you HAVE to check that hotel out if you are in New York City! It was really cool to walk around and look at it, but the lobby is off limits to anyone that is not a hotel guest. Walking around and perusing the shops was fun and gave us a real feel of the elegance of the hotel. There is a really unique food court in the lower level that is worth a look. Don’t leave before checking it out!

Afterwards we split up from our friends to do some exploring on our own. My daughter and I headed to an adorable little gem called Alice’s Tea Cup. It is a little tea shop and cafe and really worth a stop if you are traveling with your daughter. There are two locations and we went to the one closest to the other things that we were doing. It was called Chapter ii on 64th Street. It is the cutest little place and you can order a pot of tea and some scones and just sit and talk. It was one of my favorite moments with her because I had her all to myself. I know that she is growing up fast and to sit there with her, enjoying a pot of tea and talking about life, it was priceless.

The tea selection is out of this world. So many to choose from, we had trouble picking! We finally chose a fruity blend called High Noon and it was really good! We ordered two scones, a ham and cheese and a strawberry blueberry. They were served with whipped butter, fresh jam and clotted cream. They were so good and we were really hungry! Perfect combination. Little tip…check out the bathroom when you are there. It is so cute!

Afterwards we did a little shopping and walking around the neighborhood. We noticed that in New York City, every neighborhood has its own vibe, and own identity. After visiting so many different neighborhoods so quickly, we really could see the differences. We had a great morning stopping in shops and walking around in the beautiful weather we were so lucky to get.

Our next stop was Serendipity for a Frozen Hot Chocolate. It is a must stop and a longstanding cafe in Manhattan. When we arrived, we had to wait a few minutes to be seated and it was an off time…around 11:30 am. The host told us that sometimes it gets so crowded you could wait hours, so I thought that a good tip for others visiting might be to make reservations if you know when you will be stopping in…just in case.

We ordered some soup for lunch and a frozen hot chocolate to share and it was worth the wait! The soup was delicious but the Frozen Hot Chocolate was divine!

We had enough to eat and were ready to walk it off. We headed to Central Park to begin exploring all of the spots we had read about. The beautiful Gapstow Bridge was our first sighting (where Home Alone 2 was filmed!) It was so pretty and picturesque. We headed past that and followed the paths around to see several sights in Central Park. We only had about two and a half hours there, but literally could have spent all day walking around. The Alice and Wonderland statue, Conservatory Water, the baseball fields, Shakespeare Park, Strawberry Fields, the Great Lawn, Central Park Lake and Cherry Hill were all some beautiful spots that we got to see.

So many spots were so pretty, but the Mall and Literary Walk was by far my favorite. If you visit one spot in Central Park, make this one the one. It is an area in Central Park so filled with life you won’t want to leave! Musicians, performers, artists, and people just hanging out and enjoying life were everywhere. You couldn’t help but feel happy walking through there! They were even filming a movie there when we were walking through which made it even more exciting!

We reluctantly finished up at Central Park and met back up with our friends for dinner. We walked just a few blocks to Blacktap Craft Burgers, a place my daughter really wanted to go to…and not only for the burgers! Mostly, she wanted to go for the shakes! And we did enjoy those shakes! It felt good to sit down after walking all day and enjoy a really good meal. The burger selection was really good and the chicken sandwich I got was delicious! The shakes were so good. We ordered the Brooklyn Blackout and even sharing it we could not finish it! It was worth every sip.

We headed back to our hotel to grab our luggage and head to LaGuardia to go home and say goodbye to our fun getaway! Our only regret? We could have used more time to see even more than we did! We would have loved to explore the museums and just ran out of time! But life is busy and three days was what we could spare and we really packed it in and enjoyed every moment. I hope my trip itinerary helps you plan the most amazing Mother Daughter trip. This was an amazing trip that I will never forget! Every moment was special because I was with my daughter and our great friends, and we also got to see things we have never seen before. It was such a wonderful experience and I hope you all have the opportunity to use these ideas and create a perfect trip of your own!

Heather

Leave a Comment

Travel

Mother Daughter Trip to NYC! Trip Details + The Stuff You Can’t Miss! {Part Two}

If you are planning a trip to New York, specifically the Manhattan area, anytime soon, get a good pair of walking shoes! Day 2 exploring the city was so fun, and we walked most of it. Yes, of course you can UBER or take a cab, that is definitely an option. The weather was so mild and we wanted to see it all, so we chose the subway and walking route for most of our day.

We started the day bright and early with a little breakfast at our hotel. It was a complimentary, continental type breakfast, which was a nice way to start the day with some nourishment. We knew we would be eating out and about, but we grabbed a quick bite before we left. We made a stop at the concierge before going out to get a little more information on using the Subway and she was so helpful! She really took away any nervousness we had about using the subway and gave us a great map to use. We started our trip with the map below, and I highly recommend it if you are taking a trip there anytime soon. I know, I know…everything can be done on your phone these days, but I worried about service and about battery life, so I liked the comfort of having a good, old fashioned hard copy map in my purse to use.


Our first stop was the Highline. Basically this is an old historic elevated freight rail line train that the community turned into a beautiful, garden like walking path. It is not only pretty on the path, but the views of the city are amazing and cannot be missed! It was a short, easy subway ride and a short walk over to the stairs to walk up to get there. We loved walking along and seeing different views of the eclectic neighborhoods. We stepped off the Highline at the Chelsea Market to do some shopping.

Chelsea Market is a huge, indoor urban shopping experience. Beautiful, local made goods, food and flowers for sale in small shops within the walls of the warehouse. We could have spent hours there, but knew we were on limited time so tried to make the most of it. We enjoyed a crepe filled with nutella and bananas from the amazing food court (not your usual food court!) and bought a few souvenirs for family back at home. We tried some chocolate from a chocolate shop and enjoyed perusing through the various shops which included a spice shoppe, and Italian foods market, a off the rack clothing store and a fun large scale shop filled with little local shops and crafters selling their gorgeous wares. It was a great experience, and I think if I actually lived near there I would be shopping there very often!

Afterwards, we made our way on the subway to the 9/11 Memorial and Museum. As we walked up to the Memorial, we found that the line to get into the museum was incredibly long and that there was a separate line to buy tickets as well. One of the employees gave us the hint to buy the tickets on our phone so we saved ourselves one wait in a line. We did just that, but that might be another thing you may want to do before you arrive is pre-buy the tickets so you are not standing in the cold trying to do it as quickly as possible on your phone. You can buy them up to six months in advance and might make your visit a little less stressful when you arrive. The museum was a sobering experience and many of the exhibits brought tears to my eyes. Living through the horrors of 9/11 made this trip even more meaningful, and I was glad that I was able to share it with my daughter to show her what an impact this tragic event had on our country.

Getting out into the fresh air after the museum was the best thing that we could have done to refresh our spirit. We started making our way to the Battery Park. We walked from the 9/11 museum and it was a long walk, but definitely doable. We had researched all the wonderful ferry tours of the Statue of Liberty and Ellis Island, and although we longed to have that experience, we just didn’t have enough time in our day to take a three hour ferry ride. We settled for a long distance glimpse of the statue of liberty and although it wasn’t as close as I yearned to get, I was glad that we were able to see it from afar.

Our next stop was Chinatown, and we decided to grab and Uber for this trek since it was a little long to walk and by this time we were getting really hungry and tired from all of the walking. The Uber driver seemed to not know where he was going (which seemed to be an odd theme in NY…no one seemed to be able to help you find anything! We wondered how they made their own way around the city!), so he dropped us off at the edge of Chinatown near Little Italy. Although we went into a few shops, I think we had passed the touristy part of Chinatown so we felt like we really didn’t get the full experience of the neighborhood.

We did, however, enter a lot of kitschy souvenir shops and haggle with the salespeople. It was fun and I think they like it as much as we do. We bought a few t-shirts and fun gifts for people. Afterwards we decided that we had to stop and eat or we would fall over. We wandered onto Mulberry Street and found a huge strip of Italian Restaurants. We had officially wandered into Little Italy. We wondered where to go, we had done some research, but were so hungry we were willing to take anything. We walked down the street and were bombarded by young men outside of the restaurant trying to talk you into eating in their restaurant. It was so funny! My daughter thought it was hilarious. Finally, one of the men swayed us with his intense effort to get us into his place, and we succumbed to his charm! Caffe Napoli did not disappoint! We were so glad that we wandered in because the food was amazing. My daughter had Pasta Carbonara and I had Cavatelli Siciliana, a delicious eggplant and mozzarella pasta. They served warm bread on the table and their house wine was perfect. The service was great and the staff were so friendly and very charming. I would highly recommend stopping in here for a bite to eat!

We were full, but couldn’t be in Little Italy in New York City without sampling more delicious food. We stopped at the famous Ferrara Bakery and sampled a cannoli and some gelato. We had barely eaten all day, and we were making up for it now!

How could one possibly choose what to get here? I mean, could I just say, “I’ll have one of everything?”

All that walking had made us ravenous… and who could pass up gelato in Little Italy? The inside of Ferrara Bakery was cute and the choices were endless. Just make sure you are at the main location and not the small little offshoot located right at the edge of Chinatown. We made that mistake and bought a few things from that location and it wasn’t really as fresh or delicious as the stuff we purchased from the large scale restaurant and bakery.

After getting all we could (eat) out of Little Italy, we headed into SoHo to enjoy the upscale shopping and people watching. The shops were way out of our price range, but that didn’t stop us from going in and checking them out. My daughter had a ton of fun walking into stores we could never shop at, picking up a pair of shoes and marveling at the fact that they cost more than our trip to New York! After SoHo we continued walking into Greenwich Village to stop at something my daughter’s friend had found online: DO: Cookie Dough Shop. It is a small shop that sells cookie dough like ice cream! They have tons of flavors and it was packed for a Thursday evening. We bought the Brookie dough to share and it was so good. We kept saying that we wished we weren’t so full so we could really savor it all. After a few bites, we decided we would save it for a later night snack! (My daughter ate it that night–I still couldn’t eat another bite!)

After eating cookie dough, we were finally ready to head home and put our feet up. Literally! We were exhausted. We somehow made it to the subway station and headed back to midtown and our hotel. It was an amazing day, and kind of my favorite on the whole trip…but then again…day one was great too…and part three of this is coming…so just wait to see what we did then!

Heather

Leave a Comment

Travel

Mother Daughter Trip to NYC! Trip Details + The Stuff You Can’t Miss! {Part One}

This fall, my teen daughter and I took a trip to NYC to take in all the sights and spend some quality time together. The result? The best time I could have asked for, and three days of mother daughter time that I will never forget!

Let’s talk about this daughter of mine for a moment. She hates the spotlight, so sometimes, I just have to shine the light on her for just a bit. She is a great traveling partner. Seriously! If you want to take a trip and need someone with you that can navigate the subway, figure out NY city streets without ever having been there before and negotiate the best price in Chinatown? You definitely need someone like her. Not only that, but she kept me laughing for the ENTIRE trip. If she didn’t hate being the center of attention so much I would think she would be in New York one day doing comedy. But tell her that and she will give you a look. If you have a teenage daughter, you know the look I am referring to. It can stop this mom in her tracks from continuing to compliment her. That being said, I will finish it off by saying that she was a pure delight! Funny, smart, engaging and so much fun to hang around with in this wonderful city. I mean look at her. I just love her so much.

Ok, enough about her, because if I say anymore, she might kill me. Let’s get to that trip!

We decided mid October would be a lovely time to visit and we were extremely lucky with the weather and crowds. We only had three days there, so we knew that we had to pack it in, and pack it in we did! We probably walked over thirty miles over those three days and saw everything that we could. We flew out of Chicago early in the morning on a Wednesday so we could get a good start in NY. We used Expedia to make our travel arrangements and we were very pleased. Everything we booked was very smooth, and very affordable. I would definitely use them again.

We arrived at our hotel by car service at about 11:45am. We looked at several hotels and locations in Manhattan, but decided on a reasonably priced hotel in the center of it all. You see, New York is easy to navigate, but there is a lot to see. We decided being in the middle of it all so we could go in either direction was our best bet. The Midtown/Times Square area is very touristy, very crowded and slightly dirty (the NY trash thing in the front of buildings was so different from Chicago and hard to understand!) but it really was the best location to be near it all. Plus, being able to walk to Times Square at night and see it lit up and filled with people was a moment I, or my daughter, will never forget!

We stayed at the Hampton Inn Times Square North. It was a moderate, reasonably priced hotel with very comfortable rooms and super friendly staff. The hotel was clean and the room was spacious. The hotel even offered a free breakfast which is a rarity. Overall, we could not have asked for a better hotel in such a great location. Since we arrived so early, our room wasn’t ready, but the concierge checked our bags and off we went to start our adventures! We were so lucky to be traveling with a great friend and her daughter who is like a sister to my daughter and we couldn’t wait to get started!

Our first stop was a NYC tourist must see! Ellen’s Stardust Diner. If you visit, you have to make time to come here. The food is diner style, but the entertainment is top notch. Super talented singers belt out Broadway tunes NON-STOP and it is awesome. They are good…and I mean, REALLY good and you just cannot stop watching and listening! We arrived there around 12:30 and the line was moderately long. We waited outside for about 30 minutes. The weather was mild, so it wasn’t bad at all, but if it was cold, we might not have been as happy. Keep that in mind when you are visiting. When we left around 1:30 or so, there was barely a line, so I am thinking going at off times might be a good idea. I had a Ceasar salad with chicken that was good and my daughter had a BLT wrap. Both meals were perfect to just get us started. And, like I said, you are not going for the food, you are going for the experience.

TIP: Ask to be seated on the main floor if possible. The view is great and the performers come up to your table often.

The next thing on our agenda was fitting in all of the touristy things we possibly could in the shortest amount of time! We had Theater tickets that evening, so we were sort of on a schedule. We headed to Rockefeller Center and to our surprise, they already had the ice rink up and running. It was pretty to watch to the Ice Skaters for awhile spin around the rink. We really wanted to go to the Top of The Rock which is supposed to give you an incredible view of the city, but to our dismay, when we got there to buy tickets, they were sold out until later that evening. Traveler mistake #1…we should have bought them ahead. If you want to do this, try logging on to their website and find some tickets so you don’t miss out.

We headed out to St. Patrick’s Cathedral which was an amazing sight to see. Entering in the church is free, but there are several spots to make a donation. It is one of the most breathtaking sights you will see. I took several pictures of both the inside and outside, but I don’t even want to ruin it for you by posting them all because it is so lovely you will want to see it for yourself. It is a great way to quiet your mind from all the hustle and bustle of the city and take a few minutes for yourself.

We headed off to see some iconic sights like Radio City Music Hall, NBC Studios, and Times Square. We visited the M&M Store which is so cheesy and touristy but I will not lie…I loved it! There is just so much to look at and see, your eyes can barely take it all in. Just walking around the city blocks around the mid-town/Times Square area is a great way to start the trip because you will see all of those things you have always only seen in the movies and on TV.

We headed back to the hotel, exhausted already, but energized by the fact that we had a fun night ahead planned. After getting ready, we met our friends down in the lobby and headed off to dinner. It was so fun for the girls to be dressed up and heading out for a night of fun in New York City, and it was fun for the moms too!

We headed out to a really good, cozy restaurant near the hotel called The Distillery. We made reservations ahead of time, knowing that we had theater tickets and not a lot of time to wait, and we were happy we did since at only 5:30, the restaurant was already buzzing. The menu was small, but looked really good and the atmosphere was warm and inviting. The staff was friendly and we were all really happy with our meals. My daughter got a Bruschetta Pasta dish that she loved, and I had this lemon chicken skillet dinner that was really amazing. I would definitely go back to visit this restaurant again, and it was really close to our hotel so it was only a quick walk.

We were excited to head over to The Gershwin Theater next for the highlight of our first day in New York. Tickets to see Wicked! We surprised the girls with this by buying tickets from home ahead of time. They had both wanted to see this play for a really long time. It did not disappoint! Not only was it a great play, but there were two actors from Disney shows that they both used to watch starring in the show, so it contributed to even more excitement! The show was amazing and we were so happy we were able to see it on Broadway!

TIP: If possible get tickets on the Balcony level in front…we had the most amazing view of the play and the tickets were much cheaper than on the main floor!

We were ready to drop into bed at this point, but we were so excited to go to Times Square at night that we had to head over. It was absolutely amazing. Seeing it all lit up in all its glory with people bustling everywhere even though it was close to 11pm on a Wednesday night was more than we could have ever dreamed. We definitely finished the night off right, and made our way back to the hotel to get some sleep before we started our next adventure in the morning.

Check out Part Two for more fun ideas for a Mother Daughter Trip to NYC!

Heather

Leave a Comment

Cookies & Bars Desserts Fall Thanksgiving

Caramel Apple Pie Bars

Do you love apple pie, but just don’t feel like going to all that trouble? These delicious bars will give you all of that buttery crust and sweet apple pie filling goodness, without all the work. We have made these several times, and every time they just get better and better. The topping is good on its own, but the salted caramel drizzled on top at the end really brings them over the top. Make a pan of these for your holiday gathering (or just to munch on after the kids go to bed) and you may never need a real apple pie again!

Save Print
Caramel Apple Pie Bars
Author: Heather
Recipe type: Bars
Cuisine: Dessert
 
These buttery sweet dessert bars will cure your craving for apple pie in no time!
Ingredients
  • BUTTERY SHORTBREAD CRUST
  • 1 cup butter, melted
  • ½ cup sugar
  • 2 tsp vanilla extract
  • ½ tsp salt
  • 2 cups all-purpose flour
  • APPLE FILLING
  • 4 large apples, peeled and thinly sliced (I usually use granny smith, honeycrisp, or pink lady apples)
  • 4 tbsp flour
  • 4 tbsp sugar
  • 2 tsp ground cinnamon
  • 1 tsp ground nutmeg
  • STREUSEL TOPPING
  • 1 cup oats
  • ⅔ cups dark brown sugar
  • ½ tsp ground cinnamon
  • ½ cup flour
  • ½ cup butter, cold and cubed
  • Caramel topping, store bought or homemade, optional
Instructions
  1. Preheat the oven to 300°F .
  2. Prepare a 13x9 inch pan with parchment paper with some left to hang over the sides
  3. For the crust, Gently stir the melted butter, sugar, vanilla, and salt together in a medium bowl.
  4. Add the flour and stir until everything is combined.
  5. Press the mixture evenly into the prepared baking pan.
  6. Bake for 15 minutes while you make the filling and the streusel topping.
  7. To make the apple filling, toss the sliced apples, flour, sugar, cinnamon, and nutmeg together in a large bowl until all of the apples are evenly coated.
  8. In a separate bowl, make the streusel by whisking the oats, brown sugar, cinnamon, and flour together.
  9. Cut in the chilled butter with your hands until the mixture resembles coarse crumbs.
  10. Remove the crust from the oven, and turn the oven up to 350°F.
  11. Evenly layer the apples on top of the warm crust.
  12. Press down gently on the crust.
  13. Sprinkle the apple layer with streusel.
  14. Bake for 30–35 minutes or until the streusel is golden brown.
  15. Remove from the oven and allow to cool for at least 20 minutes
  16. Before serving, drizzle caramel on top.
  17. Slice into squares and serve.
3.5.3251

Heather

Leave a Comment

Main Dishes Pasta

Sausage and Spinach Stuffed Shells

I love stuffed shells. It probably stems from when I was a young girl, and for Christmas, my mom would pull out all the stops and make the most wonderful Italian Christmas Dinner. Stuffed shells was the main event, and it was worth the wait. Delicious tender pasta shells stuffed with seasoned ricotta and draped in her homemade marinara and smothered with mozzarella cheese. They were the most delicious things!

When I began cooking for myself, I made them once on a weeknight, and I realized why my mom saved them for a special occasion. They were a lot of work! Cooking the shells, letting them cool, making the filling and the sauce…it could take all day. But they were so good, it really was worth it.

I bet you are hoping that I am about to give you a shortcut right? Hoping that I am right about to let you know how to make them into a 30 minute meal while not sacrificing any of the delicious flavor? Well…

Yeah, sorry. Not happening. I wish I knew how to make them easier! But let me tell you, this version that I have here for you makes it worth it to make for family dinner, but elegant enough for a holiday dinner with all of your family to enjoy. There are a FEW shortcuts that you can take that might cut off a little time though…buying store bought sauce, or pre-making your sauce and your filling the day before. Cooking pasta and stuffing the shells won’t seem to take that long if you already have the filling and sauce made. However you decide to make them, one thing is for sure…you will love them!

Save Print
Sausage and Spinach Stuffed Shells
Author: Heather
Recipe type: Pasta
Cuisine: Main Dish
Cook time:  1 hour
Total time:  1 hour
 
Delicately stuffed shells, topped with sauce and lots of mozzarella cheese!
Ingredients
  • *1 box of Jumbo Shell Pasta, cooked, drained, and cooled on parchment paper (to prevent sticking)
  • *4 cups of your favorite Marinara sauce (check below recipe for link to my marinara sauce)
  • 16 oz. Ricotta Cheese part-skim
  • *1 lb. bulk Italian sausage, sauteed and cooked through, and drained
  • 1 cup of frozen chopped spinach, thawed, with all the water squeezed out
  • 2 eggs
  • ½ cup parmesan cheese, grated
  • 2 tsp Italian Seasoning
  • 1 tsp garlic powder
  • ½ tsp salt
  • ½ tsp pepper
  • 2 cups shredded mozzarella cheese or 16 oz or fresh mozzarella, sliced (or more!)
Instructions
  1. Preheat oven to 350 degrees
  2. In a 13x9 inch baking pan, spread about 1 cup of marinara sauce on the bottom
  3. In a medium sized bowl, mix together ricotta, eggs, parmesan cheese, italian seasoning, garlic powder, salt and pepper
  4. Fold in spinach and italian sausage
  5. Spoon about 2 tbsp ricotta mixture into each cooked, cooled shell
  6. Place filled shell into pan
  7. Continue filling each shell until mixture and shells are gone
  8. Pour remaining 3 cups of marinara sauce on top
  9. Sprinkle mozzarella cheese on top of sauce
  10. Cover with foil, and bake for 45 minutes
  11. Uncover, bake for 15 minutes
  12. Remove from oven and serve with extra sauce and extra parmesan cheese.
  13. *NOTES: When cooking pasta, follow package directions, but undercook by 2-3 minutes to prevent mushy pasta when it bakes. As for the marinara sauce, use your own recipe, the recipe that can be found here on girl and her kitchen, or a jarred version. It honestly is a forgiving recipe and any of your favorite sauces will do! For the sausage, buying it bulk is best instead of having to pull the casing off. If you have bought the sausage with casing, and dont want to pull it off, go ahead and just slice the cooked sausage thin to mix into the ricotta. Make sure you cook the sausage thoroughly before placing in ricotta because the baking time does not allow for the sausage to be fully cooked. Enjoy!
3.5.3251

Link for Girl and Her Kitchen Fresh Tomato Sauce HERE!

Heather

Leave a Comment

  • « Previous Page
  • 1
  • 2
  • 3
  • 4
  • …
  • 38
  • Next Page »

Heather

I am a midwestern girl who grew up in the big city, but now enjoys her days as a stay at home mom in the suburbs. Who says spending time in the kitchen has to be boring? I hope to inspire your family kitchen with some new ideas, fun recipes and great tips.

Stay Up to Date

Get all the latest tasty goodness straight to your inbox!

Girl and her Kitchen

Join us!

Hey! I am the GIRL in the kitchen and I am so glad you decided to visit. Love to cook and eat? You will find some great recipes on this site, whether you are looking to eat healthy, splurge on a dessert, make dinner or host a party-I have it all! Sometimes I’ll give you a story along with my recipe, other times, I want to take you straight to the food!  Whatever the reason that you decided to visit, I am so glad you joined me in the kitchen! Feel free to take a look around the site, and please…stay awhile!

Archives

Popular Categories

  • Appetizers
  • Breakfast
  • Crafts
  • Salads and Dressings
  • Side Dishes
  • Vegetables and Fruit

Most Popular Posts

Corner Bakery Cafe Giveaway!

Corner Bakery Cafe Giveaway!

Filed Under: Reviews

Bacon Cheddar Skillet Cornbread

Bacon Cheddar Skillet Cornbread

Filed Under: Breads, Quick Breads and Rolls, Side Dishes

Puffy Pancakes {Perfect for Valentine’s Day!}

Puffy Pancakes {Perfect for Valentine’s Day!}

Filed Under: Breakfast, Valentine's Day

100 Days of Real Food Cookbook Review {and Giveaway!}

100 Days of Real Food Cookbook Review {and Giveaway!}

Filed Under: Vegetarian

Copyright © 2026 · Divine theme by Restored 316