• Email
    • Facebook
    • Instagram
    • Pinterest
    • Twitter

Girl and Her Kitchen

Plan. Make. Eat. Design. Craft. Create. Celebrate. Life.

  • Home
  • About the Girl
  • Recipe Index
  • We LOVE
  • Weekly Menu

Beverages Fourth of July

Strawberry Lemonade

Strawberry Lemonade

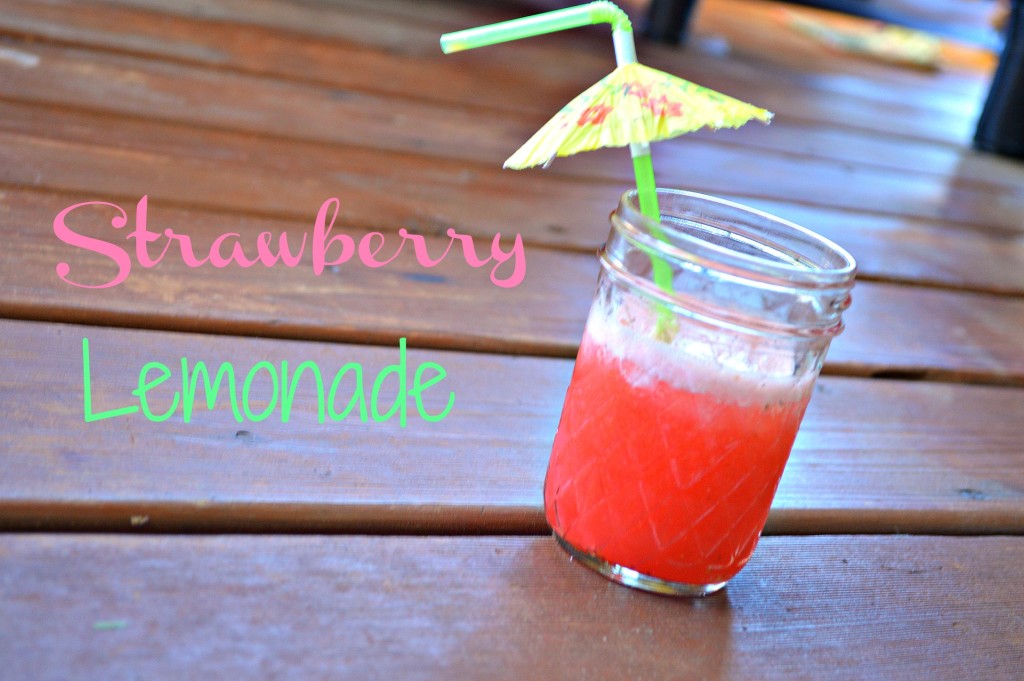
As the weather (hopefully) gets warmer, there is nothing better on a hot day than a cold drink!

Well, maybe something better would be a recipe that your kids can pretty much prep by themselves and enjoy. Yep-this one covers that!

Is this a drink that you can add a little splash of an adult beverage to as well? Yes you can!

This drink is so easy to make, and so refreshing, you might want to keep a pitcher of it on hand at all times.

This recipe is featured today on Little Lake County. Check it out for something refreshing to drink to make for your next party, when the kids are over and ready for a cool down, or for a rare moment that you can take a break and enjoy the summer!

Cheers!

{Click the red ^^^ to get the recipe!}

Heather

Leave a Comment

Breakfast Muffins & Scones

Flourless Chocolate Peanut Butter Mini Muffins {Easiest Muffins Ever!}

These muffins are like little bites of chocolate heaven! This is coming from someone who really does not like mini muffins.

I know? Weird right? I LOVE muffins. The real kind. Big, fluffy, hearty muffins.

I just really cannot stand mini muffins though. They are just so small!

One bite. Done. That is just not gonna do it for me. I need more.

I desperately need more than one bite.

But these muffins! These muffins are different. That one (maybe two) bite(s) are so rich and delicious that it is more than enough when you are done. I really did not need more than one muffin.

That is not to say I didn’t want another muffin. I always want another muffin.

The best part? These taste like the most decadent dessert, but actually have no flour or refined sugar. You may be a convert to mini muffins after trying these too. You may never have to bake a full sized muffin again.

Basically what I am telling you is that if you want that second mini muffin, go for it!

Chocolate Peanut Butter Mini Muffins

1 large over ripe banana, mashed
1 egg
1/2 cup natural peanut butter
1/3 cup unsweetened cocoa powder
1/4 cup honey
1 tbsp vanilla extract
1/2 tsp baking soda
pinch of salt
1/2 cup dark chocolate chips

Preheat oven to 400 degrees. In a food processor, add banana, egg, peanut butter and cocoa powder. Pulse. Add honey, vanilla, baking soda and salt. Pulse until smooth, about 30 seconds. Take out blade. Fold in chocolate chips. Using a tablespoon or cookie scoop, scoop into mini muffin pan lined with liners or lightly sprayed. Bake for 10-12 minutes or until set. Let cool completely, at least 30 minutes before removing from pan. These are very delicate! Enjoy immediately, or place in a tightly sealed container for 1 day on the counter, 3 days in the refrigerator or freeze for up to one month. Makes 15 muffins.

Take a bite!


Heather

Leave a Comment

Breakfast

Overnight French Toast with Coconut Syrup

french toast 2IMG_0777
Look at THIS.
This is a fabulous recipe for you Moms out there wanting something wonderful for your Mother’s Day breakfast.  After all, you deserve something wonderful (and still easy for the Hubby to make). The richness from the maple syrup and cream cheese along with the AMAZING Coconut Syrup will leave you feeling like a queen! So ladies, pass this along to your husband, or in my case, prepare it the night before and give him the baking instructions for the morning, and enjoy the deliciousness as you celebrate how WONDERFUL you are!!!

**Becca, one of our fellow writers here on Girl and Her Kitchen, loves to add blueberries right before baking.  I enjoy serving some mixed berries on the side.  You can also follow the directions and make these into Heather’s fun  French Toast Muffins .

Overnight French Toast with Coconut Syrup

1 loaf of french bread ( cut or torn into small bite sized pieces)
8-10 ounces cream cheese (chunks)
1 dozen eggs
1 1/2 cups milk
1/2 cup “real” maple syrup (no Aunt Jemima for this meal)

Directions
1. Grease a 9×13 pan (I really like the way aluminum pans bake evenly, but use what you have)
2. Layer french toast bites and small chunks of cream cheese (you are trying to make sure the cream cheese is evenly distributed)
french toast 5
3. Beat eggs, milk, and  maple syrup together in a bowl. Pour over the bread and cheese.
4. Cover and refrigerate overnight
5. Bake at 350 degrees for 30-40 minutes uncovered, top with drizzled coconut syrup

Coconut Syrup
1 cup butter (real butter)
2 cups sugar
1 cup buttermilk
1 tsp baking soda
1 tsp coconut extract

Place butter, sugar, and buttermilk in a small sauce pan and bring to a boil over medium heat. Once it is boiling remove it from heat and add baking soda and coconut extract. (It will bubble up a little, don’t be alarmed, it’s just the baking soda working) Serve warm
frenh toast 3french toast 4
*Remember to remove from heat before adding the baking soda and extract*
* This can be stored in the refrigerator in an airtight container for many weeks*
frenchtoast 1IMG_0781

 ENJOY!
What is your favorite Syrup Flavor?

Heather

2 Comments

Beef

Classic Enchiladas {and a bonus recipe for Homemade Enchilada Sauce!}

Cinco de Mayo is simply an excuse for me to eat a lot of chips and guacamole.

Like a lot of guacamole. I made two different kinds and just want to sit there with a spoon and eat it.

But, I didn’t okay? Before you get all judgy about it, I actually didn’t do it. I just wanted to. There’s a difference.

I did, however, make the best enchiladas ever! You know I love enchiladas. I have shared some recipes with you before. These shrimp enchiladas are making my mouth water right now, and this  honey lime enchilada recipe is so flavorful…yum!

This is not a new recipe. My mom has been rocking this enchilada recipe since I was a little girl and it has always been one of my favorites! It is simple and delicious and a perfect meal to make to go with all that guacamole that I want to eat.

This was that recipe when I knew my mom was making it, I made sure to be available for dinner. My friend Tina would often make herself available for dinner too. Funny enough, my mom used to keep a schedule of the meals she was going to make for the week in the kitchen desk drawer (yes, I do that now too) and I would call Tina and let her know: Enchiladas were on the schedule. She would immediately schedule herself over to enjoy them with me.

Life was pretty easy back then. I mean, life was scheduling ourselves around enchiladas. Wow.

I made these not too long ago for one of my brothers who then told my mom that I make the best enchiladas and that she needs to get my recipe. Funny since as you could guess from my story above, it is her recipe. Mothers never seem to get the credit they deserve. Really.

These are a perfect make ahead recipe too for those busy nights. Easy enough to throw all together and then put in the fridge until you are ready to bake.

I make my own enchilada sauce and have included the recipe for you, but feel free to just use canned in a pinch. Whatever is easiest for you!

Serve with chips, guac and a salad, and you have a perfect meal for any day of the year!

Save Print
Classic Enchiladas {and a bonus recipe for Homemade Enchilada Sauce!}
Author: Heather
Recipe type: Casserole
Cuisine: Dinner
 
This cheesy homemade meal will have you feeling like you are going out for dinner at a great Mexican restaurant. The homemade enchilada sauce recipe is optional....but so good and really easy!
Ingredients
  • 12 corn or flour tortillas*
  • 2 tsp canola oil
  • ¼ cup onion, diced
  • 2 garlic cloves, minced
  • 2 lbs lean ground turkey or beef, you can also use chicken by dicing 4 chicken breasts
  • 1 batch homemade enchilada sauce**, or 2 14.5 oz cans of red enchilada sauce
  • ½ cup sliced green onions, more for garnish
  • 3 cups shredded cheddar cheese
  • sour cream, guacamole, salsa, sliced olives, sliced green onions for serving
  • **Homemade Enchilada Sauce
  • 2 tbsp canola oil
  • 2 tbsp flour
  • 2 tbsp chili powder
  • 2 cups cold water
  • 3 oz tomato paste
  • ½ tsp cumin
  • ½ tsp garlic powder
  • 1 tsp salt
  • cayenne pepper, optional for a kick
Instructions
  1. *My mom would fry each tortilla individually until it puffed up. This helped the enchiladas stay really crispy and delicious, but it is a lot of work! I do it only if I have a lot of time. It is a definite must try, but the enchiladas are delicious without doing that as well! The extra step just brings them over the top good!
  2. ** Homemade Enchilada Sauce is so good and so worth the extra ten minutes it takes to make it!
  3. Directions for Enchilada Sauce:
  4. In a small saucepan, heat oil, flour and chili powder to create a roux.
  5. Cook for two minutes as it gets thick and fragrant.
  6. Add water and whisk until smooth.
  7. Heat for 3 minutes.
  8. Whisk in tomato paste, spices and salt.
  9. Whisk until smooth and cook for 10 minutes over low heat until smooth and thick.
  10. Remove from heat and it is ready to serve.
  11. Enchilada Recipe:
  12. Preheat oven to 350 degrees.
  13. Spray a 13x9 baking pan with cooking spray to prevent the tortillas from sticking.
  14. In a large pan, heat canola oil.
  15. Add onion and garlic and cook for 1 minute.
  16. Add ground beef or turkey or chicken and cook until browned.
  17. Add 1¼ cup enchilada sauce and green onions and lower heat to a simmer.
  18. Cook for 8 minutes.
  19. Remove meat from the heat and begin assembling enchiladas.
  20. Take one tortilla, add about two tbsp meat mixture, and sprinkle with 1-2 tbsp shredded cheese. Fold and tuck into pan with folded side down.
  21. Repeat using all of the tortillas and arrange into the pan.
  22. Pour remaining enchilada sauce over the top and sprinkle with the rest of the cheddar cheese.
  23. If you are saving to bake later, this is when you would cover with foil and put into the fridge.
  24. If you are baking now, bake for 30 minutes, covered with foil.
  25. Remove foil and bake for another 10 minutes.
  26. When done baking, garnish with green onions and olives.
  27. If you are removing from the fridge to bake, bake for 45 minutes covered
  28. Then remove foil and bake for an additional 15 minutes.
  29. Remove from oven and top with sour cream, salsa and guacamole if desired.
3.5.3251


Heather

Leave a Comment

Beef

Quick and Easy Taco Skillet

As the spring sports season begins to kick into high gear, we typically begin the strangest dinner schedule for about 2-3 months! What does this mean? It means that we are usually eating dinner around 4 pm, or after 7pm when we all get home. With three young kids, it is hard to juggle a good, wholesome meal, and three different places that three different children all need to be.

Prep and planning is the key to success, I have learned. Also just as important? An arsenal of meals that can be whipped up fast, with simple ingredients, and preferably, not a lot of dishes to wash when we are done!

One skillet meals are literally my best friend during this time of year. I heart them so much I could make them everyday! Super simple, and only one pan to clean! (Is it obvious I HATE washing dishes??)

This particular one is a family favorite. My kids seem to favor anything Tex Mex and this definitely fits the bill. This is my gift to you all-helping make nights of crazy activities go a little more smoothly!

Quick and Easy Taco Skillet

1 tbsp. olive oil
1 red pepper, diced
1 yellow pepper, diced
1 orange pepper, diced
1 small onion, diced
2 garlic cloves, thinly sliced
1 lb. extra lean ground beef or ground turkey
1 packet taco mix or 2 tbsp of your own spice mix
3/4 cup water
2 cups frozen corn, thawed
1  cup black beans, drained
2 cups cheddar cheese
tortilla chips, sour cream, salsa, guacamole-for serving

Preheat oven to 350 degrees. In a large skillet, heat olive oil. Add peppers, onions and garlic and sauté until golden brown. Remove from pan and keep warm on a plate. Add ground beef to pan and cook until browned. Drain any fat left in pan. Add water and sprinkle in taco seasoning. Cook for 2 minutes. Spread evenly on the bottom of the pan. Add corn layer and then bean layer on top of the corn. Spoon peppers evenly over beans. Sprinkle with cheese. Bake for 15-20 minutes until everything is hot and bubbly. Serve hot with sour cream, guacamole, salsa and tortilla chips.

What is your favorite quick and easy meal?
Let me know in the comments below!


Heather

Leave a Comment

Side Dishes Vegetables and Fruit Vegetarian

Zucchini “Parmesan”

Zucchini…I love love love it. Did you see how many “loves” I wrote there?

It is my favorite vegetable. I love it grilled, oven roasted, sautéed…well you get the picture.

Growing up, my mom mostly cooked Italian food, or Italian inspired food. This was because she was Italian and she learned from my grandfather. My grandfather was a wonderful cook, and in turn, so was my mother.  This was one of my mom’s recipes…but you never know. It could have been my grandfather’s that she adapted to her own! Either way, it is one of my favorites.

She called it Zucchini Parmesan, but it does not resemble what most would consider zucchini parmesan.  This is a great recipe that can be served as a main dish ( I would double it if it is the main dish) or as a side dish with some delicious grilled steak, chicken or fish. Over the years my mother experimented with different versions of this recipe. Some were successful, and others…not so much.

If you love eggplant, give that a try instead of zucchini. If you want to do without the breadcrumbs, just dredging the zucchini (or eggplant) in just flour and then sauteing also works well.  I have to say though, the bread crumbs bring it over the top though. This is a simple dish that gives you a lot in return.

Play with it a little, try other veggies, or make it as is! Enjoy!

Zucchini Parmesan
1 1/2 lbs of zucchini
1/2 cup of seasoned bread crumbs
1-2 eggs beaten
2 -3 plum tomatoes sliced
1 cup of sour cream
1/2 cup  freshly grated Parmesan cheese
1 1/2 tsp of dried oregano
1/4 tsp ground black pepper
1  tsp of salt
1/4 cup of olive oil

Preheat oven to 350 F. Lightly grease 8 x 8 inch square baking dish. Cut zucchini into rounds. Dip zucchini into egg and then the breadcrumbs. Repeat with all zucchini. Next heat oil in a skillet. Sauté zucchini in skillet until golden brown. Cover bottom of baking dish with zucchini. Next top with tomato slices. In a bowl, combine sour cream, salt, oregano and pepper. Spread evenly over the tomato slices. Then sprinkle with grated cheese. Bake 30-35 minutes or until cheese is melted. and zucchini is tender.

Heather

Leave a Comment

Breakfast Easter

Easy Mushroom Frittata {+ some other Easter Brunch Recipes!}

mushroom fritata

Mushrooms are my favorite!
I just love them, so, needless to say, I take every opportunity I can to sneak them into whatever I make. Sneak is the key word, because unfortunately, everyone is this house is not as big of a fan as I. This easy mushroom frittata was delicious and, as the name implies, easy! It was a cinch  to whip this one up along with another frittata that would delight my most pickiest eaters. The mushroom lovers of this house loved this delicate egg dish, filled with mushrooms and topped with a layer of freshly grated parmesan cheese. 
Perfect for Easter Brunch. Perfect for breakfast anytime. 
Want the recipe? Check out my Kids in the Kitchen with Girl and Her Kitchen post on Little Lake County this month. I will provide the recipe, step by step instructions, more pictures and a few delicious variations of this frittata. You don’t want to miss it!
Looking for other brunch recipes? Look no further! Check out these from previous postings we have done. Click on the name of the recipe to be taken right to the page with instructions! Delicious!
(Warning: Some pictures are from my very early blogging days and are hard on the eyes! Proceed with caution and forget you ever saw those photos! Only concentrate on the delicious recipes you will create from them. Banish the photos from your brain! )
Strawberry Rhubarb Baked Oatmeal
Puffy Pancakes
Quinoa Granola Bars

Quinoa Granola Bars

Asparagus and Artichoke Mini Quiche

Blueberry Corn Muffins
Honey Lime Fruit Salad

Egg and Potato Cups
Italian Egg Casserole
Whole Wheat Banana Breakfast Bread
Looking for more? Just check out my recipe index and search under “Breakfast and Brunch” and the “Easter” heading. You will find a ton of delicious recipes perfect for any holiday gathering! 
Enjoy!

Heather

Leave a Comment

Appetizers Breakfast Snacks

Sweet and Savory Bacon

Sweet and savory bacon
So…we are going to talk about bacon.

THIS bacon here.

This bacon might be the best thing you have ever eaten. I am not kidding. I was unsure at first because, I mean, how can bacon be any better than…well…bacon?

This really is. The flavor is out of this world. It is just a little jazzed up recipe to grace your brunch or breakfast table and is perfect to add a little zing to something ordinary.

I can hardly call bacon ordinary, but you get what I am trying to say.

Warning: Do not make too much of this because you might want to eat it all. Eating whole packages of bacon is sometimes frowned upon.

I am just saying.

Sweet and Savory Bacon

1/4 cup brown sugar
1 tsp chili powder
1 tsp smoked paprika (regular paprika in a pinch)
1 lb package of bacon

Cover a baking sheet with foil and place a cooling rack on top. On a plate, toss together brown sugar, chili pepper and paprika. Dredge each bacon slice in the spice mixture and place each slice carefully on the baking rack. Bake for 20 minutes until bacon is cooked through. Take pan out of the oven and let sit for five minutes. Transfer to a serving plate and enjoy.

Want more bacon? Have you tried this Pig Candy recipe guest posted by my uncle a few years ago?

Oh man. You NEED to try this. 

Enjoy!

Heather

Leave a Comment

Breakfast Muffins & Scones

French Toast Muffins

french toast muffins

The other day, we were talking brunch.

You know? Don’t you all do that with your kids? Sit around and talk…brunch?
My kids love talking about food. They are SO my children. They love to decide to make something. They love to work on it. They love to finish the recipe and look at it. They love to eat a little and then…
Well, that’s when they go back to being kids. They eat a little, and then run off and do something more kid normal, like playing or reading, or getting in a fight with their sibling. You know. Normal.
Anyways, the other day when we were talking brunch, my oldest brought up something ingenious. She thought it would be cool if all of our favorite breakfast foods could be a…wait for it…a muffin!
They are SO my kids. Have I shared my muffin obsession with you all before. I am sure I have a hundred few times.
So, she got us to thinking…waffle muffins, egg and bacon muffins, french toast muffins.
Wait a second…french toast MUFFINS?
We started brainstorming. Flour, eggs, cinnamon, vanilla, A LOT of vanilla when my younger daughter piped in.
“Why are you baking an actual muffin when you could make just little muffin shaped french toasts?” she asked, basically changing our life. SERIOUSLY.
My eldest and I looked at each other as if she just figured out world peace. I mean, her idea was ingenious.
We got to work and voila! Our muffins were fantastic! They tasted soooo good and were so fun to eat! We hope you enjoy this little brainchild of our little family brunch discussion. We know we did!
French Toast Muffins
Makes 12 muffins
10 cups cubed bread (we used challah, but feel free to use your favorite kind)
6 large eggs
3/4 cup milk or almond milk (or half and half if you are feeling really decadent!)
1/4  cup dark brown sugar
2 1/2 tsp cinnamon
1 tbsp vanilla
2 tbsp butter, softened
butter for muffin pan or non-stick spray
syrup, for serving, optional
In a large bowl, mix together eggs, milk, brown sugar, cinnamon, and vanilla. Add the bread cubes and toss until coated. Let sit for ten minutes so the bread can soak up all of the egg mixture. Meanwhile, generously spray or butter the cups in the muffin pan.  Make sure you do this well or the muffins will stick. DO NOT use muffin liners, as the french toasts will stick. Once the bread has soaked, layer the bread in the muffin cup. Do not press together, just lay the bread on top of each other just to the top of the cavity. Dot the tops with butter. Bake at 350 degrees for 25 minutes or until the muffins are golden. Remove from pan and drizzle with syrup.

Heather

Leave a Comment

Appetizers Easter

Perfectly Simple Egg Salad {+ a bonus recipe-How to Boil the Perfect Egg!}

It is almost Easter and time to decorate those Easter eggs. I don’t know about your kids, but mine require at least a dozen eggs each to color.  And who am I kidding I love to decorate them too! But who is going to eat 2-3 dozen hard boiled eggs? Not me…

Well, here is my idea…. egg salad. Yep. It sounds simple-but that is the point. A simply delicious venue for all of those beautifully colored eggs.

Listen-it is absolutely delicious and you can serve it for just about anything, even as an appetizer or snack.

Every Easter Sunday we go to my Aunt Mary’s house. She makes the best egg salad and serves it as an appetizer, it is truly so delicious and the best part?  It is super easy. I am lucky enough to have the recipe (thanks Aunt Mary!).

Hosting Easter or need something to bring to your gathering somewhere else? Give this a try. Or, save it all for yourself and make the perfect egg salad sandwich to enjoy.

It is your lucky day, because I am actually giving you two recipes in one here. The first one will come in handy this time of year while you are boiling zillions of eggs to decorate. The second is for that egg salad I have been talking to you so much about (see above if you forgot!).

This first one here is my recipe for the perfect hard boiled egg. Not a spec of green in sight. The green around the yolk is ok to eat, I just prefer it not be there.

Enjoy!

Directions for Perfect Hard Boiled Eggs

Place eggs in pot and cover eggs with cold water. Place the lid on the pot, put in stove and bring to a boil. Once the water comes to a boil, remove pot from heat and let the eggs sit covered for 10 minutes. Once the 10 minutes are over, drain the eggs and run them under cold water until cool enough to handle. At this point you can eat the eggs, use them for your recipe or put them in the fridge. You should use these eggs within 5 days.

Egg Salad Recipe

6 hard boiled eggs
3-4 tablespoons of mayo
2 tablespoons of minced onion ( I usually do this in a food processor)
1 tablespoon of minced celery (in food processor)
1/4 teaspoon of freshly ground black pepper
1/4 teaspoon of salt

Directions
First chop hard boiled eggs. Then mix in the rest of the ingredients.
If you would like a smoother egg salad, just mash up the eggs instead of chopping.
Serve with small pieces of toast or crackers.  This recipe serves about 4 people as an appetizer.

Happy Easter!


Heather

2 Comments

  • « Previous Page
  • 1
  • …
  • 9
  • 10
  • 11
  • 12
  • 13
  • …
  • 38
  • Next Page »

Heather

I am a midwestern girl who grew up in the big city, but now enjoys her days as a stay at home mom in the suburbs. Who says spending time in the kitchen has to be boring? I hope to inspire your family kitchen with some new ideas, fun recipes and great tips.

Stay Up to Date

Get all the latest tasty goodness straight to your inbox!

Girl and her Kitchen

Join us!

Hey! I am the GIRL in the kitchen and I am so glad you decided to visit. Love to cook and eat? You will find some great recipes on this site, whether you are looking to eat healthy, splurge on a dessert, make dinner or host a party-I have it all! Sometimes I’ll give you a story along with my recipe, other times, I want to take you straight to the food!  Whatever the reason that you decided to visit, I am so glad you joined me in the kitchen! Feel free to take a look around the site, and please…stay awhile!

Archives

Popular Categories

  • Appetizers
  • Breakfast
  • Crafts
  • Salads and Dressings
  • Side Dishes
  • Vegetables and Fruit

Most Popular Posts

Corner Bakery Cafe Giveaway!

Corner Bakery Cafe Giveaway!

Filed Under: Reviews

Bacon Cheddar Skillet Cornbread

Bacon Cheddar Skillet Cornbread

Filed Under: Breads, Quick Breads and Rolls, Side Dishes

Puffy Pancakes {Perfect for Valentine’s Day!}

Puffy Pancakes {Perfect for Valentine’s Day!}

Filed Under: Breakfast, Valentine's Day

100 Days of Real Food Cookbook Review {and Giveaway!}

100 Days of Real Food Cookbook Review {and Giveaway!}

Filed Under: Vegetarian

Copyright © 2026 · Divine theme by Restored 316