• Email
    • Facebook
    • Instagram
    • Pinterest
    • Twitter

Girl and Her Kitchen

Plan. Make. Eat. Design. Craft. Create. Celebrate. Life.

  • Home
  • About the Girl
  • Recipe Index
  • We LOVE
  • Weekly Menu

Soups & Stews

Tortilla Soup

In the winter, there is nothing better than a pot of warm soup. I love the warmth and comfort of it. One of the other things I love is that one pot of soup usually means about three meals for my family!

Easy dinner week!

Score.

I especially love soups that have some depth to them…i.e. soups you can put toppings on!

Let’s be honest. I love anything you can put toppings on. The more the better!

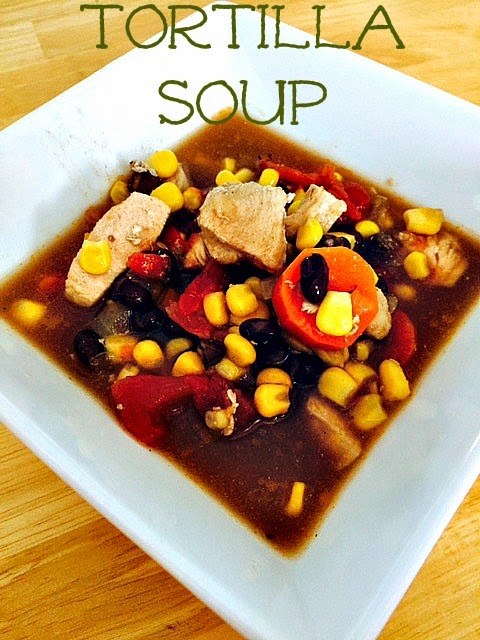
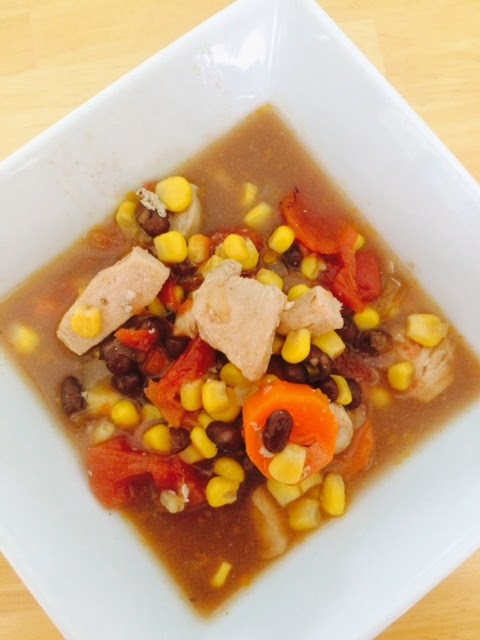
This soup is perfect for that. It is hearty filled with a ton of delicious ingredients, but the fun is topping it with avocado, cheese, sour cream and crumbled chips. Can you think of anything else? Throw it on!

This is probably not your traditional tortilla soup. What can I say, I am a soup rebel. I like things the way I like them and that’s that.

What I am saying is if you are looking for a real tortilla soup-this is probably not the place. If you are looking for a delicious soup that I call tortilla soup-welcome!

*Note-to kick up the spice-add 1/2 tsp cayenne pepper when adding the spices. I withheld that since my kids don’t do spicy but they all went back for seconds so rest assured this is a kid friendly soup!

Tortilla Soup

3 tbsp olive oil, divided
3 boneless, skinless chicken breasts, cubed
1 cup onion, finely diced
3 garlic cloves
5 large carrots, peeled and thinly sliced
5 cups chicken broth
1 can, 32 oz, diced tomatoes, undrained
2 tsp chili powder
2 tsp cumin
1 tsp garlic powder
2 tsp salt
1/2 tsp ground pepper
2 cups frozen corn, thawed
1 can, 16 oz black beans, drained

Toppings (optional): Avocado, salsa, shredded cheddar, sour cream, a lot of tortilla chips!

Heat 1 1/2 tsp olive oil in a large pot. Add diced chicken and cook about 2-3 minutes on each side until browned and cooked through. Remove from pot and onto a plate. Keep warm. Add remaining olive oil. Add onion, garlic and carrots. Cook for 3-4 minutes until lightly browned. Add chicken broth, tomatoes and spices. Bring to a boil, reduce heat and simmer for 10 minutes. Add corn and black beans. Cook until heated through, about 6-8 minutes. Serve with as many toppings as you can fit into your bowl!

Heather

Leave a Comment

Appetizers Snacks

Goat or Feta Cheese + Pesto + Sun Dried Tomato Dip

Feta dip 2

In need of a super quick appetizer to bring to your super bowl party? Look no further! This one takes pretty much no time at all to prepare but looks beautiful and tastes delicious! Whip it up quickly and serve with crackers, veggies, pita triangles or tortilla chips. This one is a great choice when you need an appetizer in a pinch. I don’t even have amounts in the recipe, because this recipe is so forgiving, you can just buy what you need based on the size dish you want to serve this in. I make my pesto homemade sometimes, but this recipe is completely perfect with store bought pesto as well! You will impress everyone and it will be our little secret that it was the easiest recipe you have ever put together! 
Feta + Pesto + Sun Dried Tomato Dip

Feta or Goat Cheese 
Pesto
Sun Dried Tomatoes
Salt
Italian Seasoning

Spread goat or feta cheese in a pretty serving dish. Sprinkle with about a teaspoon of salt and about two teaspoons of italian seasoning. Top with pesto and sprinkle sun dried tomatoes on top. Refrigerate until ready to serve and let it come to room temperature before serving,  or serve immediately.Serve with crackers, veggies or your choice of dipper.

Heather

Leave a Comment

Beef Soups & Stews

Beef Barley Soup


It is January, and in the Chicagoland area that means it’s COLD! I don’t know about you but when it is cold I make soup. I love soup and I am lucky, so does my family. I first made this soup when I had some beef stew meat and mushrooms. I wanted to make beef barley soup but a beef barley soup my way. So this beef barley soup was born.

I have to say this soup has more vegetables than beef but that was my intention. This soup tastes so good and it is good for you. When we are under the weather in this house, this is the go to soup. I try and make extra so I can have it in the freezer for those days.
My favorite ingredient in this soup is corn. I made it without the corn the first time and it was missing something. I thought corn, weird maybe, since I have never had a beef barley soup with corn in it. The corn adds a little crunch/pop and some sweetness. It works and it is yummy. This soup is hearty, perfect for a cold January night. Enjoy!

Beef Barley Soup
1/2-1 lb beef stew meat cut into small chunks
2 tablespoons of flour
1 6oz can of tomato paste
salt and pepper
1 large onion diced
3 large carrots chopped
8 oz. sliced mushrooms
4 cloves of garlic minced
1/8-1/4 red pepper flakes(optional)
3/4 cup of medium pearl barley (not quick cooking)
splash of red wine
10 cups of water
5 beef bouillon cubes or beef base equivalent or 10 cups of beef stock in place of water and beef      bouillon
1 cup of frozen corn
1/4 cup Italian flat leaf parsley
olive oil

Coat beef with flour, salt and pepper. Saute in dutch oven/stock pot with 1 tbsp or olive oil until browned on all sides. Remove beef from pot and set aside. Add sliced mushrooms, salt and pepper. Cook for 5 minutes then add the onions. Cook onions and mushrooms until the onions are translucent. Add the garlic and 1/8-1/4 tsp of red pepper flakes(optional) and cook for 30 seconds to 1 minute. Next add the tomato paste and a splash of red wine. Add beef back to pot and stir together. Next add the water and beef bouillon/beef base. Bring to a boil then turn down to simmer. Cover and cook for 30 minutes. After 30 minutes add the carrots and barley and cook for 1 hour.  Then add 1/4 of a cup and 1 cup of defrosted frozen corn. Cook for an additional 5 minutes until corn is heated through. Check for seasoning and add salt and pepper to taste. At the end add fresh chopped Italian flat leaf parsley stir and serve. ****Add more water or beef stock if too thick.****

Heather

Leave a Comment

Crafts

Growth Chart

I saw this awhile back and thought that it looked so fun to make! Since we have moved four times in the last five years, I haven’t been marking my children’s heights on the walls because I didn’t want to have leave the marks.  Well, now, thanks to this craft, I can mark away and just take it to our next destination.  And the best part is, it cost me under $5 to make!  About a month ago, I made about 20 of them with a bunch of friends who were giving them as gifts for Christmas.  So, even though the holidays are a distant memory at this time, this makes a great gift for any occasion, especially for a new mom!

Supplies
dog-eared fence post.  (I got mine at home depot)
base paint (I just used the light gray we used in out kitchen)
acrylic paint (I used a tiffany blue I got at Joanns with a coupon $.48)
sand paper
stecnil of some sort for numbers
tape measure
sharpie marker
ruler

Directions- Begin by painting the board.  Again, I used some leftover paint from our kitchen.  If you don’t have any you can always go to Home Depot or Lowes and buy a sample of whatever color you like.  They are around $3.

Let the paint dry.  Next, using your measuring tape and a pencil make small marks for each inch and slightly bigger for each ft.  As you can see from the picture below I started my number one 6 inches from the bottom of the board.  This allows me to mount in on the wall six inches from the ground.  That way it ends up a couple inches above my baseboards making it easier to mount.  Feel free to do what you like.  I had one friend start her number one at the bottom because her son was already 6ft and he wasn’t finished growing. 

After you have finished marking you can then go back over with a sharpie marker and a ruler if you choose.  I made my ft. marks about an inch and a half long and then every third inch a little bigger than the other inch marks.

If you have a fun stencil making machine use that, if not here is the way I did my numbers; I went on to microsoft word and using the “stencil” font I printed out numbers that were about 3 to 4 inches tall.  I then got a piece of carbon paper (office max) and put the black side down, touching the wood.  Then I took my stencil number paper and placed it on top of the carbon paper.  Using a pen I outlined the number, pulled the papers off, and ta da, a perfect number outline.  Pretty cool, huh?!  (You can use this technique on all sorts of projects)

Next grab your acrylic paint of choice and paint your numbers.  Once everything is finished to give an aged look you can use gel stain or a dark brown acrylic paint.  Put some paint on a plate and then using a scrunched up paper towel or cloth dab some paint on and then blot some off on a scrap paper and then blot it onto your wood.  Make sure to get edges and go over the numbers a little if you want to.  Every couple of blots wipe with the clean side of the paper towel or cloth.  This will help if you feel it went on too dark.  When you have finished that do a light sanding job along the sides and very slightly on the front.

Then just mount that and enjoy.  Here is another one Becca (fellow blogger) did.  The possibilities are endless.  HAPPY CRAFTING!

*Adapted from www.thepinningmama.com*

Heather

Leave a Comment

Beverages Christmas

The Very Best Hot Cocoa


I am not sure where you live, but around these parts it is COLD! Really cold! Like, close the schools cold! If you are in the same frozen boat I am in, I have a great recipe for you to share with the kids, or make for yourself. Hot, chocolatey and deliciously creamy-this is a must for these super cold days. Give it a try and tell me what you think in the comments!

This recipe can be found on Little Lake County in my Kids in the Kitchen with Girl and Her Kitchen Feature.
Enjoy!

Heather

Leave a Comment

Appetizers Snacks

Homemade Hummus

Do you like hummus?
 I love hummus. 
If you don’t like hummus than you may not have  had homemade hummus. 
I discovered hummus years ago when I was in college. There was this cart that sold falafel and hummus. Needless to say, I fell in love.  
However, after college, I was never able to find a hummus that I loved as much. So, I researched and experimented and this is the absolutely delicious result. I could not believe how easy it was. It is not what some would consider authentic, but it is delicious. I am asked for this recipe all the time. I am now so happy to share it with you. The best part of this recipe is you can customize it. Put more garlic in, leave some lemon juice out, it doesn’t matter it is a very versatile dish. Oh and by the way I haven’t found a falafel I loved as much either….stay tuned! 
Homemade Hummus
1 can of chickpeas drained (reserve liquid)
1 garlic clove  more if you like a lot of garlic
3-4 tablespoons of tahini
3-4 tablespoons of lemon juice
2 tablespoons of reserved liquid
2 tablespoons of olive oil 
1/2 teaspoon of salt 
Place all ingredients in a food processor and blend.  Blend until smooth Adjust ingredients to taste.
It is that easy, really! Serve with pita bread and veggies of your choice. For presentation purposes I drizzle with olive oil and sprinkle with paprika (as shown in the pictures). Enjoy!

Heather

Leave a Comment

Uncategorized

Happy Everything!

From the bottom of my heart I thank you all for being fans of our tiny little blog that has grown so much this past year! I was lucky enough to bring on three new writers who love to cook and share – just like me. This past year has been filled with unbelievable blessings and I am looking forward to a 2015 filled with love, happiness and plenty of delicious recipes and fun crafts to share with all of you!

Without all of your support, Girl and Her Kitchen wouldn’t be here. We love all of your faces (even though we can’t see you!) and your support is truly what keeps us going. Keep sharing Girl and Her Kitchen and spreading the word about us! We are so lucky to have such dedicated fans! Comment anytime to say hello-we would love to hear from you!
If you celebrate, 
Merry Christmas and Happy New Year!
If you don’t,
Happy Holidays!
For all of you wonderful fans,
Happy Everything!

*Top picture courtesy of this website

Heather

Leave a Comment

Candy Christmas Desserts

Homemade Marshmallows

killer homemade marshmallows
I once saw a sign that read “Money can’t buy happiness, but it can buy marshmallows, which is pretty much the same thing”. We feel the same way in our house, but not just any ole marshmallow will do.

True happiness is my homemade marshmallows every Christmas season. They are easy, and fun, and you can dress them up as little, or as much as you want. My family prefers them flavored with vanilla and then dipped in chocolate and sprinkled with candy canes or sprinkles. You can easily substitute the vanilla for some peppermint extract and add a little red food coloring and – voila! Peppermint marshmallows. They are the creamiest marshmallows for your hot cocoa so beware, if you make these you will not want to buy store bought again!

I originally got the recipe from the food network from Alton Brown.The link to the original is here: Alton Brown homemade marshmallows. The marshmallows featured here were some I did for a “favorite things party” with some of my girlfriends.

We had a hot cocoa bar.

Can I say yum?

Killer Homemade Marhsmallows
(adapted from Alton Brown Food Network’s Homemade Marshmallow recipe)

Here’s what you’ll need:
Saucepan with lid
Standup mixer
Candy thermometer
13×9- in dish

Ingredients:

3 packages unflavored gelatin (I wish knox)
1/2 cup ice cold water
1/2 cup lukewarm water
12 ounces granulated sugar, approximately 1 1/2 cups
1 cup light corn syrup
1/4 teaspoon kosher salt
1 teaspoon vanilla extract (substitute a couple drops of peppermint extract here if you want peppermint flavored mallows)
1/4 cup confectioners’ sugar
1/4 cup cornstarch
Nonstick spray

Directions:

Put the gelatin  into the bowl of a stand mixer with whisk attachment along with 1/2 cup of cold water to bloom the gelatin.
In a small saucepan combine the remaining 1/2 cup of lukewarm water, granulated sugar, corn syrup and salt. I stir it here, but not again. Place over medium high heat, cover and allow to cook for 3 to 4 minutes. Uncover the saucepan, clip a candy thermometer onto the side of the pan and continue to cook until the mixture reaches 240 degrees F, approximately 7 to 8 minutes. (NO STIRRING, just let it come to 240 degrees F). Once the mixture reaches this temperature, immediately remove from the heat.

Turn the mixer on low speed and, while running, slowly pour the sugar syrup down the side of the bowl into the gelatin mixture. Once you have added all of the syrup, increase the speed to high. Continue to whip until the mixture becomes very thick and is lukewarm, approximately 12 to 15 minutes. Add the vanilla during the last minute of whipping. You could substitute the vanilla for a couple of drops of peppermint extract if you want peppermint flavored marshmallows. For the peppermint marshmallows I also add a couple of drops of red coloring once it is done mixing and incorporate it with a spatula to get a more marbled look. While the mixture is whipping prepare the pans as follows:

For regular marshmallows:
Combine the confectioners’ sugar and cornstarch in a small bowl. Lightly spray a 13 by 9-inch metal baking pan with nonstick cooking spray. Add the sugar and cornstarch mixture and move around to completely coat the bottom and sides of the pan. Return the remaining mixture to the bowl for later use. For miniature marshmallows prepare a cookie sheet in the same way instead of a 13×9-inch pan.
When ready, pour the mixture into the prepared pan, using a lightly oiled spatula for spreading evenly into the pan. I simply spray my spatula with nonstick spray because these mallows are sticky! Dust the top with enough of the remaining sugar and cornstarch mixture to lightly cover. Reserve the rest for later. Allow the marshmallows to sit uncovered for at least 4 hours and up to overnight.
For miniature marshmallows I pipe the marshmallows using a cake decorating bag and tip, into long tubes of marshmallow goodness, lightly dusting with more of the powdered mixture. To put the marshmallow fluff into the piping bag I place the bag in a large tall cup and pull the bag down around the lip of the cup so that the bag is resting open in the cup (no hands!). This allows me to use both of my hands to pour the sticky mixture inside the bag. Its great! Then I pipe them out into long tubes and let them dry. Once they have dried for a couple hours I cut them into miniatures using kitchen shears. Yum!
For the regular marshmallows, turn them out of the 13×9-inch pan and onto a cutting board and cut into 1-inch squares using a pizza cutter dusted with the confectioners’ sugar mixture. Once cut, lightly dust all sides of each marshmallow with the remaining mixture, using additional if necessary. I just lightly toss them with my fingers to get them coated. Store in an airtight container for up to 3 weeks (if they last that long). Instead of the pizza cutter you can use cookie cutters and make the marshmallows into all sorts of cute shapes. This is a great time to involve the kiddos. My son loves to help with this part.
To jazz these marshmallows up you can always dip them in chocolate! After the marshmallows are cut  you can warm up some dipping chocolate and while holding one end of the marshmallow dip the other end into the chocolate. While the chocolate is still warm on the marshmallow sprinkle on some broken candy cane pieces, sprinkles, or drizzle them with melted white chocolate. Let the chocolate harden on parchment paper. You can throw them in the fridge on a plate also to get them to harden quickly, but make sure they get into an airtight container afterward. You do not want this creamy goodness drying out and getting hard. If you like peeps you could pipe these marshmallows onto a sheet of parchment paper that is covered in fine colored sugar and make your own! These marshmallows are also a great and unexpected addition to your candy or cookie plates.

homemade marshmallows

Believe me you will not regret adding these to your yearly Christmas traditions. Merry Christmas and enjoy a cup of cocoa with these killer mallows!
On a side note my awesome nieces and nephews did a cup-for-a-can cocoa stand and collected a large amount of food and donations for the local food bank. We brought our cans of food and were rewarded with a cup of delicious cocoa. It was such a beautiful way to spread love this holiday season.

Heather

Leave a Comment

Appetizers Candy Desserts

Mixed Nut Brittle

nut brittle2

Need a last minute gift, or do you just want to use up those left over nuts?
This is your lucky day.
Better yet?  Everything you need is probably already in your pantry.
I don’t know about you, but when I am baking, I always have nuts left over. I never have enough of one nut to make that recipe again. Well, look no further because I have a recipe for all those leftover nuts.
Nut Brittle.
I am sure you have all heard of peanut brittle-but why should peanuts have all the fun? In this recipe, you can use any nuts.  This particular time, I used peanuts, cashews, almonds, pecans and hazelnuts. This brittle is great as a snack, or as a last minute gift idea. Package it up and bring as a hostess gift or serve it in a pretty dish at your next party.  Your family and friends will love it and no one will guess how easy this recipe is!
The best part? If you are so lucky and have some of this nut brittle left over, break it up in even smaller pieces and sprinkle on ice cream.

nut brittle gifts


Mixed Nut Brittle
1/2 cup of water
1 stick of butter
1/2 cup of corn syrup
2 cups of sugar
1/2 teaspoon of vanilla
1/2 teaspoon of baking soda
12 oz of salted mixed nuts
sea salt for finishing(optional)
In a large saucepan, combine the sugar, water, butter and corn syrup and vanilla and bring to a boil. Cook over medium-high heat, stirring occasionally, until it is light brown and registers 300 on a candy thermometer or about 10 minutes.  Remove the pan from the heat and stir in the baking soda. Be careful the baking soda makes the mixture bubble. Quickly stir in the nuts, them immediately pour on a baking sheet lined with parchment paper.  Using an offset spatula or  the back of a spoon, spread the brittle in a thin layer. You can sprinkle with salt at this point. Let the brittle cool completely and break into pieces.

Heather

Leave a Comment

Appetizers Beef

Holiday Appetizers: Mini Stuffed Peppers

stuffed peppers 2
As I have said in probably a million posts, I love appetizers! I could eat them for every meal if given the option (thank goodness that option has never been presented!). I love finding new, creative ones to make and swaying away from the normal “chip and dip” type appetizers. I was attending a holiday party the other night where everyone was bringing an appetizer or dessert, and I felt like making something with a little more substance. I wanted something that people could eat and feel more like they were having dinner along with the appetizer spread. Mini stuffed peppers were exactly that! Tender cooked peppers, filled with a seasoned ground beef mixture sprinkled with flavorful romano cheese and baked.

Honestly, this is one tasty appetizer!

Mini Stuffed Peppers

1 24 oz bag of multicolored mini sweet peppers
2 lbs. of lean ground beef
3  8 oz cans tomato sauce
1 cup italian seasoned breadcrumbs
2 tsp salt
1/2 tsp pepper
1/4 cup finely chopped onion
1/2 cup romano cheese, grated + more for sprinkling

Preheat oven to 375 degrees. Bring a large pot of water to a boil on the stove. While water is coming to a boil, wash peppers, and slice them in half, removing all seeds. When water is boiling, gently drop peppers in and cook for 5 minutes. Drain and arrange peppers on a large baking sheet lined with parchment paper or foil. In a large bowl, mix together ground beef, tomato sauce, bread crumbs, salt, pepper and onion. Stir until combined. Add romano cheese and stir just until combined. Fill peppers generously with meat mixture. Cover pan with foil. Bake covered for 25 minutes. Remove foil, sprinkle generously with romano cheese and bake uncovered for 20 more minutes. Remove from oven and serve immediately. If pre making, let cool and refrigerate. When reheating, heat in a 400 degree oven for 7-9 minutes.
mini stuffed pepper 1


Heather

Leave a Comment

  • « Previous Page
  • 1
  • …
  • 11
  • 12
  • 13
  • 14
  • 15
  • …
  • 38
  • Next Page »

Heather

I am a midwestern girl who grew up in the big city, but now enjoys her days as a stay at home mom in the suburbs. Who says spending time in the kitchen has to be boring? I hope to inspire your family kitchen with some new ideas, fun recipes and great tips.

Stay Up to Date

Get all the latest tasty goodness straight to your inbox!

Girl and her Kitchen

Join us!

Hey! I am the GIRL in the kitchen and I am so glad you decided to visit. Love to cook and eat? You will find some great recipes on this site, whether you are looking to eat healthy, splurge on a dessert, make dinner or host a party-I have it all! Sometimes I’ll give you a story along with my recipe, other times, I want to take you straight to the food!  Whatever the reason that you decided to visit, I am so glad you joined me in the kitchen! Feel free to take a look around the site, and please…stay awhile!

Archives

Popular Categories

  • Appetizers
  • Breakfast
  • Crafts
  • Salads and Dressings
  • Side Dishes
  • Vegetables and Fruit

Most Popular Posts

Corner Bakery Cafe Giveaway!

Corner Bakery Cafe Giveaway!

Filed Under: Reviews

Bacon Cheddar Skillet Cornbread

Bacon Cheddar Skillet Cornbread

Filed Under: Breads, Quick Breads and Rolls, Side Dishes

Puffy Pancakes {Perfect for Valentine’s Day!}

Puffy Pancakes {Perfect for Valentine’s Day!}

Filed Under: Breakfast, Valentine's Day

100 Days of Real Food Cookbook Review {and Giveaway!}

100 Days of Real Food Cookbook Review {and Giveaway!}

Filed Under: Vegetarian

Copyright © 2026 · Divine theme by Restored 316