• Email
    • Facebook
    • Instagram
    • Pinterest
    • Twitter

Girl and Her Kitchen

Plan. Make. Eat. Design. Craft. Create. Celebrate. Life.

  • Home
  • About the Girl
  • Recipe Index
  • We LOVE
  • Weekly Menu

Crafts Thanksgiving

Give Thanks Pallet Sign

give thanks 3


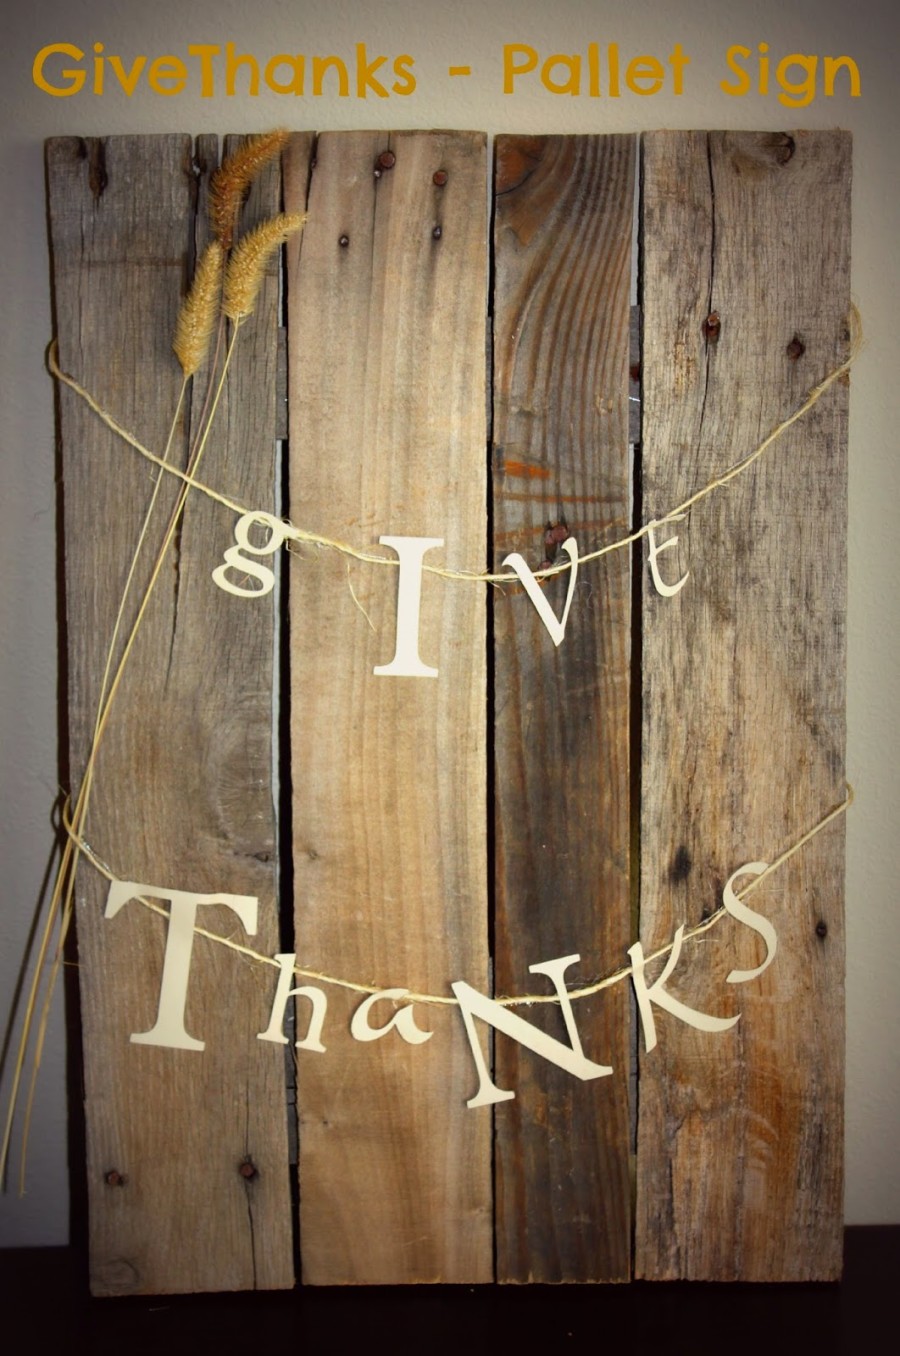
Who doesn’t love free pallets, fall, and THANKSGIVING?! My sister-in-law Kiersten and I made these beautiful rustic Thanksgiving pallet signs from some free pallets stacked by a shop. Kiersten saw them lying around, asked if she could snag them, and threw them into the back of her car. Serious score on her part! I love that pallets are versatile and can make any project have a lot of character. The wood is always beautiful and no two pieces identical with knots and nails to make them interesting. We also have a lot of wheat fields where I live so I simply grabbed a few pieces growing on the edge of the road by my house. Craft stores also carry these though and they are usually pretty inexpensive.

I love Thanksgiving and I love thinking about all the things I’m grateful for. Having this sign up is a good reminder to me each day to have a heart of thanksgiving. When I’m thankful for all the little and big things in my life I’m soooo much happier! God blesses me daily and its good to have a reminder to be humble and truly give thanks for all I have.

Supplies: 
Pallet wood- you’ll need about half of a pallet (I cut my four front pieces to 20in long and back two to 13in because that was how wide my four boards side by side ended up being)
Crowbar/Hammer
Saw
Glue and Glue Gun
Twine or Yarn
Paper- I used cardstock for the letters
Dried Wheat or Leaves

Let’s do this:

1. Disassemble pallet. Try to leave the nails intact so that they can be seen on your sign. I did this with a crowbar/hammer. Once the pieces were apart I bent the nails on the backside of the wood so I wouldn’t get poked by them and could still see their tops on the front side.

2. Cut four pieces to the desired height of your sign. I cut mine at 20in. Some of the pieces had different widths. This is totally ok and adds more character and asymmetry to the final product.

3. Cut two pieces that will go on the backside and hold all the front pieces together. I got this length by lying my four cut pieces side by side then laying the back piece across them and marking where it needed to be cut. Mine ended up being 13in long.This is how the back looks. I purposefully placed my pieces with gaps in between. Make sure you cut your back pieces long enough to span the entire width of the sign.

4. Glue you back pieces onto the back of your four main pieces. Use enough glue to make sure they stick together, but not so much that is oozes through and you see it in your gaps (that would be sad).

5. The letter part for me was pretty easy because I have a cricut. If you don’t have one, have one of your friend that has one cut the letters for you, or do it the old fashioned way and stencil then cut out your letters. You could easily print off the letters with your computer and cut them from that. If I don’t have the cricut or I want a specific font I’ll print my letters out, tape the paper to a bright window, place my cardstock on top of that, and then trace my letters. When I’m all done tracing I cut it out with scissors or the sword of exact-zero (aka: razor blade for all the non-Lego Movie lovers). I chose letter heights from ranging from 1-4in both upper and lower case with some italics and some normal for my pallet sign.

Sorry for the chipped nails, but you get the idea!

6. Cut two pieces of twine and drape them across the front of your sign to the desired placement, I swooped mine so the letters look like a little dangling banner. Using a light hand, glue the twine in the back (see picture of back of the sign) and then in a couple of places in the front so your “swoop” doesn’t move.

7. Glue your letters to the twine so that they are dangling.
 
8. Adorn with dried wheat or leaves.

9. Hang in a prominent place so you can enjoy your handy work and remember to give thanks every single day (mine is in the kitchen).

Heather

Leave a Comment

Breakfast Halloween Muffins & Scones St. Patrick's Day

Green Muffins {Perfect for Halloween!}

Oh browned and rotten bananas how I love you!

You make the most delicious loaves of banana bread, you twirl up in smoothies like nobody’s business and you make a regular chocolate cake taste deliciously moist.

If only I could learn to eat you before you turn brown and mushy, I would save a lot of time because I wouldn’t have to bake you up. Somehow, you keep getting me to buy you, even though I know I will never eat you as a fruit, only as a dessert or muffin.

Enter these muffins. Deliciously moist, filled with a lot of healthy ingredients, and still tasty for the kids! Call them Frankenstein muffins, call them shamrock muffins, whatever fits! These are easy and packed with goodness. My kids loved them for Halloween!

Green Muffins
Makes 12-16 muffins depending on how full you fill the cups

2 cups whole wheat pastry flour
3/4 cup sugar
2  tsp baking powder
1/2 tsp baking soda
2 1/2 tsp ground cinnamon
1/2 tsp salt
1/3 cup melted butter (or coconut oil, melted for a vegan option)
3/4 cup buttermilk (or almond milk for a vegan option)
6 oz of fresh spinach
2 bananas, mashed
2 tsp vanilla extract

Preheat oven to 350 degrees and line a muffin tin with liners. In a large bowl, whisk together whole wheat flour, sugar, baking powder, baking soda, cinnamon and salt. In a food processor, combine butter (or oil), buttermilk (or almond milk) and spinach. Pulse until mixture is thoroughly combined and thick. Add in bananas and vanilla extract and pulse again until bananas are completely mashed and incorporated. Add wet ingredients to dry and fold in just until combined. Do not over mix. I use an ice cream scoop to fill the muffin cups. Bake for 18-20 minutes. Let cool 10 minutes in the pan. Remove and cool on a cooling rack. Store in an airtight container at room temperature for two days, or freeze muffins in a freezer safe container for up to one month.

They work for St. Patrick’s Day too!
What is your favorite Halloween food?

Heather

Leave a Comment

Salads and Dressings Vegetables and Fruit

Homemade Ranch Dip

So there is not much that my kids won’t dip into ranch dressing–carrots, cumbers, chicken nuggets-you name it! I have always been searching for a great “from scratch” ranch dip and dressing recipe, but had never found one that was the perfect mix of spices…until now.

This one is absolutely perfect! Fresh and delicious, it whips up quickly, and is perfectly tasty. Kids will love it-and grown ups will too. It is really versatile as well-it can be made into a dip, and a dressing as well.

Want to give it a try? Head on over to Little Lake County and take a look at my monthly Kids in the Kitchen with Girl and Her Kitchen feature. You can find this delicious ranch dip recipe there!

Heather

Leave a Comment

Desserts Fall Snacks

Stuffed Baked Apples

So, recently I took some fruit… and made it bad.
Well…the good bad. You know what I mean.
I took some really big honeycrisp apples and I stuffed them.
I stuffed them with a buttery crumb topping, bathed them in apple cider and baked them.
You are probably thinking…well, that doesn’t sound that bad…
Well, then I went and smothered them in vanilla ice cream.
Guilty.
Oh…did I mention how I drizzled caramel on top of that?
I probably went too far, but…
Delicious.
Seriously.

Stuffed Baked Apples

4 large Honeycrisp apples
2/3 cup oats
2/3 cup brown sugar
1/3 cup flour
1 tsp cinnamon
1/2 tsp nutmeg
1/3 cup softened butter
1 tsp vanilla
2 cups apple cider
Ice Cream (optional)
Caramel (optional)

Core apples part of the way, leaving the apple intact and the bottom in place. Mix oats, brown sugar, flour, cinnamon and nutmeg together in a bowl. Add softened butter and vanilla and mix well until mixture is clumped together. Divide the crumb mixture in fourths and stuff each apple. Pour apple cider over apples. Bake 40 minutes or until the apples are soft, but not mushy. Serve with ice  cream or caramel if desired.


Heather

2 Comments

Crafts Halloween

Halloween Glam Pumpkins

glam pumpkins1Every couple of months a group of girlfriends and I get together at my house for a crafting afternoon (this  turns into every couple of weeks during the holiday season). I usually get all the supplies and prep work done beforehand and my girlfriends happily bring their money, goodies to share, and sometimes kiddos for a play date while the mommies play.

Last Halloween, this was the craft I chose, and rightfully named them Glam Pumpkins. Orange and black are great for Halloween, but sometimes a girl needs a little GOLD. These pumpkins are a cinch to do and come together quickly. This is a great project to do with friends because you can get a couple of sets of pumpkins with just one long 4×4 board. The heights and colors of the pumpkins are completely up to you. Some of the ladies wanted their pumpkins taller with orange and cream, some wanted brown and orange. They are great as center pieces, placed on mantles, or floors. They are also a great addition to the front porch.

Supplies:
Wood:  4×4 board for the blocks (the length of the board I used was 9 ft, allowing me to cut multiple sets) and 1×1 board for the stems.
Sand Paper: I used a light/medium grit. You’re just lightly smoothing.
Paint: acrylic craft paint. I chose antique white and gold.
Paint Brushes and Sponges: I used a large paint brush and a circular sponge for the dots
Painters Tape: Choose the width of the tape to coordinate with the width you want for your stripes etcs.
Glue Gun and Glue
Polyacrylic/polyurethane: I used a spray poly. This is especially important if your pumpkins are going to be on the front porch and in the elements. I find that polyurethanes will yellow over time, so be careful in selecting your spray. Use a polyacrylic if you can find it!

Let’s do this!

1. Cut blocks and stems. I cut the 4×4 into an 11in, 8in, and 5in lengths. Cut three stems from the 1×1 at 3in. This can be done at your hardware store or at home if you have a chop-saw.

2. Sand blocks to desired texture. I lightly sanded the blocks where the cuts were made and that was about it.

3. Paint all blocks the background color you want them. I used antique white. Let this dry before you try and tape off for your stripes or chevron. If you’re in a hurry, use your hair dryer! While you’re waiting for your blocks to dry, paint your stems.

4. Tape off your wood. You can employ a ruler and pencil if you want it just right. I used a round sponge to make the circles. I love how it left the edges a little uneven. Let this dry. If you are super careful you can remove the tape before it dries, if your worried you’ll smudge, just leave it till its dry and then take it off. Feel free to bedazzle with glitter or gems with a little modpodge.

5. Plug in your lava maker(glue gun), yes when I was twelve my older sister Hannah shot hot glue across our dining room table and onto my hand. I have the scar to prove it. Glue your stems to the top of your blocks, I angled my stems so the sides and corners were opposite of the blocks corners and sides.

6. Now if you want a little more worn/antique look you can sand the edges prior to spraying with your polyacrylic or add a dark gel stain to the edges. I did this with a set I made for my mom’s country house. The pumpkins were orange and cream with brown steams and were cut to longer lengths so the tallest was 18in instead of 11in. Perfect height if they are on the floor or a front porch. If you’re satisfied with your work, take it outside (I set it on an old sheet or tarp) and spray two coats of polyacrylic/polyurethane allowing it dry between coats.

7. Add a little glam to your porch or mantle with your completed pumpkins.

wood pumpkins

Heather

3 Comments

Crafts Halloween

{Halloween} Crafting : Home of the “Wicked Witch”

wiked with


Fall is in full swing and here’s a fun way to add a little something to the front porch.  I happen to have a couple of little monsters running around and find myself occasionally resembling the “Wicked Witch” after a long hard day of craziness, so it’s fitting for me.  (I’m sure none of you moms know what I’m talking about, right?! HA!!)
Here are the directions, which you probably don’t even need. This is just a fun, rough, Halloween craft so I was going for more character, and less symmetry and perfection. But by all means do what makes you happy:)
Step 1– Trip to your favorite home improvement store for wood and paint
(I had some paint on hand from another project)
I grabbed a large piece of plywood 4ftX4ft.  It was some where around $10.  And I had them just cut it right in half.
*My amazingly wonderful friend Erin wanted to do this project as well so my wood was $5. I put another sign on the back we will be featuring at Christmas time so really it was like I spent $2.50 per sign.  Not bad!!!
Step 2– Paint the board black. (I used some black spray paint I had on hand)  I didn’t even bother sanding, but you can if you choose.   
Step 3– I measured and drew light lines with pencil across my board once I determined the spacing I wanted. There is no right way here.
Step 4– Pencil in words.  Just as a rough outline.  Once you begin painting you can make them bigger or smaller, but it’s just nice to have an idea.
Step 5– Using white acrylic paint and a small paint brush or sponge paint your words. 
Step 6– Optional – Spray or paint a Poly acrylic seal coating if you are worried about it getting wet.  I omitted that step because my sign isn’t featured where that may be a problem. 

And…That’s it.  Easy right?


wiked with 2

Happy crafting!

Heather

2 Comments

Breakfast Fall

Pumpkin Pancakes with Cinnamon Spiced Apples

October is the month of the pumpkin and I am not afraid to admit that I  love every minute of it.

I know some feel just the opposite and want to scream every time one of their favorite foods is tainted by their dreaded pumpkin, but not me! Sorry pumpkin haters, but I am in love with this time of the year and I will be finding numerous ways to enjoy pumpkin in every food I can!

I will eat anything pumpkin for the entire month of October. November too. When December rolls around, it is time for some new flavors, but these pumpkin pancakes? I can eat these any time of the year.

This recipe creates the most moist, flavorful pancakes I have ever tasted. The cinnamon apples? That just brings them over the top that even the most die hard pumpkin hater might be turned.

I have seen crazier things happen.

Did I mention making these pancakes makes your house smell unbelievable? Feel free to leave the cinnamon apples off if you are in a pinch for time, but make them another time-you really don’t want to miss out on these.

Pumpkin haters, beware. Pumpkin lovers, rejoice!

Pumpkin Pancakes with Cinnamon Spiced Apples

Pancakes:
1 1/2 cups whole wheat pastry flour
4 tblsp brown sugar
1 tblsp baking powder
1 teaspoon baking soda
1/2 tsp salt
2 tsp cinnamon
1/2 tsp nutmeg
1/2 tsp ground cloves
1 1/2 cups plain whole milk or low fat yogurt (do not use fat free)
2 tsp vanilla extract
2 tbslp butter, melted
2 eggs
2/3 cup pumpkin puree

Cinnamon Apples:
2 Honeycrisp apples (or other firm apples), sliced into wedges
2 tblsp butter
1 tsp cinnamon
1 tsp nutmeg
1/2 tsp cloves
1 tblsp maple syrup
1/4 cup apple cider

Combine dry ingredients together in a large bowl, set aside. In a medium bowl, whisk together yogurt, vanilla, and butter. Add eggs one at a time, continually whisking. Fold in pumpkin puree and whisk to combine until mixture is smooth. Gently add to dry ingredients and mix until combined. Do not over mix.

Begin preparing cinnamon apples. Melt butter in skillet and add apples. Turn to coat apples with butter. Sprinkle apples with cinnamon, nutmeg and cloves. Cook for 2 minutes, tossing a few times. Add maple syrup and toss to coat. Cook for two more minutes. Pour in apple cider to deglaze the pan and simmer apples for 2 minutes or until fork tender. Keep warm.

Heat a non stick griddle to medium heat. Drop 1/4 cup of batter onto the griddle and cook until small bubbles began to appear and pop on the top of the pancake. Carefully flip and cook the other side for 1-2 minutes or until cooked through.

Serve warm with butter, syrup and cinnamon apples.


Heather

1 Comment

Cakes and Cupcakes

Coconut Lime Cupcakes

So I made these.

You know those things you make that are so darn pretty, and then you taste them, and they are so delicious too?

Yeah, I really don’t know about that either, because usually I make stuff that might taste good, but look good? Ahhh…no.

These cupcakes though? So simple. So delicious. So pretty.

I actually made these for a PTO teacher appreciation event at my kids’ school. I wanted to bake something that still said “summer” since I was pretty much bent on not letting go of summer yet, even though school had already started!

These cupcakes have a burst of lime flavor, swirled with coconut and moist and delicious vanilla cake. Topped with frosting and a coconut and lime zest garnish-they are as pretty as can be!

I know we are into fall now, but if you are just looking for a burst of summer to fill in the spaces between pumpkin this and apple that, you will thoroughly enjoy these!

Coconut Lime Cupcakes
Makes 24 cupcakes

Cake:
1 box of yellow cake mix
3 large eggs
1/2 cup vegetable oil
1 cup sour cream
1 teaspoon vanilla extract
2 teaspoons coconut extract
2 tsp fresh lime zest
1 cup coconut

Frosting:
1 recipe Old Fashioned Frosting or your favorite vanilla frosting

Garnish (Optional):
Shredded coconut
Lime Zest

If making old fashioned frosting, you will want to get the first mixture ready and cooling first since the whole process takes awhile.

Preheat oven to 350 degrees. Line two cupcake pans with liners. Combine all cake ingredients in a large bowl except for the coconut. Mix on low for 30 seconds with a hand mixer, and then turn the mixer on high and mix for two more minutes. Fold in the coconut just until combined. Evenly distribute the cake batter in the cupcake cups. Bake about 18-22 minutes checking frequently. Cupcakes are done when a toothpick is inserted in the middle and comes out clean. Do not over bake. Cool in pan for ten minutes and then remove to a cooling rack. When completely cooled, frost with old fashioned frosting or your favorite frosting recipe. Garnish with coconut and lime zest.


Heather

1 Comment

Chicken & Turkey Crockpot Sandwiches

Crockpot Cheesy Chickensteak Sandwiches

Cheesey chicken cover

This is one of those perfect crock pot recipes : easy, no fuss and deliciously different. I have said it before, I really dislike the crockpot recipes that all seem to taste the same. It seems to especially happen with chicken.  I think I went through a one month time frame of using my crockpot that each night my husband nodded kindly in my direction when he took his first bite.

I knew what he was thinking: this again?

It was a different recipe each time, but seemed to have the same flavor and I swear he must have thought I was cooking the same thing every time I used the crockpot.

Either you are nodding your head in agreement with me right now, or swearing me off as crazy. It wouldn’t be the first time, so lucky for you, I am not easily offended.

This recipe is simmered all day in, get ready for it…beer.  Don’t worry. Before you ask, it is kid friendly since all the alcohol is cooked off after six hours of cooking. Because of the beer, and all the spices, the chicken is so tender and flavorful you just want to eat it out of the pot right there.

But wait.

Now you are going to go ahead and add shredded cheese that will soon become melty and stretchy and absolutely delicious.

Serve these on your favorite sandwich roll, and the sides can be easy. Fresh fruit and a salad are all we need.

Definitely a keeper!

Crockpot Cheesy Chickensteak Sandwiches
serves 6

2 lbs boneless, skinless chicken breasts
2 green peppers, sliced
1 cup sweet onion, sliced
4 garlic cloves, minced
1 tblsp smoked paprika
1 1/2 tsp salt
1 tsp pepper
8 oz beer, favorite variety
1 1/2 cups shredded cheddar cheese
6 whole wheat buns, toasted, or your favorite variety of bun

Layer peppers, onions and garlic at the bottom of your crockpot. Place chicken on top. Sprinkle with paprika, salt and pepper. Add beer. Cover and set to cook for 6 hours on low. Uncover with 30 minutes to go and shred chicken, tossing well to absorb juices. Return cover and let cooking time finish. All the juice should be absorbed, but if it is not, and there is still an excess of liquid, you can try to drain a little. Sprinkle shredded cheese on chicken and cover while crockpot is on warm for ten minutes. Serve on toasted buns.

Heather

Leave a Comment

Salads and Dressings

Apple Harvest Salad

So, now that it is September, it is basically time for us to forgo all of the summer stuff and move forward into Fall!

Do you know what this month also means?

Apples!

You cannot get enough of them in September, and I love using them in whatever I can. I love to bake with them especially, but we need to throw in a healthy recipe here and there.

In that case, I present you this salad. This delicious, crunchy, full of apples salad that you will thoroughly enjoy throughout this month and beyond.

Want the recipe? Check it out on Little Lake County in my monthly Kids in the Kitchen with Girl and Her Kitchen feature.

Also, if you are having a salad, you are totally deserving of some fall desserts! Have you tried these chunky apple oatmeal cookies with browned butter frosting? If not, get on that!

Happy Beginning of Fall!

(Warning: Don’t ruin my day by telling me it is not fall yet. Sometimes you need to just pretend!)

Heather

Leave a Comment

  • « Previous Page
  • 1
  • …
  • 13
  • 14
  • 15
  • 16
  • 17
  • …
  • 38
  • Next Page »

Heather

I am a midwestern girl who grew up in the big city, but now enjoys her days as a stay at home mom in the suburbs. Who says spending time in the kitchen has to be boring? I hope to inspire your family kitchen with some new ideas, fun recipes and great tips.

Stay Up to Date

Get all the latest tasty goodness straight to your inbox!

Girl and her Kitchen

Join us!

Hey! I am the GIRL in the kitchen and I am so glad you decided to visit. Love to cook and eat? You will find some great recipes on this site, whether you are looking to eat healthy, splurge on a dessert, make dinner or host a party-I have it all! Sometimes I’ll give you a story along with my recipe, other times, I want to take you straight to the food!  Whatever the reason that you decided to visit, I am so glad you joined me in the kitchen! Feel free to take a look around the site, and please…stay awhile!

Archives

Popular Categories

  • Appetizers
  • Breakfast
  • Crafts
  • Salads and Dressings
  • Side Dishes
  • Vegetables and Fruit

Most Popular Posts

Corner Bakery Cafe Giveaway!

Corner Bakery Cafe Giveaway!

Filed Under: Reviews

Bacon Cheddar Skillet Cornbread

Bacon Cheddar Skillet Cornbread

Filed Under: Breads, Quick Breads and Rolls, Side Dishes

Puffy Pancakes {Perfect for Valentine’s Day!}

Puffy Pancakes {Perfect for Valentine’s Day!}

Filed Under: Breakfast, Valentine's Day

100 Days of Real Food Cookbook Review {and Giveaway!}

100 Days of Real Food Cookbook Review {and Giveaway!}

Filed Under: Vegetarian

Copyright © 2026 · Divine theme by Restored 316