• Email
    • Facebook
    • Instagram
    • Pinterest
    • Twitter

Girl and Her Kitchen

Plan. Make. Eat. Design. Craft. Create. Celebrate. Life.

  • Home
  • About the Girl
  • Recipe Index
  • We LOVE
  • Weekly Menu

Uncategorized

Apple Pumpkin Sunflower Bread

Ooohhh! I love fall. I love the leaves, I love the weather, I love all that goes on with it. Especially the food! Most notably…pumpkin and apples. I love trying out tons of new pumpkin recipes every fall, but I need to make sure I don’t overload on cider doughnuts, apple pies and rich pumpkin desserts. I mean, don’t get me wrong, I would looooove to overload on that sort of stuff, but that just wouldn’t be good for me at all.
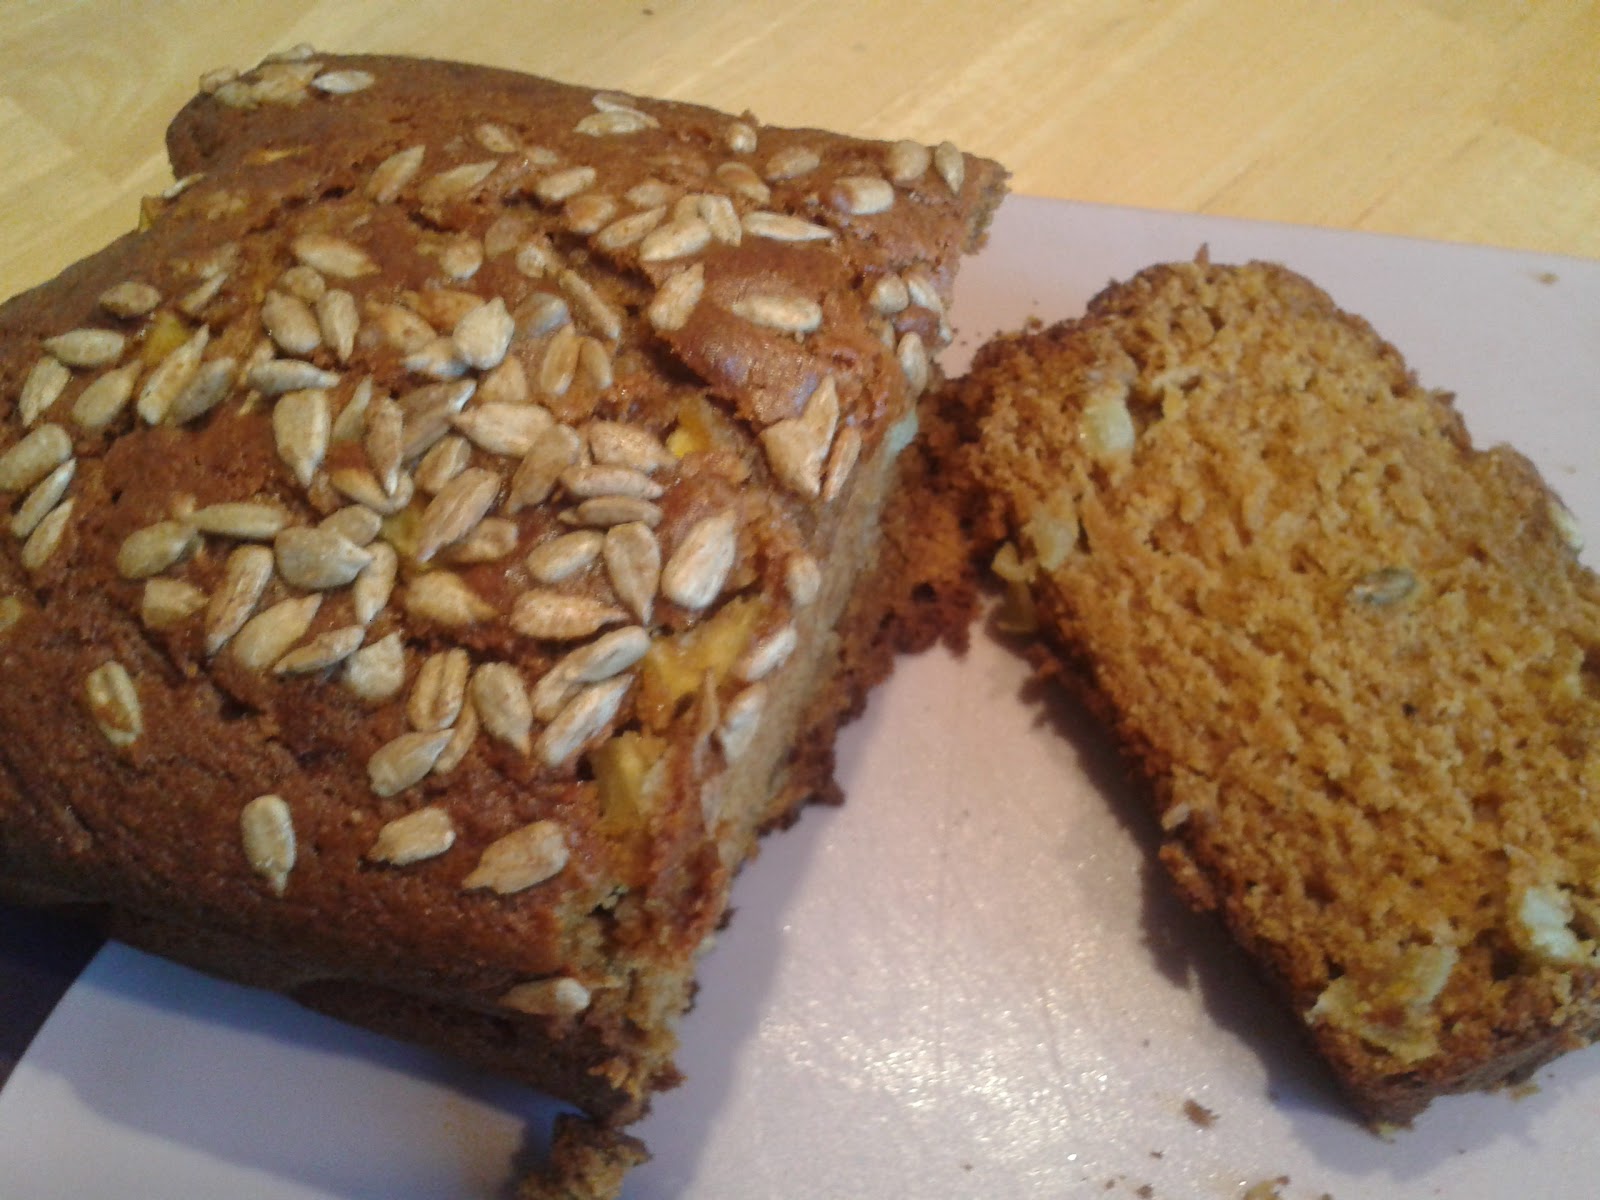
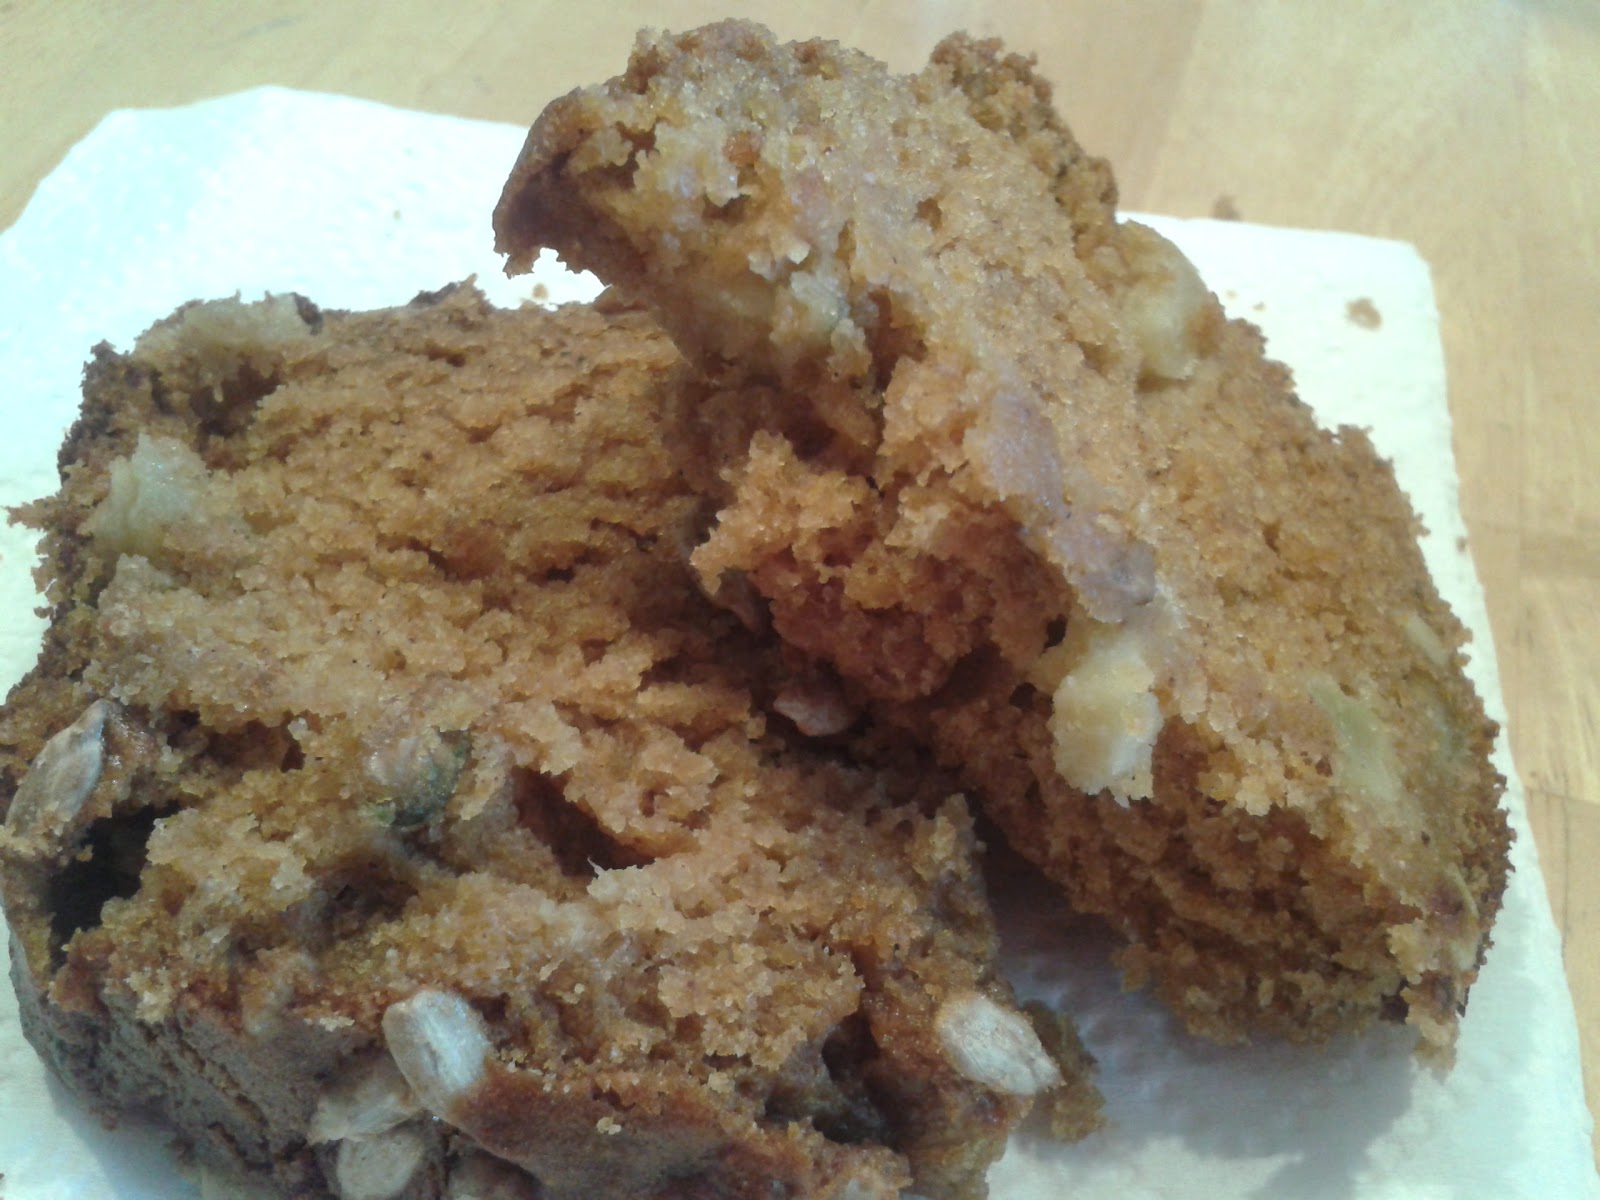
This recipe works for me because it combines the sweet taste of a dessert, with healthful additions like whole wheat flour, fresh apples, pumpkin and sunflower seeds. It is moist, delicious, and the extra added crunch of the seeds makes for a perfect fall treat. We spread this with some homemade pumpkin butter and it was very much enjoyed by the whole family!

*Just a note* : This makes two 9×5 loaves of bread. I was thinking of cutting it in half to only make one, but stuck with it. After tasting this bread, I highly recommend making two loaves and popping one in the freezer to enjoy at another time. It is just THAT good! I also made muffins with this recipe too, and it makes about 2 1/2 dozen muffins.

Apple Pumpkin Sunflower Bread

1 1/2 cups whole wheat pastry flour
1 1/2 cups all purpose flour
2 1/2 tsp pumpkin pie spice
2 tsp baking soda
1 tsp salt
3/4 cup sugar
1 cup brown sugar
1 cup vegetable or canola oil
4 eggs
3/4 cup apple cider
1 15 oz can of pumpkin
2 cups finely chopped, peeled, firm apples (I used granny smith)
3/4 cup dry roasted sunflower seeds

Spray bottom of two 9×5 loaf pans. Line with parchment paper leaving a slight overhang, and spray with cooking spray. In large bowl, mix flours, pumpkin pie spice, baking soda and salt. In medium bowl, beat sugars and oil on medium speed until well combined. Add in eggs. Beat well. Pour in cider and mix until blended. Slowly add in flour beating on low speed. Beat in pumpkin and then fold in apples and 1/2 cup sunflower seeds. Pour in prepared pans, spreading evenly. Sprinkle remaining sunflower seeds evenly over two loaves and gently press in to top. Bake at 350 degrees for 50-60 minutes. Cool in pan for 10 minutes. Lift out using parchment and cool on wire racks until completely cooled, at least two hours. Slice and serve.

Heather

Leave a Comment

Uncategorized

Overnight Oatmeal in a Jar

So this is one of the easiest breakfast ideas I have seen in awhile. It can be prepared the night before AND it tastes really good too. Interested? Intrigued?
I will tell you more.
Anything you can prepare the night before always sits well with me. You see, I have mentioned before, I am not exactly the “give yourself a lot of time” kinda gal. I am more the “wake up with just enough time to throw on clothes, scarf down food and run out the door” kinda girl.
Well, when I had kids, I changed a little bit.
A real little bit.
Well, kind of not at all.
But my kids do eat, are dressed and to school on time.
Does that count?
That is why breakfasts like this LITERALLY save my life. There is no prep involved. Unless you call pulling it out of the fridge and unscrewing the cap work, then, yes, I guess there is some work.
Better yet, these really didn’t take a long time to prep the night before either so when I remembered at 11 just as I was heading to bed, I was able to throw them together really quickly and still have time to play around on pinterest for a half hour  get to bed in a timely manner.
I will say, I am no photographer. Also, this is the kind of really delicious food where a picture does it no justice so please, pull your eyes away from the photo and try it. It really is good. I know a lot of you are visual people though, so I try to put a picture out there, even if it is really an awful photo (see above!)

Overnight Oatmeal in a Jar

1/4 cup quick oats
1/2 cup skim milk
1/2 tbsp chia seeds
2 tblsp of your favorite dried fruit such as raisins, cranberries, blueberries or a mix of all
1 tblsp brown sugar
1/2 tsp cinnamon

Optional “in the morning” toppings:
chopped nuts
fresh fruit
granola

Place first six ingredients in a jar, shake, cover and refrigerate overnight. Add any optional toppings in the morning if you want and enjoy!

*I ate it cold, but my husband poured his in a bowl and warmed it up. Good either way! :)*

Heather

Leave a Comment

Breakfast

Homemade {Healthier} Pancake Mix

I know I have talked about this before, but here it goes again. 
I love variety. 
Seriously. I cannot do the same workout day after day, eat the same thing every day, do the same activity every day. It just doesn’t work for me. This is deep in contrast to my husband who can eat the EXACT same breakfast day in and day out. He can get up at the same time, do the same workout, eat the same thing and have the exact same morning as he has since I have known him. He is good like that. Reliable.
He always teases me about “fancy-ing” things up. He secretly loves that I can take a bowl of cereal and add so many different things to it that it seriously no longer resembles anything even close to cereal. He may even be a little jealous. 
I mean come on. Oatmeal squares? Or oatmeal squares with almond milk, toasted almonds, dried cranberries and a sprinkle of cinnamon? 
Really no contest here.
So, this little habit of mine of always needing change really gets in the way when we have 2.2 seconds to get out of the house each morning to ensure my kids actually get to school on time.
Cereal is soooo boring every day. But who has time to make a hot breakfast?
Enter in….already made…healthy….convenient….delicious…pancake mix!!!!
(Cheers and applause abound)
This mix is not only easy to put together, but incredibly good and much healthier than boxed mixes Not to mention you can whip up a batch of the mix, and keep it ready to go in your pantry for a week, or your fridge or freezer indefinitely! You take it out, add the wet ingredients and all you need is a hot griddle. Not to mention, you know what every ingredient is in this mix. If you want a scary morning, read the box on some of your favorite pancake mixes. I cannot say I have ever even heard of some of the ingredients! Now, I believe in variety, and treats and sweets and things that aren’t all that healthy once in awhile, but, I don’t love feeding that stuff to my kids in the mornings. This mix can make you feel good about what you are giving them! 
Easy enough for my mornings!
  Homemade Pancake Mix
3 1/2 cups rolled (quick) oats
3 cups whole wheat pastry flour
2 cups all-purpose flour
3 tablespoons brown sugar
3 tablespoons baking powder
1 tablespoon salt
1 tablespoon baking soda
1 tblsp cinnamon
1 cup vegetable or canola oil

 Mix all the dry ingredients together in a food processor. Slowly drizzle the oil into the bowl while the processor is running. When all the oil has been added, stop the food processor and squeeze a  handful of mix in your hand. If it stays together, it is just right. If it is still crumbly, add another tablespoon of oil at a time until the consistency is correct. I have never had to add extra oil, so you should be fine. Store in an airtight container for up to two weeks at room temperature or indefinitely in the refrigerator or freezer.

To make the pancakes: whisk together 1 cup of mix,  1/2 cup buttermilk or milk, and 1 egg. The mixture may seem thin at first but will thicken as it stands. Heat a griddle and drop the batter onto it. When the edges look dry and bubbles come to the surface and don’t break, turn the pancake over to finish cooking on the next side. One cup of mix will make about 6 pancakes. Top with your favorite toppings such as butter, syrup, fresh fruit, nuts and yogurt.

*HINT* : I stored the mix in a plastic container and then with a permanent marker, wrote on the top:
 Mix 1 cup mix, 1/2 cup buttermilk and 1 egg. Therefore, I wasn’t always searching around for the recipe on those busy mornings! 🙂

Heather

Leave a Comment

Cakes and Cupcakes Christmas Desserts

The BEST Chocolate Cake

I have always loved a good chocolate cake. I feel like I have been searching for the perfect cake since, well…forever. Most of the cakes I have tried – Restaurants, bakeries, even some home baked, were always too dry, or didn’t have enough of that chocolate flavor I was searching for. I am not opposed to cake mix cakes either, but while the boxed vanilla yellow cake is delicious, I have never been too fond of the chocolate version. I made a recipe called Chocolate Lover’s Dream cake, that used a boxed mix, and that came really close to being what I was looking for, but I still missed that “from scratch” taste.

I decided to set out on my own and give it a try. I combined what I loved about several other recipes, and pulled it all together into one, super fantastic, chocolate cake. It was worth it. The chocolate flavor? Delicious. There is not a dry crumb in the whole cake and the texture…well, to eliminate me saying that word that everyone hates…it is so perfectly….sorry I can’t help it…MOIST. It just is. There is really no other way to say it!

It is the best chocolate cake you will ever try.

Save Print
The BEST Chocolate Cake
Recipe type: Cake
Cuisine: Dessert
Cook time:  60 mins
Total time:  1 hour
Serves: 1 cake
 
This rich and velvety chocolate cake seems like it should be for the fanciest of occasions, but it is perfect for a weekend night in, topped with creamy whipped cream and enjoyed with your family.
Ingredients
  • 3 cups all-purpose flour
  • 2½ cups sugar
  • 1 tbsp + 1 tsp baking soda
  • ½ tsp salt
  • 1 cup unsweetened, dutch processed cocoa powder
  • 1⅓ cups coconut oil, melted
  • 1½ cups buttermilk
  • 3 large eggs
  • 1½ cups dark stout beer
  • 1 tsp pure vanilla extract
  • Icing, if desired
  • Powdered sugar, if desired
  • Whipped Cream or Ice Cream, optional, but recommended!
Instructions
  1. Preheat the oven to 350 degrees
  2. Spray a large bundt cake pan very generously with spray and lightly flour.
  3. I use a baking spray that does the trick of both and I use A LOT. You don't want this cake to stick!
  4. Blend flour, sugar, baking soda, salt and cocoa powder in a large mixing bowl.
  5. With an electric mixer on low, slowly add oil, buttermilk, then eggs one at a time.
  6. Add stout beer slowly and Mix well. The batter will be VERY thin. Do not be alarmed!
  7. Pour in vanilla and mix just until batter is smooth
  8. Pour into pan and bake until a toothpick comes out with moist crumbs, about 50-65 minutes
  9. Begin to check it at 50 minutes-DO NOT overbake!
  10. Cool in pan for 10 minutes
  11. Loosen sides gently with a butter knife
  12. Carefully turn out onto a cake serving platter and let cool completely, one hour
  13. Frost or sprinkle with powdered sugar. Serve with whipped cream, or ice cream (both recommended!)
  14. Store in a tightly lidded container at room temperature for up to three days.
  15. After that, refrigerate, but let come to room temperature before serving.
  16. Cake freezes well too.
3.5.3251

Grab the recipe for my  Old Fashioned Frosting here. Want a delicious chocolate ganache? You can get that right here. Or, the vanilla glaze, pictured in the photo, can be found here. Not in the mood for frosting? Sprinkle the cake generously with powdered sugar and that will do the trick too!

*Photos courtesy of my good friend at Courtney Van Alice Photography. Check her out for photos as good as this cake!*


Heather

1 Comment

Side Dishes

Cream Corn

Ok, ok. See? I have a problem.
Here I had a WHOLE summer to post all of these summery recipes and then fall hits and boom!
Here is a summer recipe for you!
What is wrong with me? I am baking cheesy pasta in the summer and making corn on the cob in the fall. Oh well. This one is too good to let sit ALL the way until next summer. I want to share it with you.
See?
I am so thoughtful.
I am ONLY thinking of all of you and how you really do not want to miss out on this creamy, buttery, wonderful corn side dish. It is really so easy-it can be prepared in minutes. Pair it with some barbecue chicken in the crockpot, or, if you really want to be a rebel, throw something on the grill and pretend summer hasn’t ended yet.
YUM.
I swear, fall recipes to come….soon.

Sweet Cream Corn

6 ears of corn, cooked (You can throw them on the grill or boil them)
3 tblsp butter
2 tbslp heavy cream
2 tsp seasoned salt
1/2 tsp black pepper

After corn is done cooking, scrape all the corn off the cob into a saucepan. Put heat on low. Mix with butter, stirring until butter is melted and creamy. Stir in cream, seasoned salt and pepper. Taste and adjust seasonings if necessary. Enjoy!

Heather

Leave a Comment

Crockpot Uncategorized

Crockpot Tex Mex Chicken Bake

I love the summer.
Barbecues, outdoor play with the kids, pleasant weather, swimming and so much more to enjoy.
But fall?
I love fall even more. Cool, crisp days, pumpkins, apples, halloween, delicious food and cozy nights with the family.
I know it is not officially fall yet, some of these crisp and cool days hint to me that it is not too far off. For this mom who loves to cook, it means the return to the oven and the crockpot, two things I try to to avoid during the summer. Well, I try…sometimes I can’t resist. Why is it that on the hottest summer day, I realize that I have a taste for some sort of baked dish or a simmering soup I can make in the crockpot?
Well, I can now use the oven without guilt, and the crockpot has taken its rightful place as my best friend again.
This recipe is just like a baked casserole, but something you can throw together in the afternoon and have ready by the time dinner time hits.I did use the greek yogurt in the recipe and it turned out delicious.
I served this with a green salad with buttermilk ranch dressing and fresh fruit.
Perfect dinner in no time!

Crockpot Tex Mex Chicken Bake

1 1/2 cups low fat sour cream or low fat plain greek yogurt
1 1/2 cups salsa verde
1 garlic clove, minced
1 tsp salt
Cooking spray
3 cups cooked, diced chicken breast
9 corn or flour tortillas
1 1/2 cups cheddar cheese, grated

In a small bowl, mix yogurt, salsa, garlic and salt in a small bowl. Spray bottom of crockpot with cooking spray. Line the bottom with three tortillas, ripping if necessary to cover the bottom of the crockpot. Pour 1/4 of the salsa mixture over the tortillas. Add half the chicken, spreading evenly. Sprinkle with 1/2 cup cheddar  cheese. Cover cheese with three tortillas, 1/4 of the salsa mixture, the rest of the chicken and 1/2 cup cheese. Cover once again with three tortillas, the rest of the salsa mixture and the remaining cheese. Cover and cook on low for four hours. Serve with more salsa, chopped cilantro and sour cream.

Heather

Leave a Comment

Uncategorized

Orange Dreamsicle Dip

Labor day always signals the end of summer to me, but it is always warm out for weeks afterwards and sometimes that craving for fresh “summery” food kicks in. I love all the stews and soups of fall, but occasionally on a hot, indian summer day, I will grill some chicken and fresh veggies and cut up lots of fruit to enjoy. We love savoring the last tastes of summer before the cool weather comes back for good.

I made this dip for the first time this summer when I brought a tray of fruit to a friend’s lake house. It was a huge tray-HUGE! But we ate the whole thing and scraped the dip bowl clean. I love fruit on its own, but this dip just adds some extra sweet to what is already delicious. Best of all, it really tastes like a dreamsicle! You will not believe it!

I cut up fresh pineapple, cantaloupe, honeydew, and strawberries to dip. I also added blueberries and blackberries to my fruit tray as well. All were delicious dipped in this fantastic, creamy dip. It is easy to make, delicious and a perfect way to enjoy the last warm days we may see for awhile.

Dreamsicle Fruit Dip

1 8 oz block of cream cheese, softened
2 cups cool whip, thawed
1 tblsp confectioners sugar
4 tblsp orange juice
2 tsp vanilla extract

Mix cream cheese with a hand mixer until smooth. Add cool whip, orange juice and vanilla. Blend well. Chill for one hour. Serve with fresh fruit or graham crackers.

Heather

Leave a Comment

Chicken & Turkey

Caprese Chicken

Let’s face it.
Chicken can get boring. Really boring.
There are times that I want chicken, but I am tired of some of the usual ways I prepare it, and need something fresh and new.
Ok, well, it has been a while since I inundated you with cheese, tomato and basil recipes so I figured.. it was time.
You know I can barely resist this combo in appetizers and snacks, so bringing it to the dinner table was even better. This chicken was so delicious and flavorful and a perfect combo of some of my favorite ingredients. I especially love the drizzle of balsamic reduction as a finishing touch. This recipe pleased my family, but would impress dinner guests as well. Versatile, delicious and not a boring chicken recipe. Just what I was looking for!

Caprese Chicken

3 – 6 oz chicken breasts pounded about a 1/2 inch thick and then cut in half
1/4 cup olive oil
2 tblsp fresh lemon juice
1 tsp dried Italian Seasoning
1 tsp salt
1/2 tsp pepper
2 roma tomatoes, cut into 12 very thin slices
8 oz fresh mozzarella, cut into twelve very thin slices
Salt and pepper
1 1/2  cups balsamic vinegar
Thinly sliced basil leaves

After pounding the chicken and cutting the pounded pieces in half, set the 6 chicken breasts aside in a ziploc plastic bag. Whisk together olive oil, lemon juice, italian seasoning, salt and peper together in a small bowl. Pour over chicken in plastic bag. Seal and refrigerate for at least 30 minutes.
After chicken has marinated, heat large saute pan and spray with cooking spray. Cook chicken breasts about 5-6 minutes on each side, or until cooked through. Turn off heat. Place two tomato slices on each piece of chicken. Lightly salt and pepper tomato. Place two slices of thinly sliced mozzarella on top of each tomato. Cover pan and let sit in hot pan until cheese is melted. In small saucepan, heat balsamic vinegar. Bring to a boil, turn down heat and cook for about 2-3 more minutes until it is thick, syrupy and reduced. Drizzle over chicken, tomato and cheese stack. Sprinkle basil leaves on top and serve.

Heather

Leave a Comment

Christmas Cookies & Bars Snacks

Magical Cookies

So, while making these cookies, I had the funniest thought.
I am warning you. My husband comments on how random my thoughts are sometimes so I apologize in advance on the crazy randomness that is this story.
I was pouring the vanilla extract in the dough (pouring since I never, ever measure vanilla, not sure why, just never do), and I was thinking of the 80’s show Family Ties. Did you watch that show? I loved it. Well, if you used to watch it, do you remember that episode with Tom Hanks? Remember that one? He played the alcoholic? Stay with me here….stay with me….
I was just thinking about it and how he couldn’t stop drinking so he drank all the maraschino cherry juice and vanilla extract out of the family’s pantry. I was laughing thinking about this today-not because he was an alcoholic because that totally is not funny-I mean I was laughing thinking of myself as a young girl watching this and thinking ….who would do that?? Didn’t he even say something in that episode like “it’s not Miller time but it’s Vanilla Time!” Really, who writes this stuff? It’s crazy that that character actually became an award winning movie actor.Although seriously, I loved that show. LOVED it. Am I dating myself?
So anyways, I decided to try it.
Not becoming an alcoholic-don’t worry Mom.
The vanilla. I mean, I have tried it before in stuff. Cookies, french toast, cakes, well…everything else you can think of because I totally LOVE the heck out of vanilla. But I never tasted it….plain.
I mean, it smells good, it tastes good in everything, so let’s give it a try.
Ok-so here is the moral of the story : Don’t do it. It is totally gross.
Seriously I would never be able to drink a whole bottle.
I guess Tom Hanks was a good actor back then after all.

Ok. Back to the point. Gosh, was that a digression or what?
Magical Cookies. I know, I know…such a ridiculous name.
But really….they are.
Magical, that is.
Why? You may ask. Well, the first reason is that they are seriously the easiest cookies I have ever made. Like take 5 minutes to prep the dough-easy. The other reason they are magical? They are so good and they magically disappear off the plate when you serve them.
Ok…did I just make the cheesy name worse? Well, make them for yourself and you may jump on the magical train and agree with me. Don’t knock it before you try it!
I needed a good laugh today-hope I gave you a chuckle as well.
If not, just make some of these cookies. They will definitely make you feel better.

Magical Cookies

1 box butter recipe chocolate or yellow cake mix
1 egg
1 block of cream cheese, softened
1 stick of unsalted butter, softened
1 tsp vanilla extract
Powdered sugar

Mix cake mix, egg, cream cheese, butter and vanilla with an electric mixer until well combined, about two minutes. Chill for 2 hours in refrigerator. Roll into teaspoon sized balls and roll in powdered sugar. Place on ungreased cookie sheet 2 inches apart and bake at 350 degrees for 10-12 minutes. Let cool completely and dust with more powdered sugar if desired.

*I tried both versions, chocolate and yellow. They are both so good! The yellow cake version tastes like a soft, tender, butter cookie and the chocolate version tastes like a buttery brownie. Both are well worth it!

Heather

2 Comments

Pasta

Pasta con Broccoli

Have you ever mentioned to someone something you made for dinner that is commonplace on your dinner table and they looked at you like “what?”
That happened to me.
I have this dish that I make all the time. It is one of my favorites. It’s called Pasta con Broccoli (yes, I guess I am trying to be fancy with the “con” otherwise known as “with”).
 It. Is. Delicious.
 It’s great as a side, a main dish or cold from the tupperware as leftovers….
Wait…what??
It is. Not that I did it or anything. I would just assume it really is great.
Well, I made this dish as a side dish for a meal that I made for a friend and when I told her about it she looked at me as if she had never heard of it before.
“What????? You have never eaten Pasta con Broccoli??? (insert fancy accent from region of your choice)”.
I wanted to shake her and tell her what she has been missing all her life. I mean I have eaten this at least once a week since I was born!
Okay. Well, maybe like once a month.
Okay, okay. I am sure my mom didn’t make it for me until I was at least old enough for solid foods. But by that time, I was ready.
It is delicious! It is worth making this part of your family’s favorite recipe collection. (You have one of those right??). It is so easy, so simple, so fresh, but really so tasty, you will want to make it again and again.
Feel free to add shrimp or chicken and make it a meal or keep it simple as a side.
By the way, after my friend ate this, she called me to tell me that they loved it. It’s hard to resist!

Pasta con Broccoli

1 lb. pasta, any kind
1 cup olive oil
3 garlic cloves, peeled and minced
1 lb, fresh broccoli cut into bite sized pieces
1/2 cup chicken broth
salt and pepper
 Pecorino Romano Cheese

Start a large pot of water boiling. Add pasta and cook according to package directions. While pasta is cooking, heat olive oil in large skillet. and saute garlic until translucent and fragrant about 2-3 minutes. Add broccoli and toss with olive oil and garlic in pan for two minutes until the broccoli starts to brown slightly. Add broth, salt and pepper. Simmer 8-10 minutes until broccoli is tender but still bright green. Drain pasta and return to large pot it was cooked in. Pour broccoli mixture over pasta. Sprinkle liberally with pecorino romano cheese and more salt and pepper if desired.

Heather

Leave a Comment

  • « Previous Page
  • 1
  • …
  • 27
  • 28
  • 29
  • 30
  • 31
  • …
  • 38
  • Next Page »

Heather

I am a midwestern girl who grew up in the big city, but now enjoys her days as a stay at home mom in the suburbs. Who says spending time in the kitchen has to be boring? I hope to inspire your family kitchen with some new ideas, fun recipes and great tips.

Stay Up to Date

Get all the latest tasty goodness straight to your inbox!

Girl and her Kitchen

Join us!

Hey! I am the GIRL in the kitchen and I am so glad you decided to visit. Love to cook and eat? You will find some great recipes on this site, whether you are looking to eat healthy, splurge on a dessert, make dinner or host a party-I have it all! Sometimes I’ll give you a story along with my recipe, other times, I want to take you straight to the food!  Whatever the reason that you decided to visit, I am so glad you joined me in the kitchen! Feel free to take a look around the site, and please…stay awhile!

Archives

Popular Categories

  • Appetizers
  • Breakfast
  • Crafts
  • Salads and Dressings
  • Side Dishes
  • Vegetables and Fruit

Most Popular Posts

Corner Bakery Cafe Giveaway!

Corner Bakery Cafe Giveaway!

Filed Under: Reviews

Bacon Cheddar Skillet Cornbread

Bacon Cheddar Skillet Cornbread

Filed Under: Breads, Quick Breads and Rolls, Side Dishes

Puffy Pancakes {Perfect for Valentine’s Day!}

Puffy Pancakes {Perfect for Valentine’s Day!}

Filed Under: Breakfast, Valentine's Day

100 Days of Real Food Cookbook Review {and Giveaway!}

100 Days of Real Food Cookbook Review {and Giveaway!}

Filed Under: Vegetarian

Copyright © 2026 · Divine theme by Restored 316