• Email
    • Facebook
    • Instagram
    • Pinterest
    • Twitter

Girl and Her Kitchen

Plan. Make. Eat. Design. Craft. Create. Celebrate. Life.

  • Home
  • About the Girl
  • Recipe Index
  • We LOVE
  • Weekly Menu

Appetizers Snacks

Jalapeno Popper Dip

Well the time I wait for all year has finally arrived! Christmas! YAY!
By the time January 2nd rolls around, you will undoubtedly be completely sick of me talking about Christmas. I guarantee you that it will somehow make it into every single post from now until then. I am giving you fair warning, so plan accordingly.
The holidays mean many things to me, but one thing they mean is APPETIZERS! Seriously, tell me one other time of year you can count on eating appetizers at every family get together? I love appetizers and this is the time I try out all sorts of new ones.
My first family gathering happened to be my daughter’s birthday party just last weekend. Ok, not Christmas related, but we do call her our Christmas baby, so you can kid of do the six degrees to Kevin Bacon on that one. She definitely connects to Christmas…so it was sort of a holiday-ish get together.
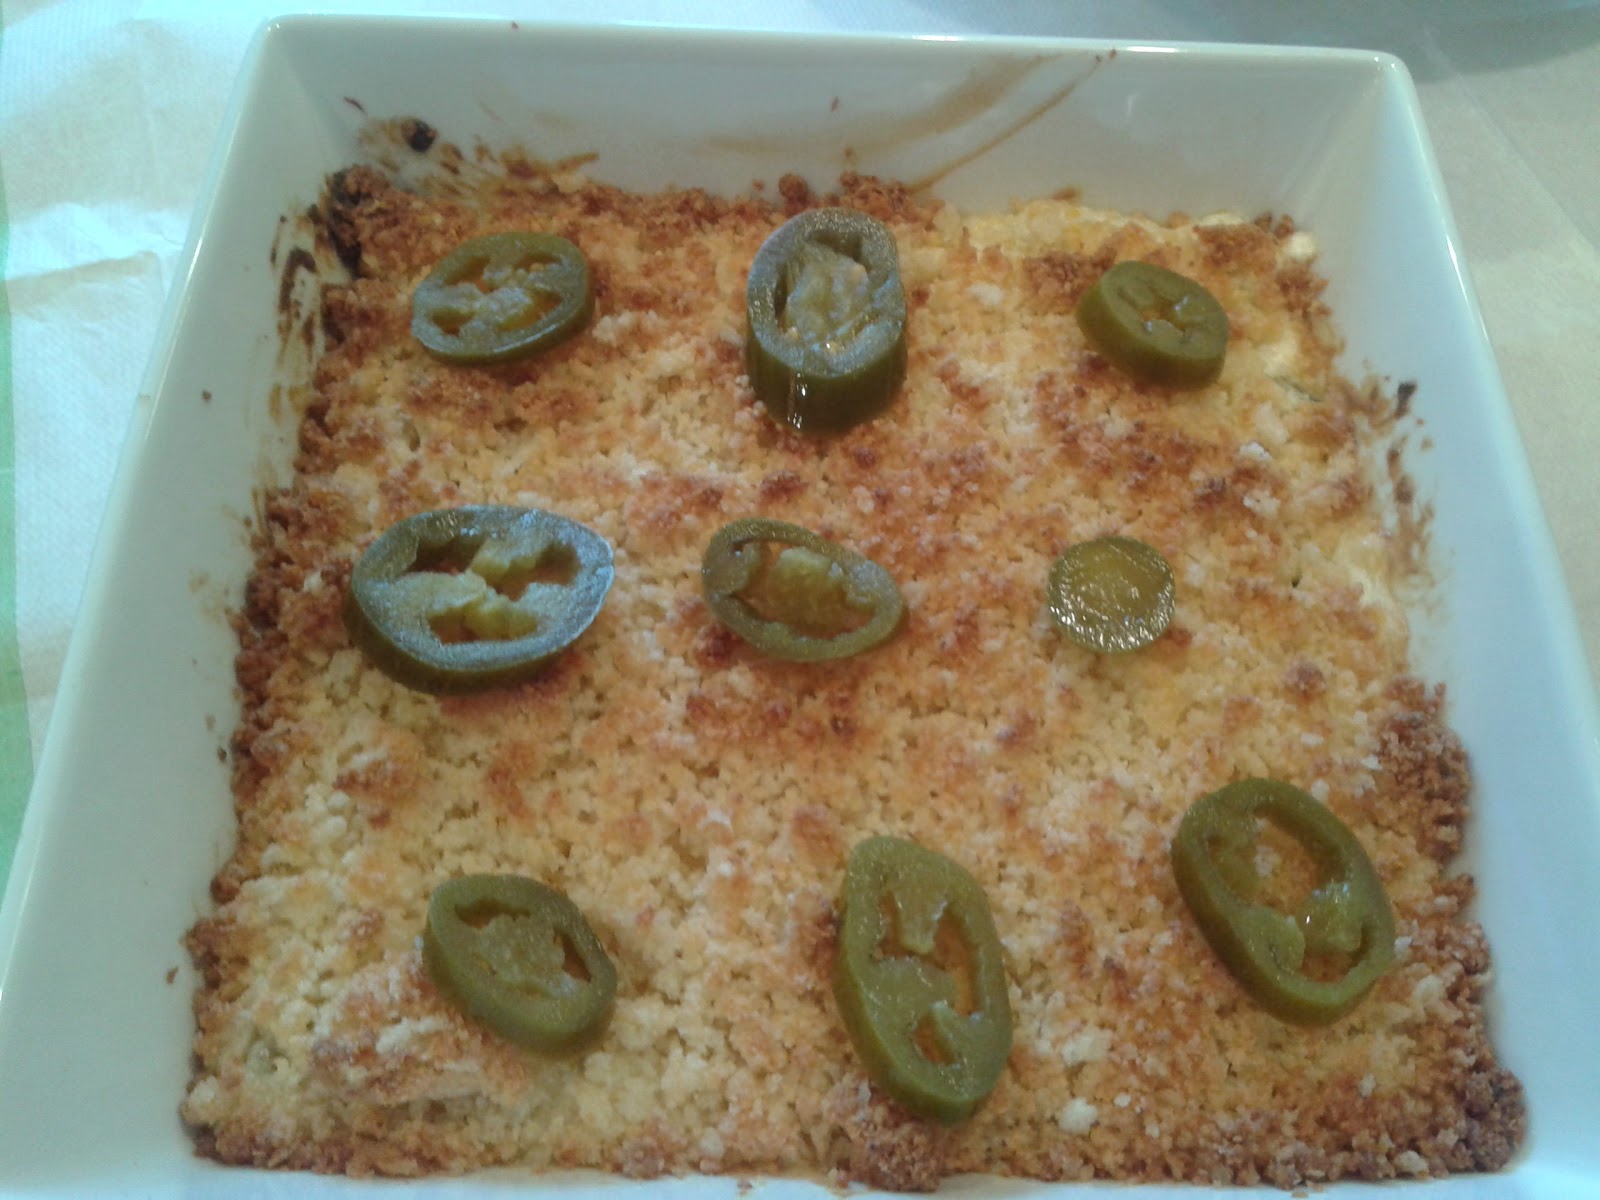
I, of course, HAD to make some appetizers and this one was a hit. I bought the mild jalapenos or I knew I would hear about how spicy it was all evening. It had just the right amount of heat to it, but if you like things really spicy, go ahead and throw the hottest of the chiles and jalapenos in there. The best thing about this dip is that it really tastes like a popper! The creamy, slightly spicy dip is accompanied by a buttery crunch of the bread crumb topping. Perfect scooped up with a sturdy chip.
First holiday appetizer! Enjoy! 🙂

 Jalapeno Popper Dip

2- 8oz packages of cream cheese, softened
1 cup mayo
1- 4 oz can of chopped green chiles, undrained
1- 4 oz. can of chopped jalapenos, undrained
1 1/2 cups shredded mexican cheese
3/4 cup panko breadcrumbs
3/4 cup parmesan cheese
1/4 cup melted butter
Sliced jalapenos for garnish (optional)
Chips, assorted veggies, crackers for serving

Mix the first five ingredients together until smooth in a large mixing bowl. Pour into a 9×9 casserole dish. Melt butter and combine with panko bread crumbs and parmesan cheese.  Sprinkle over cream cheese mixture. Bake at 350 degrees for 25 minutes or until bread crumbs are slightly browned and crunchy. Garnish with sliced jalapenos.  Serve with chips, veggies or crackers.

Heather

2 Comments

Uncategorized

Taffy Apple Salad

Every Halloween I try to make the holiday just as much for the adults, as for the kids. When I first had kids, I would make a big deal out of it and have a big lunch, dessert, and invite my parents, in laws, and siblings. My grandma used to come…even some aunts and uncles! It was so fun, but those were the days when Halloween was a little more simple. No classroom parties, trick or treating consisted on showing off the cute costumes on our tiny kids to a few neighbors and the festivities ended by 7 with the kids tucked in to bed. Since my kids started school, I had to scale back the full out party that I used to have, but I didn’t want to lose that fun we always had each Halloween. We still have a fun meal, some festive snacks, and usually a guest or two (five!). It keeps the holiday fun for us grown ups too!

This year I made a simple soup recipe, some warm bread and a crisp green salad. I finished it off with some chocolate chip pumpkin bars for dessert with a taffy apple salad.

The taffy apple salad was a perfect accompaniment to the dinner. Crunchy and sweet, with just a little indulgence in there for a Halloween treat. Great for fall, delicious anytime. Even perfect for a Thanksgiving dessert to go along with all those delicious pies!

Taffy Apple Salad

2 Honeycrisp Apples, diced
2 Granny Smith Apples, diced
1/2 cup Snickers bar, cubed
1/2 cup salted peanuts
1 cup cool whip
Caramel for drizzling

Combine apples, snickers and peanuts. Fold in cool whip. Drizzle carmel over the top and serve immediately.

Heather

Leave a Comment

Main Dishes Pasta

Butternut Squash Skillet Lasagna

2012-11-03+17.02.00.jpg

Ok-so wait.
I hid my vegetables for the first time.
You know what I mean? Remember those books that came out that were filled with recipes on how to hide vegetables from our kids. I bought one…I have absolutely no idea why. But I made a few recipes from them. You see, I cheated though. When I made the recipes, I completely spilled the beans to my kids.
“See these brownies kids? There are BLUEBERRIES in here!” They were super excited.
Brownies?
Check.
They didn’t care if I stuffed blueberries in there. They were getting BROWNIES! They love brownies AND blueberries. This was a win-win situation for them. My kids are typically huge fruit fans and even really love their vegetables most of the time so I really never had the need to hide healthy food from them, nor did I want to.
Sometimes though, things change.
I came across this recipe.
This really delicious recipe. A recipe that might possibly be worth going against everything I believe in about hiding healthy food.
This recipe was for butternut squash lasagna and seriously…I could not stop thinking about it.
Yeah, I know. What is wrong with me?
My whole day was like:
“Mom? Can you help me with my homework?”
“Sure.” Butternut squash lasagna.
“Mom? Can my we watch a show?”
“Sure.” Butternut squash lasagna.
It was in every thought.
Get the picture? See now you know. If I seem distracted to you at some point, it is probably some delicious recipe stuck in my head.
Don’t take it personally.
I knew though that my kids would not get that excited about a lasagna made with butternut squash. You see, butternut squash is one of those veggies that they do kinda have to be talked into eating. It is not like they won’t eat it. It is just a lot of work to get them there.
Also, it didn’t help that when they think about lasagna, they think about tomato sauce and ricotta cheese.
Not so much butternut squash.
So I did what any loving, caring mother would do.
I hid the squash.
Yep.
I never told them that it was in there.
And you know what the funniest part of this whole thing was?
They loved it!
Yep, two servings and plates licked clean.
I can vouch for it too.
It was amazing!

Butternut Squash Skillet Lasagna

1 pkg whole wheat lasagna noodles
3 cups fresh or frozen butternut squash, cubed
1 tsp salt
1/2 tsp pepper
1/2 tsp nutmeg
2 tblsp olive oil
3/4 cup chicken stock
1 sweet onion, chopped
1 lb. ground chicken breast
1 tblsp butter
1 tblsp flour
2 cups lowfat milk
1/2 cup mascarpone cheese
1/2 cup grated parmesan
8 oz fresh mozzarella cut into 1/2 inch thick rounds
1/2 cup seasoned panko bread crumbs
2 tblsp melted butter
sage leaves

Cook lasagna noodles 1 minute less than recommended cooking time, and set aside to cool. In a large skillet, heat 1 tblsp of olive oil. Add squash, 1/2 tsp salt, pepper, and nutmeg and stir to coat. Add 1/3 cup stock and cover skillet. Cook squash for 8 – 10 minutes or until completely fork tender. Transfer to a bowl and mash with a fork.
Preheat oven to 400 degrees. Heat the other tblsp of oil in the skillet and add ground chicken, onion and 1/2 tsp of salt, cooking until browned and chicken is fully cooked through about 6 minutes. Remove from skillet and set aside.
Heat butter in skillet and once melted, whisk in flour until a thick paste forms. Whisk in milk. Keep whisking until smooth and fold in mascarpone cheese. Stir until smooth and add parmesan. Whisk in mashed in butternut squash. Turn heat off. This mixture will be really thick so add stock until it is a bit thinner. You don’t want it to be watered down, per say, but more of a sauce consistency. Stir in chicken mixture and coat with sauce. Rip apart lasagna noodles and add to skillet, saving four noodles whole. Top the lasagna with the whole noodles, covering the top. Combine the bread crumbs and the melted butter in a small bowl. Sprinkle evenly over the lasagna and top with mozzarella cheese. Garnish the top with sage leaves. Place the entire skillet in the oven and bake for 20 minutes. Turn on the broiler, and broil top of lasagna for 3-5 minutes or until the mozzarella is browned and bubbly. Serve immediately.

*Recipe adapted from How Sweet It Is

Heather

Leave a Comment

Thanksgiving

Individual Pumpkin Cheesecakes


I remember when I first had a baby and our friends Tina and Sean came over to meet our new little member of the family. They already had two kids at the time and were definitely more seasoned in what it was like to actually have little humans running around the house wreaking havoc on all that you have. They were smiling about the fact that we had a dish of candy on one of our coffee tables along with some candles. They both advised us to enjoy having that out since this would be the last time we would ever be able to have that out for a very long time without it being destroyed.  I remember sitting there and holding our little girl, all wrapped up in a blanket, thinking, this is the life. Calm. Peaceful. Content.

Fast forward eight years later, and guess what?
They were right.
Not only did we have to leave the candy out of decoration plans following that year, we also left the table out.
Yes, the whole table left our family room.
It found a nice cozy spot in our basement, where it stayed for a long time.
It just didn’t fit with our parenting philosophies of letting our kids actually play in our home.
GASP.
Yes, we have a very small family room and if we wanted our kids to be able to play, we had to get rid of the table.
It was fine. We only really missed it when our feet needed to find a place to rest after a long day with the kids. Or when we wanted to enjoy a pizza and a movie after the kids went to bed…it was hard to find a place for the pizza with no table.
But, guess what?
We survived and the kids had a blast with the giant (super tiny) play space that they gained without the table.
It returned recently to our family room now that the kids are all old enough to do more than toddle in a tiny space and play with toys scattered on a blanket.
It was the best toy in the room for the kids. You would be amazed at how many super fun games can be played on a table. Seriously, I was amazed.
The point?
When I hosted book club with some friends, it held these delicious mini pumpkin cheesecakes quite wonderfully.
We all win.
Welcome back table. It’s nice to see you again.

Individual Pumpkin Cheesecakes

Makes 8 individual cheesecake parfaits

1 can of pumpkin puree
1 can of sweetened condensed milk
2 – 3 tblsp brown sugar
1/2  tsp cinnamon
1/2 tsp nutmeg
2 tsp pumpkin pie spice
1 egg, beaten
1 1/2 cups heavy cream
1 pkg, cream cheese softened
1/2-1 cup powdered sugar
2 cups crushed graham cracker crumbs
6 tblsp butter, melted
Fresh Nutmeg for serving

*Read Recipe: These need to be chilled so need to be made ahead of time or overnight.*
In a small saucepan over medium heat, combine pumpkin and sweetened condensed milk, whisking until smooth. Add sugar and spices. Taste and add more sugar or spice to your liking. Heat over low heat whisking frequently for 8 minutes. In a small bowl, whisk one egg. Add a few tablespoons of hot pumpkin mixture to egg whisking very fast until smooth. Add a few tablespoons more and repeat whisking process. Continue to do this until you have about a cup of the mixture in the small bowl with the egg. This is called tempering. Basically you are slowly getting the egg up to the hot temperature in a way that prevents it from scrambling. Add the entire small bowl mixture to the hot pumpkin mixture in the saucepan. Whisk together and heat through, about 8-10 minutes stirring frequently. Turn off heat. Meanwhile in a bowl, with beaters on high, beat heavy cream with powdered sugar until whipped and fluffy. Whip in softened cream cheese. Whip until fluffy, thick and smooth.
In a medium bowl, mix graham cracker crumbs with melted butter until crumbly and buttery. Test some of the graham mixture by pressing a bit together in your fingertips. If it doesn’t slightly stick together, add a little more melted butter. In 8 individual dessert dishes or glasses, press a 1/4 cup of graham mixure into the bottom. Top with a quarter cup of pumpkin and top with 1/4 cup cream cheese mixture (I piped my cream cheese mixture for a prettier look!). Chill for 3 hours or overnight. Serve with a sprinkle of fresh nutmeg.

*I used mini dessert dishes and it made more than 8/Also, for a great way to transport these and hold them in the fridge is a muffin or a jumbo muffin pan. Holds them right in place and easy to take in and out of the fridge.*

Heather

1 Comment

Breads, Quick Breads and Rolls

Easy Homemade Bread {Truly Unbelievable!}


I love homemade bread. There is nothing better than the smell of it baking in your house and the taste of it right out of the oven. My mom was big on baking homemade bread as well and, lucky for me, we enjoyed many a loaves when I was younger. I love baking it almost as much as I love eating it. It sounds funny, I know, but there is something very comforting about making the dough and then reaping the rewards of your hard work when it comes out of the oven.
A lot of time, people shy away from even attempting to make homemade bread because the whole process might seem a little intimidating. I promise, stick with me and you will be making the best homemade bread in no time.
Let’s start slow though….
I recently attempted this loaf of bread I saw on Pinterest. It intrigued me because it claimed to be really easy. I realized I had all the ingredients already in the house, and it did seem really easy.
I gave it a try.
The result?
A chewy on the outside, soft on the inside, flavorful, delicious bread that was super easy to make!
I promise.
Let’s make this your first “bread-making” lesson and we will start with this easy loaf. It is so good and so worth it!
It is important to note though, that you have to start this dough the night before you want to make it. Don’t let this scare you! Keep reading and you will see how easy this is!

Easy Homemade Bread

3 cups all purpose flour
2 tsp salt
1 tsp yeast
1/4 cup honey
1 1/2 cups water

In a large bowl, whisk together flour, salt and yeast. Drizzle in honey and add water. Mix until a very wet dough forms. Cover bowl with plastic wrap and set askide for 12-18 hours to rise. DO NOT REFRIGERATE.
Heat oven to 450 degrees and heat a cast iron pot for 15 minutes in the oven. (I actually used a large corning ware pan, because I don’t have a cast iron pan! I sure need one though!) While pot is heating, take dough out of bowl and shape into a ball on a heavily floured surface with heavily floured hands. Take pot out of oven and  add dough. Cover and bake at 450 degrees for 30 minutes. Remove lid and bake for 15 minutes more. Carefully take pot out and remove bread. Serve hot with butter.

Heather

1 Comment

Snacks

Quinoa and Chocolate Chunk “Granola Bars”

I have been searching for a delicious homemade granola bar for a long time. I love granola bars, but I think it is hard to find a really good, satisfying granola bar that isn’t loaded with all sorts of horrible stuff. If I am going to have a granola bar, I want it to be good for you. Really. If I am going to have horrible stuff, I …um… would much rather waste those calories on say, chocolate cake?
 Definitely not a granola bar.
I want a healthy delicious snack that I can feel good about. I really love crunchy granola bars, but this recipe was not that. When they first came out of the oven, I wasn’t sure because I was really looking forward to a crunchy version.
Believe me, what these lacked in crunch, they made up for in flavor. These are a softer, more delicate granola bar, but so filling, satisfying and delicious. They honestly have more cookie like consistency, but hey, a cookie that is good for you? Sign me up!
Make a batch of them and cut them into individual servings. Wrap them up and freeze them…if they last that long. My kids brought them for their snack in their lunch and we finished the WHOLE batch in less than a week. These make a lot too! You will love them!

Quinoa and Chocolate Chunk Granola Bars

1 cup quinoa, cooked and cooled
3 tblsp milk
1 1/4 cup oats
1 cup slivered almonds
1/2 cup ground flaxseed
3/4 cup dark chocolate chips
1/2 cup honey
1/4 cup butter, melted
1 tsp vanilla extract

Preheat the oven to 350 degrees. Line a 13×9 baking pan with parchment paper with a slight overhang. In a large bowl, mix quinoa with milk. Stir in oats, almonds, and flaxseed. Fold in chocolate chips. Slowly add honey, butter and vanilla and stir until mixture is completely moistened. Press mixture into baking pan and push down with a spoon so it is firmly packed into the pan. Bake 20 minutes until slightly browned. Cool completely, and remove bars using parchment overhang. Cut cooled granola bars into snack sized portions. Store in a tightly sealed container at room temperature or freeze.

Heather

Leave a Comment

Beverages Halloween

Apple Cider Sangria

I feel like the summer brings an endless supply of drink recipes. It is so easy to think of a refreshing, summer drink, but when it comes to fall, it never seems so easy. Of course beer comes to mind, but if you absolutely hate beer (who…me?) that really won’t do it for you either.
Now, I was thinking….summer….turn a summer drink into a fall drink…hmmm…
The first thing that came to mind was sangria. I looked at a few recipes and kind of mashed them together with a fall twist. Enjoy this with your favorite fall appetizers and some good friends.
Make a double batch.
I highly recommend a double batch.

Apple Cider Sangria

1 bottle sweet white wine
3 cups apple cider
1/2 cup brandy
2 apples, diced
2 pears, diced
1 cup lemon lime soda

Mix all ingredients together except for soda and chill for at least three hours. Add soda right before serving. Enjoy!

Heather

Leave a Comment

Halloween Snacks

Pumpkin Seeds {Two Ways!}

I vaguely remember my mom making pumpkin seeds when I was little, but for all I know, she could have toasted these up every Halloween and it is just permanently filed away in the “do not disturb” part of my brain.
It seems like more and more memories are getting locked up there these days.
The verdict is in…I am getting old..-er.. I really just cannot bring myself to say “old” yet. Sorry.
So, back to the seeds, (see, really frightening proof of my getting old….-er is my tendency to go off on really strange tangents!). ANYWAYS-the seeds!
Okay, the seeds. So, after I had kids and we carved our obligatory pumpkins, well, I tried making toasted seeds.
Let’s just say I had less than stellar results.
So, fast forward about five years, when I was sitting at my friend Vickie’s house for some appetizers and drinks right around Halloween. She had this bowl of seeds sitting there, right in front of me. She kept pushing it towards me, telling me to try one, that they were really good.
Well, let’s just say, I was ignoring her for a bit, remembering my slightly overcooked, sorta chewy, flavorless, soon to be tossed in the garbage seeds I had made a few years back.
Well, Vickie is not one to let you off the hook.
I finally dipped my fingers in the bowl and tasted the seeds, the seeds that soon became known as little bits of Halloween Heaven.
Well...not really...but wouldn’t that be a good addition to this story if I did start to call them that?
So anyways, she was nice enough to share her recipe with me, which I proceeded to use all these years.
And then, wouldn’t you know, years later, in walks my other good friend Tara, (well to be honest, we were sitting in her kitchen) telling me how delicious the seeds her husband makes are. Well, of course I asked her to send me the recipe, and of course I had to try to make them.
OMG. (I really never say OMG either, but it seemed to fit. Giggles as I remember yesterday when my 5 year old kept saying GOM! She really just didn’t get it. )

So good.
So good.
It is really an almost similar recipe, and they are both equally good, but I am just giving you two ways to make your own….Halloween Heaven!
Or, er..whenever you want to eat them. Totally does not have to be Halloween.

Vickie’s Pumpkin Seeds

*recipe edited with some of my changes I have added in throughout the years while still being true to Vickie’s recipe!*

Clean seeds by rinsing them and getting all of the pumpkin pulp off. Let air dry for about an hour.

In a large fry pan, with about 1 tblsp butter per 3 cups, lightly saute seeds for 10 minutes

Add 1 tsp popcorn salt

Bake at 225 degrees for 90 minutes, stirring every 15 minutes

Let cool. Store in an airtight container for up to one week.

(Vickie is a self described saltaholic and salts the seeds every time she opens the oven to stir. You can try it, but proceed with caution!)

Jon’s Pumpkin Seeds

Clean seeds
 
Soak overnight in Salt water solution (1 1/2 tsp per cup of water), use enough to cover all seeds

Drain excess salt water
 

In large fry pan with about 1tblsp butter fry seeds lightly for 5 min stirring constantly.  

Add 1 tsp salt

Place on baking sheet spread evenly
 

Bake at 350 for 15 minutes (mine took only 10 but my oven runs hot. Watch them carefully)
 

Salt if desired


Heather

Leave a Comment

Breakfast

Pumpkin Butter

When I was little, for some reason, it was such a treat to have apple butter in the fridge. I just loved it! The fresh flavor of apples, cinnamon and sweetness. I loved it! I used to spread it on toast, graham crackers, whatever, it was just that good.
I have now discovered pumpkin butter and that almost beats apple butter out of the park. Now don’t get me wrong, I still love my apple butter, but there is something about pumpkin butter that just seems ….decadent. You know, it almost feels like you are eating pumpkin pie for breakfast when you spread it on your toast. Of course, being the serial label reader that I am, I was dismayed to find out that many of the brands add lots of stuff that I would rather not have in my pumpkin butter.
I decided to take this one on.
Why couldn’t I make a sweet, smooth pumpkin butter, with only real ingredients?
The result?
Amazing.
Try it for yourself-when you wake up in the morning and make yourself a piece of toast…you may even feel…giddy.

Pumpkin Butter

3 1/2 cups pumpkin puree
2 1/2 tsp vanilla extract
3/4 cup apple cider
1 cup brown sugar
2 cinnamon sticks
2 1/2 tsp pumpkin pie spice
1/2 tsp nutmeg
1/4 tsp ground cloves

Combine all ingredients in large saucepan on the stove. Bring to a boil. Reduce heat. Simmer for 30 minutes or until thickened. Stir frequently. Let cool, remove cinnamon sticks and serve. Will keep in a tightly closed container for two weeks.


This is great on toast, graham crackers, or as a dip for apples! Enjoy!

Heather

1 Comment

Uncategorized

Pumpkin Chocolate Chip Bars

My friend Tina used to bake a Pumpkin Chocolate chip cookie every year at Christmas that was so good! The reason I think I loved it so much was because although it was a holiday cookie, it had some evidence of the fall season that just passed as well. I always loved sampling her cookies, and these bars nostalgically remind me of that cookie. I love the pumpkin flavor combined with the deep rich chocolate in this bar. Not to mention, these are so moist, they almost melt in your mouth. I cut them really small because they are so rich and delicious, you only need a bite to be satisfied. Or two or three….just for fun though…
If you have strong opinions against using so much butter (I should, but could not resist trying these out with the two sticks), you may sub in a half cup of applesauce. These also freeze well, so you can bake a pan and freeze some for all of your fall holiday occasions.

Pumpkin Chocolate Chip Bars

2 1/3 cups all-purpose flour
1 tablespoon pumpkin pie spice
1 teaspoon cinnamon
1 teaspoon baking soda
3/4 teaspoon salt
1 cup (2 sticks) butter, room temperature
3/4 cup granulated sugar
3/4 cup dark brown sugar
1 egg
2 teaspoons vanilla extract
1 (15-ounce) can pure pumpkin puree (not pumpkin pie mix)
2 cups chocolate chips (I stand by Ghiradelli bittersweet chips-THE BEST!)

Preheat oven to 350 degrees. Line a 9×13-inch pan with parchment paper, leaving an overhang on each long side.
In a medium bowl, combine flour, pumpkin pie spice, cinnamon, baking soda, and salt; set aside. In a large bowl using a mixer, cream the butter and sugars on medium-high speed until smooth. Beat in egg and vanilla until combined. Add pumpkin puree and mix until combined. Mix in the dry ingredients and fold in the chocolate chips. Spread the batter evenly in the pan. Bake 35 minutes or until toothpick inserted in the middle of the bars comes out clean. Cool completely in the pan about 1 hour, and then lift bars out onto a flat surface using parchment paper. Cut into squares and serve.

*Recipe adapted from Mel’s Kitchen Cafe

Heather

Leave a Comment

  • « Previous Page
  • 1
  • …
  • 26
  • 27
  • 28
  • 29
  • 30
  • …
  • 38
  • Next Page »

Heather

I am a midwestern girl who grew up in the big city, but now enjoys her days as a stay at home mom in the suburbs. Who says spending time in the kitchen has to be boring? I hope to inspire your family kitchen with some new ideas, fun recipes and great tips.

Stay Up to Date

Get all the latest tasty goodness straight to your inbox!

Girl and her Kitchen

Join us!

Hey! I am the GIRL in the kitchen and I am so glad you decided to visit. Love to cook and eat? You will find some great recipes on this site, whether you are looking to eat healthy, splurge on a dessert, make dinner or host a party-I have it all! Sometimes I’ll give you a story along with my recipe, other times, I want to take you straight to the food!  Whatever the reason that you decided to visit, I am so glad you joined me in the kitchen! Feel free to take a look around the site, and please…stay awhile!

Archives

Popular Categories

  • Appetizers
  • Breakfast
  • Crafts
  • Salads and Dressings
  • Side Dishes
  • Vegetables and Fruit

Most Popular Posts

Corner Bakery Cafe Giveaway!

Corner Bakery Cafe Giveaway!

Filed Under: Reviews

Bacon Cheddar Skillet Cornbread

Bacon Cheddar Skillet Cornbread

Filed Under: Breads, Quick Breads and Rolls, Side Dishes

Puffy Pancakes {Perfect for Valentine’s Day!}

Puffy Pancakes {Perfect for Valentine’s Day!}

Filed Under: Breakfast, Valentine's Day

100 Days of Real Food Cookbook Review {and Giveaway!}

100 Days of Real Food Cookbook Review {and Giveaway!}

Filed Under: Vegetarian

Copyright © 2026 · Divine theme by Restored 316