• Email
    • Facebook
    • Instagram
    • Pinterest
    • Twitter

Girl and Her Kitchen

Plan. Make. Eat. Design. Craft. Create. Celebrate. Life.

  • Home
  • About the Girl
  • Recipe Index
  • We LOVE
  • Weekly Menu

Side Dishes Vegetables and Fruit Vegetarian

Easter Menu: Garlic and Sour Cream Mashed Potatoes

As the mother of four, it’s often difficult to please every palate with one dinner. One child loved chicken while the other wanted fish; one burgers the other hot dogs; and the same with pot roast or pork roast… every meal. It’s a bit unnerving to have someone unhappy at every sitting. I’ve heard the saying that you can’t please everyone all the time, but–and I know you will agree–as a mother, I always wished I could.

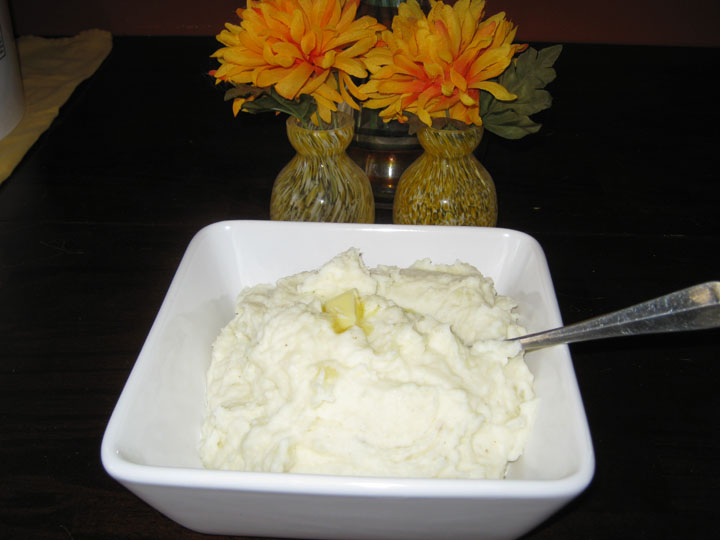
Thankfully, there was always one thing that I was sure they would all love no matter what entrée I put next to it: mashed potatoes. All the kids love mashed potatoes and so do I. I love potatoes in all their incarnations, but mashed is my favorite. The creamy texture is so delightful and the buttery flavor is always sure to please. And they had the power to make assembling around the dinner table much more harmonious.

As the kids grew up, their taste buds grew as well and I was able to experiment with different additions to my regular mashed potatoes. This is one of my best. The garlic, cooked with the potatoes, takes on an almost roasted flavor and permeates the potatoes to the perfect degree. The sour cream adds the velvety texture we all love with mashed potatoes and adds a unique, baked potato essence.

This side dish is perfect for your Easter dinner because it’s a delicious mashed potato “upgrade” without a lot of extra work. It’s going to compliment the garlic and herbs in the lamb perfectly, while adding a luxurious and creamy texture to the the plate. Make plenty because your guests are going to love them.

Garlic and Sour Cream Mashed Potatoes

2 1/2 lbs. russet potatoes
1 cup sour cream
2-3 cloves garlic, peeled
1/4 cup butter
Salt and pepper to taste

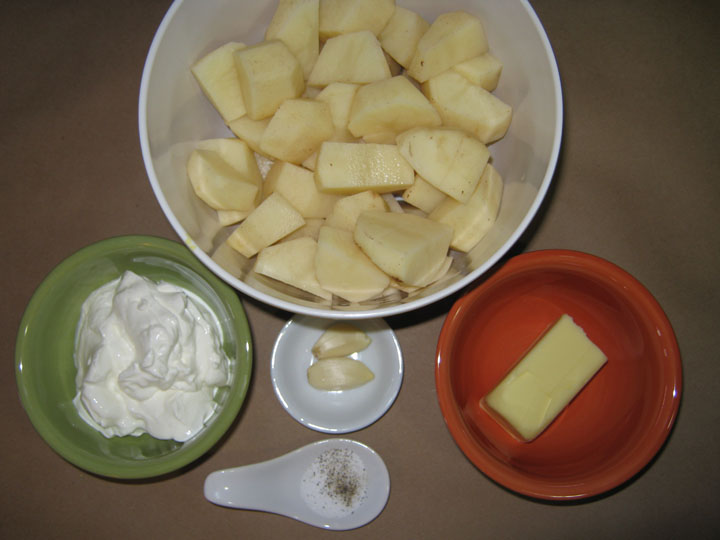
Peel and dice potatoes to a uniform size so they cook evenly. Place potatoes and garlic cloves in a pot and cover with water to about one inch above the potatoes. Add a tsp of salt to the water and bring to a boil, reduce to simmer. Cook until the potato is easily smashed with a fork, about 25 minutes.

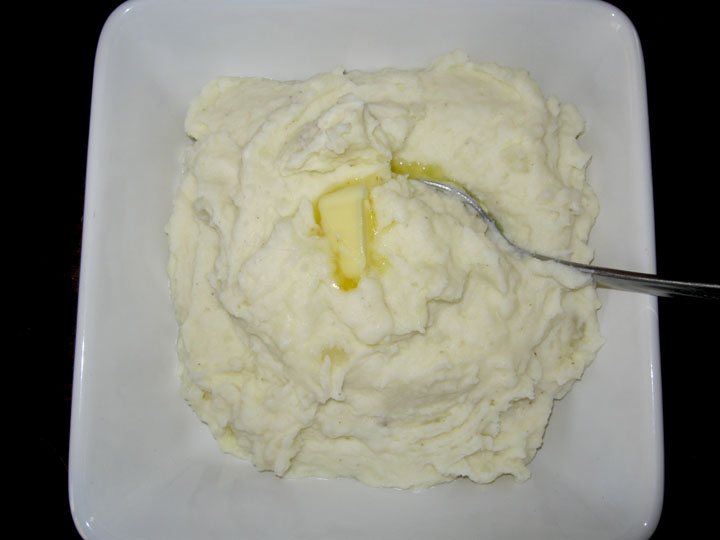
Drain the potatoes and place in a bowl. Add butter, sour cream, salt and pepper. Mix with a mixer or blend in a food processor until creamy. Taste one more time to make sure seasoning is just right. Place in a serving bowl and top with a small pat of butter.

Your guests will dive into these potatoes with great gusto. And everyone will be pleased with the taste. Even your most finicky guests, or as I like like to call them, the children. I’ve actually seen my kids put down their Easter baskets to get to the mashed pototoes. It was our version of an Easter Miracle.


Some sides from this site that will also work well:
Mediterranean Orzo Salad
Perfect Roasted Asparagus

Heather

Leave a Comment

Easter Lamb Main Dishes

Easter Menu: Herb & Garlic Crusted Lamb Chops

When I was a kid, Easter dinner meant one thing: we were having ham. I’m not grumbling; my mom was a great cook and I don’t mind having ham once in a while, but my kids aren’t big ham fans. So, being the good mom I try to be–and to avoid the dissatisfied wails of my rug-rats–I had to make a few adjustments.

One of those was finding something new for Easter dinner. Lamb was a perfect choice. It’s special in the sense that most people don’t eat it often, and yet it’s easily accessible. You can find lamb in various cuts in most grocery stores, especially around Easter time.

The good news about lamb: it’s super easy to make. It’s one of those meats that can be cooked rare, medium, or well. (Which makes it almost foolproof.) And it’s delicious.

When I was working on this recipe I tried to combine some of my favorite flavors for lamb. These spices bring out lamb’s most succulent qualities. And the aroma of garlic, rosemary, thyme, and oregano will switch everyone’s taste buds to on position.

If you’ve never tried lamb before, this will be the perfect recipe to start with. The cooking method is simple, the flavors are familiar and comforting, and I’ll walk you through the whole process. So let’s go, because as Peter Cottontail would say, “Easter’s on it’s way”.

Herb & Garlic Crusted Lamb Chops

6-8 Lamb Loin Chops
1/3 cup bread crumbs
2-3 cloves minced garlic
1 1/2 Tbs. fresh thyme, chopped
2 tsp. fresh rosemary, chopped
1 1/2 Tbs. fresh oregano, chopped
Salt and pepper to taste
3 tsp. Dijon mustard

Preheat oven to 350 degrees. Bring chops to room temp before cooking. Mix bread crumbs, garlic, oregano, thyme, rosemary, salt and pepper together in a bowl. Pour onto the center of a large piece of aluminum foil. Baste each chop with dijon mustard on one side, place dijon side down in bread crumb mixture and baste second side with the mustard. Flip to cover other side with crumbs. Place all the chops on a plate, ready to cook and fold up the foil, with crumbs inside, and toss in the trash. (Easy clean up is one of my favorite ways to cook!)

Heat 2 Tbs. oil in a large pan. It’s important to remember when frying not to crowd your pan. Crowding can turn frying into sautéing. We don’t want that. We want nice, crispy, golden chops. Place chops in pan and cook until crisp and a rich, honey-amber color, about 2-3 minutes. Flip and cook on other side for the same amount of time. After browning, place the chops, still in the pan, in the oven. Cook for an additional 6-10 minutes depending on whether you want them rare, medium or well done.

* Note: if your pan has a plastic handle it can still be placed in the oven. Just wrap the handle completely in foil. This makes it oven safe up to 450 degrees.

When you take these out they will be juicy and tender, golden and delicious, and ready to stun your family or guests. Serve them up with the side dishes recommended in my next posts, and your Easter dinner will be complete. Hippity, hoppity let the holiday begin.

* This meal would be perfect with these other recipes from Our Kitchens:
Easy Homemade Bread
Buttermilk Herb Bread

Heather

Leave a Comment

Appetizers Easter

Easter Menu: “Angeled” Eggs

I don’t know about you, but I’m thinking Easter. As someone who loves to entertain, holidays are one of my favorite times to have guests. It’s also one of the most likely times for your schedule to fill up, leaving you little time to actually plan and execute a memorable holiday meal. That’s where I come in.

This Easter, I’m offering you an entire Easter menu, from starter to dessert. I will take all the worry out of your meal so you can spend time on the important things, like coloring eggs and hiding them for the big egg hunt. (And you may actually be able to spend time with your family and guests for a change.) This menu will be broken up into a week-long posting, so check back each day to see what’s next.

Today’s recipe is simple, but with a touch of class. It uses the one thing everyone has an abundance of at Easter time: Eggs! Lots and lots of eggs. If your kids are like mine, they eat one egg in the morning and that’s it for the rest of the day. (Maybe it’s all that candy!) Meanwhile, you’re stuck with piles of hard boiled eggs, from the egg coloring to the egg hunt and every egg in between. Here’s the answer to your eggs-aggerated abundance of “hen fruit.”

This recipe for deviled eggs is a classic. It’s the way my mom taught me and, though I have no idea where she got her recipe from, sentimentally, I’m kind of hoping it was from her mom. The truth is, mom’s hand-me-down recipes are always the best. They evoke memories of childhood and family and, best of all, mom’s love. And who would ever change one word of those precious memories? Not me. But while the basic deviled eggs recipe is tried and true, I’ve freshened it up and made it more angelic.

“Angeled” Eggs

1 dozen eggs, FRESH
2 Tbs. mustard
1/2 cup mayonnaise
salt and pepper to taste

Small package of lox (smoked salmon), diced
1 Tbs. capers, chopped
4 pieces of crisp cooked bacon
2 Tbs. chives, chopped
Smoked paprika for sprinkling

 The most important part of hard boiling eggs is starting with fresh eggs. That makes them easier to peel. Take your fresh eggs out and let them come to room temp before you begin. This ensures the cooking time will be more accurate. Place eggs in a pot in a single layer, cover with COLD water to about and inch above the tops of the eggs. Bring the water to a boil. As soon as the pot of water comes to a boil, remove it from the heat and cover it with a lid. Let the eggs sit in the boiling water for 15 minutes. Drain and fill pot with very cold water to stop cooking. Let cool.

Remove the shells from your eggs and rinse to ensure all the shell is gone. With a sharp knife, slice the eggs in half lengthwise and remove the yolks. Place the yokes in a large bowl, place the whites on a platter, hole side up, and ready to fill. Add the mustard, mayonnaise, salt and pepper to the yolks. I use a potato masher to get all the lumps out, then stir a few times with a spoon just to make sure all is well blended.

I use a pastry bag to fill my eggs, but if you don’t have one, just place all your yolk mixture in a large zip lock bag, twist the top, and cut off one corner. Making sure the twisted part of your bag is tight, squeeze some yolk mixture into each egg white till it’s a bit above the surface of the egg white.

Now comes the part where we turn deviled eggs to the bright side. The secret’s in the toppings. The right toppers take the evil out of the eggs and make them, well, heavenly!

I prefer preparing a variety of eggs. For some, I sprinkled on a bit of lox and chives, others bacon, or capers, or capers and lox … well you get the idea. Then I dusted them with a bit of smoked paprika for lovely color and some smokey flavor. Don’t be limited by my favorite toppings. Use your imagination. If you would like it on your egg, then try it. And, they look fantastic. Your guests will devour these and your kids will love them too. (My daughter ate 14 of them!) No more strangely colored eggs staring back at you every time you open the fridge for weeks after Easter. Who needs that guilt trip, right?

* Some of Our other appetizers that will be good companions to these eggs are: 
Cheesy Stuffed Mushrooms
Tomato Cheese Tarts with Carmelized onions

Heather

Leave a Comment

Breads, Quick Breads and Rolls St. Patrick's Day

St. Patrick’s Day: Irish Soda Bread

My husband does not cook.

I mean, he does many things, but cooking is just not one of them.

Sometimes he tries. He will offer to cook. I begrudgingly say yes, (begrudgingly, only because I know what is coming.)

He starts to prepare. And then…it starts.

The questions. The many, many, many questions.

Questions so plentiful, you honestly feel that death would be better than one. more. question.
But another one comes. And another.

And so many more after that, you are ten times more exhausted then if you really would have done all the cooking yourself. Repeat this same process if he is at the grocery store. You get the picture.

Now, I am not insulting him. He would laugh if he read this because he knows it’s true. He owns it.
I mean, this is a man who cleans, does laundry and is almost 100% helpful in every other area of home life.

As I said before, cooking is just not one of them.

When I was a kid, one of my good friend’s dad…now he knew how to cook. Not only did Melissa’s dad cook, he loved to share his creations with you. He was one of those cooks that were truly happy when you ate. And ate. And ate. Oh, did I eat.

Cheesecake, pasta, salads…you name it, this guy made it. I remember having some of the best treats for snacks when we were really young, and devouring cold, delicious pasta from the fridge at three in the morning after a night out, when we were a tiny bit older.

So fast forward to adulthood and nights that would never last until three am, and I find myself thinking of some of his recipes from time to time.

My friend, who is also a great cook herself, has made some of his fabulous dishes over the years, one time even bringing me a large bowl of pasta and a loaf of fresh baked Irish soda bread when I had just had a baby. Talk about comfort food…yum.

The reason that this soda bread is so perfectly delicious is that it is so easy to make, doesn’t require yeast and has the most perfect golden brown crust when it comes out of the oven. Did I mention the inside of the bread is incredibly soft and tender with just the right amount of sweetness. The raisins are optional, but I would highly recommend not leaving them out. I don’t even like raisins, and I love them in this bread. Give it a try, you might decide you agree.

This recipe makes a big amount, (three loaves!) perfect for sharing with friends! Bake some up and make this St. Patrick’s day a little bit sweeter.

Save Print
St. Patrick's Day: Irish Soda Bread
Author: Heather
Recipe type: Bread
Cuisine: Dessert/ Breakfast
Cook time:  60 mins
Total time:  1 hour
Serves: 3 loaves
 
This delicate bread is wrapped in an almost crunchy, golden brown crust with the most delicious tender inside and pops of sweet, juicy raisins. Perfect for St. Patrick's Day, and just right for any time!
Ingredients
  • 8 cups all purpose flour
  • 2 cups sugar
  • 3 tbsp baking powder
  • 2 tsp baking soda
  • 2 tsp cream of tartar
  • 3 eggs, beaten
  • ¾ cup butter, melted
  • 2 cups of raisins (I use a mix of regular and golden raisins)
  • 1 quart buttermilk-divided
  • Coarse sugar for sprinkling
  • Butter for serving
Instructions
  1. In a small bowl, place two cups of raisins and 2 cups of buttermilk.
  2. Microwave on high for 45 seconds.
  3. Let raisins sit and soak in the bowl while you are preparing the dough.
  4. Mix all of the dry ingredients together in a very large bowl.
  5. Add beaten eggs and melted butter.
  6. Stir with a fork.
  7. Add buttermilk and stir with a sturdy wooden spoon until batter is combined.
  8. Add raisins and buttermilk from soaking.
  9. Stir with a wooden spoon until raisins are incorporated.
  10. It will be lumpy looking.
  11. Pour evenly into three standard size loaf pans and smooth the top.
  12. Sprinkle coarse ground sugar on top.
  13. Bake at 350 degrees for 60 minutes.
  14. Check for doneness.
  15. If it still needs time, bake for longer in five minute increments until loaf is ready.
  16. Cool ten minutes in the pan.
  17. Turn out onto a wire rack and cool before slicing...if you can wait!
  18. Serve with soft butter.
3.5.3251


Heather

Leave a Comment

Uncategorized

Zucchini Banana Chocolate Chip Cupcakes

I think I might love cupcakes almost as much as I love muffins.
Almost.
As you know from my millions of muffin posts (more to come, I assure you)…that is an awful lot.
Enter in, Zucchini Banana Chocolate Chip Cupcakes.
I know. The name of these is a mouthful. Both figuratively, and literally.
These are probably one of the more riskier cupcake adventures I have taken, but it was very worth it. A healthy cupcake? I mean, seriously, you can probably leave off the ganache and call it a muffin.
Either way, I am a happy girl.
These are healthy and delicious. With ingredients like shredded zucchini, mashed banana and whole wheat pastry flour, who could go wrong? These also sport only one third cup of brown sugar in the WHOLE recipe, but somehow end up sweet and perfect. They are pretty darn guilt free, so when you top them with some of the ganache (definitely not guilt free) you don’t have to feel so bad! I mean, we are entitled to a little bit of indulgence right? If you can’t make that sacrifice, leave off the frosting, and you will still have a really tasty dessert (or breakfast. Hey! Did you hear me when I said ONLY 1/3 cup of sugar? It is okay!)  to enjoy.
These cupcakes were made in the “other girl and her kitchen” ‘s kitchen. We had a blast cooking together, laughing and experimenting with our recipes. That is really what cooking is all about to me. I put my heart into everything I make, and usually am making whatever “it” is for someone I love and care about.
I hope these recipes give you the same feeling. If you are a pro in the kitchen, or just starting out, I hope that we can enjoy these recipes together…one cupcake (or muffin) at a time! 🙂

Zucchini Banana Chocolate Chip Cupcakes

Makes 12 cupcakes

2 cups whole wheat pastry flour
1 teaspoon baking soda
1 teaspoon baking powder
1/2 teaspoon cinnamon
1 large egg
1/3 cup packed brown sugar
1/3 low fat buttermilk
2 tsp vanilla extract
1/4 cup butter, melted and cooled
1 1/3 cups shredded zucchini
1 large banana, mashed
1/2 cup dark chocolate chips

1 recipe Chocolate Satin Ganache

Preheat oven to 350 degrees. Prepare a 12 cup cupcake pan with cupcake liners and set aside. In a small bowl, combine whole wheat pastry flour, baking soda and powder, and cinnamon. Set aside. In a large bowl, beat egg and brown sugar with an electric mixer until smooth and no lumps remain. Add in vanilla, butter and buttermilk. Mix until well combined. Add in zucchini and mashed banana.

Slowly add in dry ingredients and mix on low until just combined. Fold in chocolate chips. Using an ice cream scoop, evenly divide batter among the 12 muffin cups about 2/3 cup per muffin cup.

 Bake for 15-17 minutes until slightly golden and toothpick inserted in the middle comes out clean. Let cool completely. Dip top of cupcake into a bowl of the chocolate satin ganache, turn right side up and let it set, about 20 minutes. Store cupcakes in a tightly sealed container for up to two days.


Heather

1 Comment

Uncategorized

Quick Linguini with Turkey Sausage

I can still visualize my father, standing in front of the stove, singing over a pot of sugu (his word for sauce). The window is open and the breeze is blowing the aroma of sautéed onions and garlic throughout the house. To this day, the smell of onions and garlic sautéing in a pan with some olive oil can make me ravenous. I feel a bit like Pavlov’s dog! Am I drooling?

My dad would start his “sugu” early and let it simmer for hours. His sauce was amazing and, sometimes, when guests are coming, I will take the time to make his long-simmering, drool-inducing recipe. But, let’s face it: Most days you just don’t have that kind of time. So I’ve created a quick cooking recipe for those busy days. The slow cooked flavor is still there, but the time in front of the stove is cut down to 25- 30 minutes.

This recipe’s long cooking flavor comes from adding a little broth to the sauce. Because the broth has been cooked for several hours (usually by Swanson or Knorr) it gives the more intense taste you look for in sauce. Also, by switching the pork sausages in my father’s sauce to ground turkey sausage, the cooking time is cut to a fraction. And, by adding fennel, you get the flavors you enjoy when eating pork sausage.

Don’t get me wrong though; this recipe isn’t exclusive to just family. Your guests would love it as well. It’s saucy and scrumptious. You will slurp in every noodle with delight. Let’s face it, pasta is the food of the gods. Everyone loves it and it’s super easy to make. It’s perfect for those busy days when keeping your eyes open, your mind functioning, and your kids happy till bedtime feels like it will take the same effort as summiting Mt. Everest. Let me show you how easy this is.

Quick Linguini with Turkey Sausage

2 lb package ground turkey sausage, bulk
1 clove garlic, minced
1 small onion, diced small
1/4 tsp fennel seeds
1/4 tsp red pepper flakes (omit these if you don’t want any heat)
2 tsp olive oil
1 can whole tomatoes in puree, (I break these up into smaller pieces by hand)
1 cup chicken broth
1 Tbs. tomato paste
8 ounces linguini

Serves 4-6

Heat oil in a pot over medium heat. Add onions and garlic (YUM!). Sauté until they begin to soften. Add in fennel and red pepper flakes. Stir for one minute. Add ground turkey sausage and cook until turkey is browned.
Add tomatoes, broth, and tomato paste. Salt and pepper to taste. Simmer for 25-30 minutes.

Bring a large pot of water to boil. After it begins to boil, add in a tsp of salt and stir. (This adds flavor to the pasta.) Add linguini to the pot and cook according to package directions. Drain, but do not rinse the pasta. Add to turkey sauce and stir until well blended. Serve with Parmesan cheese and a lovely glass of wine and you will see the clouds disappear and the sun shining through! I think my dad would approve.

Heather

Leave a Comment

Uncategorized

Chocolate Satin Ganache

Need a chocolate fix?
I’ve got you covered!
This frosting is a chocolate lover’s dream. So silky, creamy and rich with a deep chocolate flavor. The best part? When drizzled over your cakes or cupcakes it leaves a shiny, satiny finish that really hikes you up a notch on the “I am a really good baker” list.
I made these pretty healthy cupcakes the other day (recipe coming soon) so I didn’t feel  a lot of guilt dunking the tops of these cupcakes into the frosting and giving them a satiny, beautiful finish. I did in fact, feel guilty taking spoonfuls of the frosting and enjoying every creamy bite, but that is a different story…
This is a thin frosting so think drizzling, glazing, dunking, dipping and swirling. Do not think about piping, spreading or doing any sort of design with it. It is just not that type of frosting. It is also a yummy dip for fruit, graham crackers or shortbread, but it won’t harden, so be aware of that. It stays soft and shiny and the flavor is sure to wow you.
I will follow up with the cupcake recipe…truly a delicious one as well! In the meantime, make a batch of this frosting and dip away. It makes a lot so you will have some left for the cupcakes too!

Chocolate Satin Ganache

3/4 cup of evaporated milk
1 cup sugar
8 ounces of bittersweet dark chocolate, chopped
8 tblsp butter, softened
1 tsp vanilla

In a small saucepan, gently heat evaporated milk and sugar until it comes to a gentle boil. Remove from heat and add chocolate. Stir until melted. Allow mixure to cool. Add butter and vanilla to cooled mixture and beat with an electric mixer until smooth and creamy.

Use immediately.


Store leftovers in a covered container in the refrigerator. Let ganache come back to room temperature before using again.

Heather

Leave a Comment

Vegetarian

Asparagus and Artichoke Mini Quiche

It’s snowing today. Again! I’m not one of those “I hate winter” people. I love the changing seasons and, when winter begins, I’m more than ready to start the soups, stews, and casseroles that seem out of place in the summer months. But when March rolls in like the proverbial lion, I am so ready to kick winter to the curb. Sweaters off, mittens packed, and hibernation over.

That applies to my kitchen bounty as well. It’s like a seasonal clock goes off inside of me and I’m ready for lighter fare and longer days. That’s what’s great about this dish. It fits into the emotional change that spring brings me as well as my appetites’ desires for something different. Less dense. More aligned with the bounty of spring things.

This is a dish that, unlike most winter food, is adaptable to any mealtime too. It can be a breakfast, lunch, dinner, and it’s perfect for Easter brunch. Furthermore, real men not only eat quiche, they love it. (But, feel free to add bacon if you want more assurance they’ll relish it!)

So, in honor of more sun, budding plants, windows open, and breezes cleaning out the cobwebs in our homes and heads…let’s dig into some quiche.

Asparagus and Artichoke Quiche

1 Pkg ready pie crust
6-8 pieces asparagus, cut into bite size pieces
1/2 can artichoke hearts, cut into bite size pieces
3 eggs
1/2 cup heavy cream
1/2 cup Gruyere cheese, shredded
1/2 tsp dried parsley
1/2 tsp dried tarragon
1/2 tsp dried chives
1/4 tsp dried chervil

* Use fresh herbs if you like.
* If you want to add bacon to this recipe I would recommend 3 slices, diced and cooked to crisp
* I used mini tart pans for my quiche, but a cupcake pan will work. It makes six tart size quiche or 8-10 cupcake-size quiche.

Preheat oven to 375 degrees. Prepare you pans with butter and a dusting of flour.

Roll out the pie crust slightly. Cut pieces to fit your tins. Fill the tins with the pie dough. Prick the bottoms of the crust with a fork to ensure the crust doesn’t bubble up too much. Place them in the oven and bake for 10 minutes.

Blanch aspargus in boiling water for 2 minutes, until it turns a bright green then immediately drain and plunge into ice water.

Beat together eggs, cream, and salt and pepper. Add in the cheese.

Divde asparagus and artichokes between tins. Pour egg mixture over the top. Bake for 25 minutes, until filling is set.

Serve with a salad for more of a meal. A nice fruit salad for a breakfast or brunch, or a fresh green salad for lunch or dinner. These quiche tarts are so good that I walked by the stove at about three in the afternoon and grabbed one to eat–cold, as a snack–leaving a delicious trail of buttery crumbs for my cats to follow. And, they did!

Heather

Leave a Comment

Sandwiches

Italian Sloppy Joes

Sooooo…I have a disturbing memory.

Remember back in the day…(again, aging myself-why do I keep doing that?) when that show Roseanne was on? Okay, so it was a funny show, and then it became sort of a weird show. My first reason for thinking that happened when they replaced the real Becky with a new girl and we were just supposed to go on thinking it was Becky. Didn’t they bring the old Becky back then too? Then the middle daughter got married right? That just didn’t seem very funny for a comedy. Then all that drama happened with a certain actress and a certain baseball game and a certain patriotic song, blah, blah, blah, you are with me right? Do I have this all right or am I wrong?
The strangest part of that show to me, (minus the completely weird finale where everything was a dream right?) was when Roseanne and her sister opened up a restaurant. It wasn’t the fact that they opened up a restaurant, it was the fact that it was called a loose meat restaurant.
Why oh why does that still completely GROSS me out?? Why would they call it that? Did that really bring in customers? They had to know that the name would completely turn people off.
Oops.
Probably not a good lead in for my sloppy joes post huh?
Well, my point is, I always used to think of that when I had sloppy joes and it kind of turned me off of them. Even though, the ones my mom made were really good, I just wasn’t in to it. It didn’t help when I went to a potluck party once and someone served sloppy joes, but there were…beans in them? Has anyone ever heard of this? Is it a bean dish? Is it a sloppy joe? Do you put it on a bun? Do you eat it plain?
Very confusing.
Anyways, back to my point. (Is there one? Is there one..really?)
I really haven’t been into the whole sloppy joes thing for a looooong time! Until….
THIS RECIPE!
It brought me back to the world of sloppy joes! It is so good, I could have had two sandwiches, but who does that, right? Except for skinny husbands who can eat whatever they want and never gain a pound even if they workout every day religiously have dessert every night.

Oh! Sorry, off topic again!

Try these! And don’t read anything above this line. It might turn you off of this recipe and you totally have to try it! SO good!

Italian Sloppy Joes

 Makes about  3 1/2 cups or 6 sandwiches

1 lb Italian turkey sausage or Italian pork sausage, removed from casing
1/2 cup chopped onions
3 cloves garlic, minced
1 red bell pepper, diced
1 green bell pepper, diced
1 1/3 cups crushed tomatoes from a can
1/2 tsp dried rosemary
salt and pepper, to taste
6 Italian sandwich rolls (or your favorite. I used 100 calorie wheat rolls)
6 slices part skim mozzarella
1 cup baby spinach

In a medium non-stick skillet, cook the sausage over medium-high heat, breaking up as it cooks into small bits until cooked through, about 5-6 minutes. Add the onions, garlic and peppers, and  cook for another 2-3 minutes. Add the crushed tomatoes, rosemary and salt and pepper. Cover and cook for 10 minutes on low while all the flavors come together.

To serve, place about 1/2 cup of meat on a roll and top with cheese and baby spinach.

*Using turkey sausage, low calorie, whole wheat rolls, and part skim or reduced fat cheese makes this a low fat, healthy meal.*

Heather

Leave a Comment

Uncategorized

Vanilla Bean Espresso Panna Cotta

My Father was a full-blooded Italian. His parents came straight from Sicily to America. So, we naturally grew up eating a lot of really yummy Italian food in our house. Pasta, Braciole, Lasagna…you name it, we had it. And I was a huge fan of it all (except for desserts).

To me, Italian desserts left a lot to be desired. As a child, the flavors of anise, Amaretto, and almond just didn’t cut it. Nothing was worse than finding a cookie that looked like it was chocolate-filled and finding raisins, or worse, FIGS! What a horror. My dad loved them, but probably to his delight, the kids hated them.

In my own true-to-my-beliefs fashion, I want my first blog post to be a dessert. That’s because it has always been my rule of thumb: If you fear you won’t have room for dessert after dinner, eat dessert first! And this dessert is a perfect choice. Panna Cotta is a silky, flan-custard-like dessert that can take on almost any flavor you put in it. For me, the perfect flavor combination is vanilla and espresso.

The first time I made this dessert, my sister swore it had chocolate in it. The Truth is it just has that luscious mouth feel and taste that you usually associate with chocolate. And what’s bad about that?

Vanilla Bean Espresso Panna Cotta

1 vanilla bean, sliced in half and scraped
1/2 cup skim milk
1 packet unflavored gelatin
1 1/2 cup heavy cream
3 tsp instant espresso powder
1/3 cup sugar

Let’s start with the vanilla bean. If you’ve never used one before, it’s very simple. Take the long vanilla bean and slice it lengthwise down the middle. Take a half and scrape right down the middle with the sharp side of your knife. You will see a small gathering of vanilla seeds forming on the end of your knife. The bean scrapings are what go into the Panna Cotta. Repeat with the other half of the bean.

Next, place the milk in a heavy saucepan. Sprinkle it with the gelatin. Let stand 3-5 minutes to let the gelatin begin to soften. Turn stove on to a medium heat and stir milk and gelatin until the gelatin dissolves, but don’t let the milk come to a boil.

Add the vanilla seeds, heavy cream, sugar, pinch of salt and espresso to the pan, stir until the sugar dissolves. Remove from heat and pour into espresso cups or whatever small container you choose. Chill in the fridge for at least 4 hours. Stir twice in the first half hour just to redistribute the vanilla seeds. Garnish with shaved chocolate, whip cream, espresso powder or fruit; what ever you like. Me, I couldn’t decide, so I plated some of each! This recipe makes 6 espresso cup servings.

Heather

Leave a Comment

  • « Previous Page
  • 1
  • …
  • 23
  • 24
  • 25
  • 26
  • 27
  • …
  • 38
  • Next Page »

Heather

I am a midwestern girl who grew up in the big city, but now enjoys her days as a stay at home mom in the suburbs. Who says spending time in the kitchen has to be boring? I hope to inspire your family kitchen with some new ideas, fun recipes and great tips.

Stay Up to Date

Get all the latest tasty goodness straight to your inbox!

Girl and her Kitchen

Join us!

Hey! I am the GIRL in the kitchen and I am so glad you decided to visit. Love to cook and eat? You will find some great recipes on this site, whether you are looking to eat healthy, splurge on a dessert, make dinner or host a party-I have it all! Sometimes I’ll give you a story along with my recipe, other times, I want to take you straight to the food!  Whatever the reason that you decided to visit, I am so glad you joined me in the kitchen! Feel free to take a look around the site, and please…stay awhile!

Archives

Popular Categories

  • Appetizers
  • Breakfast
  • Crafts
  • Salads and Dressings
  • Side Dishes
  • Vegetables and Fruit

Most Popular Posts

Corner Bakery Cafe Giveaway!

Corner Bakery Cafe Giveaway!

Filed Under: Reviews

Bacon Cheddar Skillet Cornbread

Bacon Cheddar Skillet Cornbread

Filed Under: Breads, Quick Breads and Rolls, Side Dishes

Puffy Pancakes {Perfect for Valentine’s Day!}

Puffy Pancakes {Perfect for Valentine’s Day!}

Filed Under: Breakfast, Valentine's Day

100 Days of Real Food Cookbook Review {and Giveaway!}

100 Days of Real Food Cookbook Review {and Giveaway!}

Filed Under: Vegetarian

Copyright © 2026 · Divine theme by Restored 316